User and guest IDs
If you are have a user ID in a customer tenant then follow this page to configure Partner Admin Link. This is the primary use case covered in the Microsoft Learn docs but included here for completeness.
In brief
-
Authenticate in the customer context:
- sign on as the user the customer created for you in their tenant, or
- if invited as a guest into their tenant then a) sign on and b) switch directory to the customer tenant
-
Link your ID to the PartnerID using the CLI, PowerShell or the Azure Portal screen.
The information here is lifted straight from the main documentation which is found at https://aka.ms/partneradminlink.
Creating the Partner Admin Link
When you have access to the customer’s resources, use the Azure portal, PowerShell, or the Azure CLI to link your Partner ID to your user ID. Link the Partner ID in each customer tenant.
-
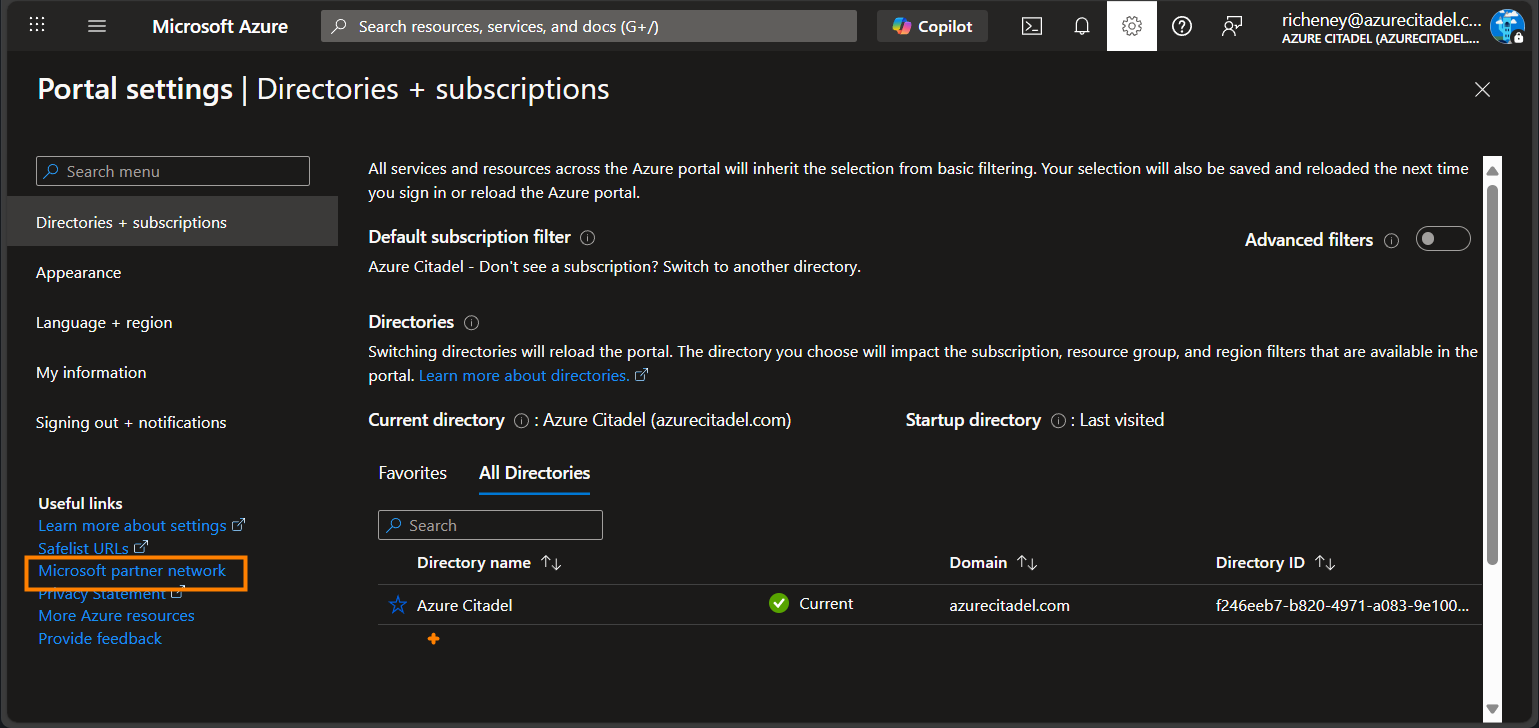
Open the Azure Portal.
-
Click on the Settings icon at the top.
-
Select the Microsoft partner network link in Useful Links at the bottom left.
-
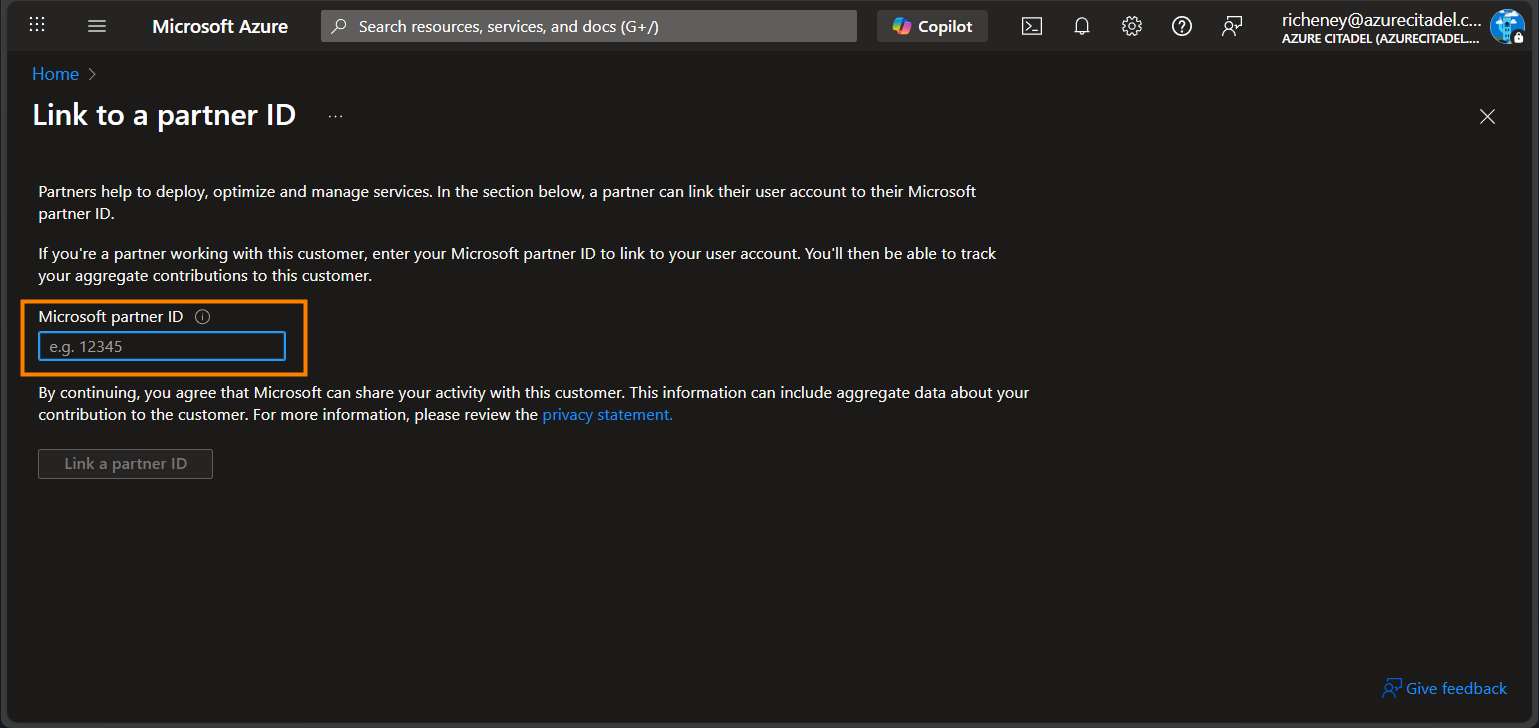
Enter your Partner ID.
-
Click on the Link a partner ID button to save.
Use PowerShell to create the link
-
Install the Az.ManagementPartner PowerShell module.
Install-Module -Name Az.ManagementPartner -Repository PSGallery -Force -
Sign in to the customer’s tenant.
Connect-AzAccount -TenantId <tenantId> -
Create the Partner Admin Link.
New-AzManagementPartner -PartnerId <partnerId> -
Additional commands
Display the partner ID.
Get-AzManagementPartnerUpdate the partner ID.
Update-AzManagementPartner -PartnerId <partnerId>Delete the Partner Admin Link.
Remove-AzManagementPartner -PartnerId <partnerId>
Use the Azure CLI to create the link
-
Install the Azure CLI’s managementpartner extension.
az extension add --name "managementpartner" -
Sign in to the customer’s tenant.
az login --tenant "<tenantId>" -
Create the Partner Admin Link.
az managementpartner create --partner-id "<partnerId>"
{
  "createdTime": "2026-02-16T14:44:35.818407Z",
  "etag": 9,
  "id": "/providers/microsoft.managementpartner/partners/314159",
  "name": "314159",
  "objectId": "84964f8f-22ce-4a1e-ba9d-1e45a53ca1c4",
  "partnerId": "314159",
  "partnerName": "Azure Citadel",
  "state": "Active",
  "tenantId": "ac40fc60-2717-4051-a567-c0cd948f0ac9",
  "type": "Microsoft.ManagementPartner/partners",
  "updatedTime": "2026-02-17T13:48:41.4676825Z",
  "version": 9
}
Additional commands
-
Display the partner ID.
az managementpartner show -
Update the partner ID.
az managementpartner update --partner-id "<partnerId>" -
Delete the Partner Admin Link.
az managementpartner delete --partner-id "<partnerId>"
Why do you have to switch into each customer tenant for guest IDs?
Your user ID in your home tenant may have been invited as a guest to multiple customer environments. You are signing in with the same MFA each time, so why do you need to switch into each customer tenant and recreate the Partner Admin Link in each one?
When you accept an invitation, Entra creates a new objectId in the customer’s tenant. (The User Principal Name for a guest ID includes #EXT#, e.g. first.last_partner.com#EXT#@customer.com.)
The Partner Admin Link is between the tenantId.objectId and the partnerId as you can see in the JSON output above for the Azure CLI commands.
Attestation
This command can be used to display information about the tenant, the security principal, and the Partner Admin Link. You first need to authenticate and ensure that you are in the correct customer context. This Bash command will work in the Cloud Shell, even in the PowerShell experience.
curl -sSL https://aka.ms/pal/attestation | bash
{
  "tenantId": "ac40fc60-2717-4051-a567-c0cd948f0ac9",
  "tenantDisplayName": "Contoso",
  "tenantDefaultDomain": "contoso.com",
  "type": "user",
  "displayName": "Richard Cheney",
  "userPrincipalName": "richard.cheney@azurecitadel.com",
  "appId": null,
  "objectId": "74afa9e2-d243-414b-bab2-db8dd242827f",
  "partnerAdminLink": "/providers/microsoft.managementpartner/partners/314159",
  "partnerName": "Azure Citadel",
  "partnerId": "314159"
}
{
  "tenantId": "ac40fc60-2717-4051-a567-c0cd948f0ac9",
  "tenantDisplayName": null,
  "tenantDefaultDomain": null,
  "type": "servicePrincipal",
  "displayName": "PAL (Partner Admin Link) for Azure Citadel",
  "userPrincipalName": null,
  "appId": "7b7fe81e-da85-4271-a065-b0a00634ae75",
  "objectId": "a52475b0-d310-41ac-a4b1-d1e3161e0127",
  "partnerAdminLink": "/providers/microsoft.managementpartner/partners/314159",
  "partnerName": "Azure Citadel",
  "partnerId": "314159"
}