Test VM Image
Test the VM image before publishing.
Introduction
It is important that we test the image we’ve created before publishing. Otherwise the image may fail certification checks or simply not function as desired.
Test we can create a VM from the virtual machine image
The first and simplest test is to confirm that we can create a new VM instance based on the work we did in the last lab.
The steps are different depending on which approach you have chosen to follow. Follow the relevant steps and then continue from Finalise the test
Steps for Shared Image Gallery approach
-
Do not follow these steps if you are using the SAS URI approach
-
Make sure the VM is deallocated
az vm deallocate \ --resource-group 'marketplace-vm-offer' \ --name 'marketplacevm' -
Set the status of the VM to “Generalized”
az vm generalize \ --resource-group 'marketplace-vm-offer' \ --name 'marketplacevm' -
Create an image of the VM
az image create \
   --resource-group 'marketplace-vm-offer' \
   --source 'marketplacevm' \
   --name 'marketplacevm-image'
Example output
{ "extendedLocation": null, "hyperVGeneration": "V1", "id": "/subscriptions/xxxxxxxx-xxxx-xxxx-xxxx-xxxxxxxxxxxx/resourceGroups/marketplace-vm-offer/providers/Microsoft.Compute/images/marketplacevm-image", "location": "westeurope", "name": "marketplacevm-image1", "provisioningState": "Succeeded", "resourceGroup": "marketplace-vm-offer", "sourceVirtualMachine": { "id": "/subscriptions/xxxxxxxx-xxxx-xxxx-xxxx-xxxxxxxxxxxx/resourceGroups/marketplace-vm-offer/providers/Microsoft.Compute/virtualMachines/marketplacevm", "resourceGroup": "marketplace-vm-offer" }, "storageProfile": { "dataDisks": [], "osDisk": { ... ... ... } -
Take a note of the “id” from the output. You will use it in the next step.
-
Now create a new resource group and create a new VM from the image we just created
az group create --name 'marketplace-vm-offer-test' --location 'westeurope'Use the “id” as the
--imageparameteraz vm create \ --resource-group 'marketplace-vm-offer-test' \ --name 'marketplacevm-test-vm' \ --image '/subscriptions/xxxxxxxx-xxxx-xxxx-xxxx-xxxxxxxxxxxx/resourceGroups/marketplace-vm-offer/providers/Microsoft.Compute/images/marketplacevm-image' \ --admin-username azureuser \ --ssh-key-value ~/.ssh/id_rsa.pub
Steps for SAS URI approach
- Do not follow these steps if you’re using the Shared Image Gallery approach
The following is based on the instructions Test a virtual machine image but with some modifications as I have found the provided script not to work for Linux images.
-
Sign in to the Azure portal.
-
On the home page, select Create a resource, search for “Template Deployment”, and select Create.
-
Choose “Build your own template in the editor”.
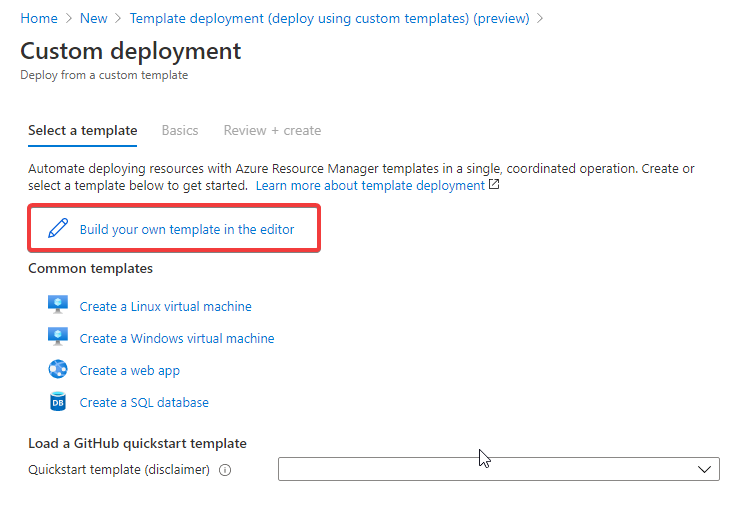
-
Replace the contents of the editor with the JSON from this file and hit Save
-
You will need to provide parameter values for the following
Parameter Comment User Storage Account Name Name of the storage account where the VHD image is stored User Storage Container Name Most likely the default vhdsDns Name For Public IP Provide a DNS name for the public IP; must be lowercase Admin User Name Set a username the administrator account for the new VM Admin Password Set an administrator password for the new VM OS Type Leave as LinuxVM Size Size of the virtual machine instance (defaults to Standard_B1s)VM Name Provide a name for the VM resource VHD URL URL of the VHD Image we created above. This can be found on the blob details page. Navigate to: storage account -> containers -> vhds -> VHD image blob nameIt is a good idea to create a new resource group for the test VM. However the deployment will fail if the target storage account for the new VHD is not the same account hosting the source VHD image. Either:
- use the storage account that was created in the previous steps of the lab (resulting in the new VM and its VHD being in different resource groups) or
- create a resource group and storage account and copy the VHD image to the new storage account before creating the VM in the same resource group
The first approach is simpler and adequate for the purposes of a test. Once finished testing you can delete the resource group and the new (specialised) VHD from the original storage account. Be careful not to delete the generalised VHD image.
Finalise the test
- Confirm that browsing to the IP address of the new VM displays the NGINX welcome page - NOTE you may need to add a rule on the NSG to allow incoming traffic on Port 80.
- SSH into the new VM and confirm the presence of a
/tmp/users.txtfile with a creation time matching the last reboot
Run validations on the virtual machine
-
Prior to submitting a VM Offer for certification (publishing), you should run a set of validation tests against a specialised VM created from the generalised VM image. This can identity early issues that would otherwise result in a certification failure.
We can use the VM we created in the previous step.
-
There are two ways to do this:
-
Use the Certification Test Tool for Azure Certified
This is a Windows application that walks through the process of connecting to the VM, running a series of tests and producing a report. You can create a small Windows VM in Azure and install it on that to test. We will use this approach for the lab.
-
Use the Self-Test API
This is an API hosted in Azure. You send a POST request to the API with details of the machine to test and it returns a test report. You need to create an AAD app registration to authenticate with the API. You can find more details here. There is an excellent walkthrough video here which also bridges some of the gaps in the documentation.
-
-
Install the Certification Test Tool for Azure Certified on a Windows Machine. Download Link
-
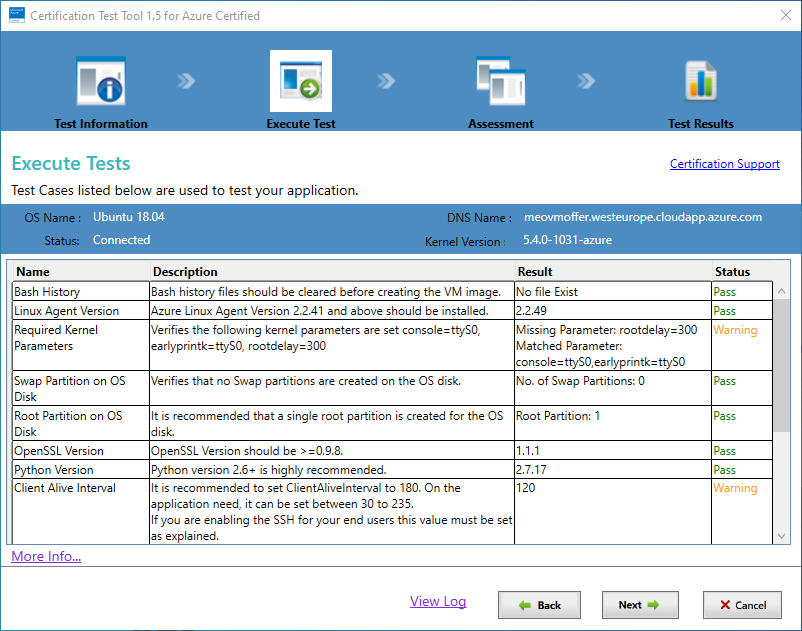
Run the Certification Test Tool and enter the required information (test name, platform, auth type, DNS name for the VM to be tested etc)
-
On completion you will be presented with a set of test results. Review the results and ensure you take any necessary action before submitting a final image for certification.
-
In these labs we will be submitting a VM offer to the marketplace but only to the preview stage for testing purposes. We will not submit for final certification.
While attention should be paid to the results of the report, it is not necessarily required to fix every issue for the purposes of completing the lab.