Azure Bastion with native tools & AAD
Follow this lab to configure a small Azure Bastion environment with a couple of example VMs for config management purposes. Authenticate with your Azure AD credentials and access using native SSH and RDP.
Introduction
The Azure Bastion service has been very successful since its introduction. The standard SKU enables the use of native tooling. There are also updated AAD extensions.
Combining these gives a very functional way of accessing virtual machines in Azure whilst enabling MFA and drastically limiting the attack surface. Remember that Azure Bastion can also access virtual machines across virtual network peers.
In this lab you will:
- use Terraform to spin up the lab environment
- connect to the Windows Server 2022 Azure Edition virtual machine via Azure Bastion
- authenticate using Azure Active Directory
- using the native Windows remote desktop tool
- connect to the Ubuntu 20.04 virtual machine via Azure Bastion
- authenticate using Azure Active Directory
- using openssh from either Windows or WSL2
- explore basic automation integration
- set variables using the instance metadata service
- access an example secret from the key vault using the virtual machine’s managed identity
- access a “management” application using a tunnel via Azure Bastion
- clean up
AAD authentication
Before we build the environment, spend a few mintes to understand the requirements for AAD auth on Azure VMs, as specified on these pages:
- Log in to a Windows virtual machine in Azure by using Azure AD
- Log in to a Linux virtual machine in Azure by using Azure AD and OpenSSH
Windows checklist
-
Supported OS level - Windows Server 2019 or Windows 10 1809 and later VM, e.g.
publisher = "MicrosoftWindowsServer" offer = "WindowsServer" sku = "2022-datacenter-azure-edition" version = "latest" -
System assigned managed identity enabled on the VM
-
AADLoginForWindows extension added to the VM
publisher = "Microsoft.Azure.ActiveDirectory" type = "AADLoginForWindows" -
RBAC role assignment on the VM (or higher scope), either
- Virtual Machine Administrator Login
- Virtual Machine User Login
-
Member user (guest IDs not supported)
-
Outgoing 443 permitted to specific URIs
Example call (Windows OS level)
az login
az extension add --name bastion
az network bastion rdp --name myBastion --resource-group myBastionRG --target-resource-id <myVMID> --enable-mfa true
Login using RDP, specifying the userid in user@domain.com format.
Linux checklist
-
Supported Linux distribution, e.g.
publisher = "canonical" offer = "0001-com-ubuntu-server-focal" sku = "20_04-lts-gen2" version = "latest" -
System assigned managed identity enabled on the VM
-
AADSSHLoginForLinux extension added to the VM
publisher = "Microsoft.Azure.ActiveDirectory"
type      = "AADSSHLoginForLinux"
(Installs the aadsshlogin or aadsshlogin-selinx package.)
-
RBAC role assignment on the VM (or higher scope), either
- Virtual Machine Administrator Login
- Virtual Machine User Login
-
Member user (guest IDs not supported)
-
Outgoing 443 permitted to specific URIs
Example connection:
az login
az extension add --name ssh
az ssh vm --name myVM --resource-group myResourceGroup
Pre-requirements for Terraform example
You will need
-
to be Owner on an Azure subscription
-
an SSH key pair (defaults to
~/.ssh/id_rsa.pub)
If you want to use a completely separate SSH key pair for this lab then you can create one using the following command:
ssh-keygen -m PEM -t rsa -b 4096 -f ~/.ssh/bastion -N ''
Then specify admin_ssh_public_key_file = "~/.ssh/bastion.pub" in terraform.tfvars.
Create resources
Note that this section may be run from the Cloud Shell, but we recommend that you setup and use your own bash environment.
-
Clone the repo
git clone https://github.com/terraform-azurerm-examples/bastion -
Change directory
cd bastion -
Initialise
terraform init -
Create a terraform.tfvars
Optional. You may override the default variable values in variables.tf or add in additional AAD object IDs for the Virtual Machine Administrator/User Login roles on the resource group.
Example terraform.tfvars:
location = "eastus2"
admin_ssh_public_key_file = "~/.ssh/bastion.pub"
address_space = "10.3.240.0/25"
If a windows password is not specified for the admin account then one will be generated and stored in the key vault along with the private key for the SSH key pair. All access should be via AAD authentication, so these credentials are intended for break glass scenarios.
For reference, here are all of the defaults found in variables.tf, expressed in terraform.tfvars format.
resource_group_name = "bastion" location = "West Europe" bastion_name = "bastion" admin_username = "azureadmin" admin_ssh_public_key_file = "~/.ssh/id_rsa.pub" windows_server_name = "windows" windows_server_admin_password = null virtual_network_name = "bastion" address_space = "172.19.76.0/25" subnet_name = "vms" scale_units = 2 virtual_machine_admins = [] virtual_machine_users = [] -
Plan
terraform plan -
Apply
terraform applyTerraform will start to create the resources and will then display the outputs. The resources take about 20 minutes to deploy.
-
Redisplay output
Optional. If you ever need to redisplay the output values, then type:
terraform output
Resources created
All of the resources are created in a single resource group.
| Resource Type | Default Name | Notes |
|---|---|---|
| Resource group | bastion | |
| Virtual Network | bastion | 172.19.76.0/25, split into two /26 subnets for VMs and Azure Bastion |
| Bastion | bastion | Standard SKU |
| SSH Key | ubuntu-ssh-public-key | ~/.ssh/id_rsa.pub |
| VM | ubuntu | Ubuntu 20.04 with AAD and Azure tools |
| VM | windows | Windows 2022 Server Azure Edition with AAD and Azure tools |
| Key Vault | bastion-<uniq>-kv | Secrets: windows password, private SSH key, sql connection string |
Plus associated NSGs, NICs, OS disks etc.
RDP
Use the native Windows RDP client via Azure Bastion to access the Windows server. Authenticate with your AAD credentials.
The command to initiate an RDP session can only be used from a Windows client, e.g. Windows 10 / Windows 11.
PowerShell cmdlets for Azure Bastion are available but are not covered in this lab.
-
Copy the command
Run a
terraform outputcommand to display the command, and then copy the result. Run this from the directory that you originally cloned and ranterraform applyfrom.terraform output rdp_to_windows_serverExample output:
az network bastion rdp --name bastion --resource-group bastion --target-resource-id <vmid>Copy the command between the double quotes, but not the quotes themselves..
-
Authenticate
You’ll need the Azure CLI installed at the OS level.
Open a PowerShell terminal on your machine and login to Azure.
az loginCheck you are in the right subscription. (This is your “current context”.)
az account showIf not then change subscription.
-
RDP
Run the
az network bastion rdpcommand you copied earlier. You’ll be prompted to re-authenticate using your AAD credentials before you can access the desktop.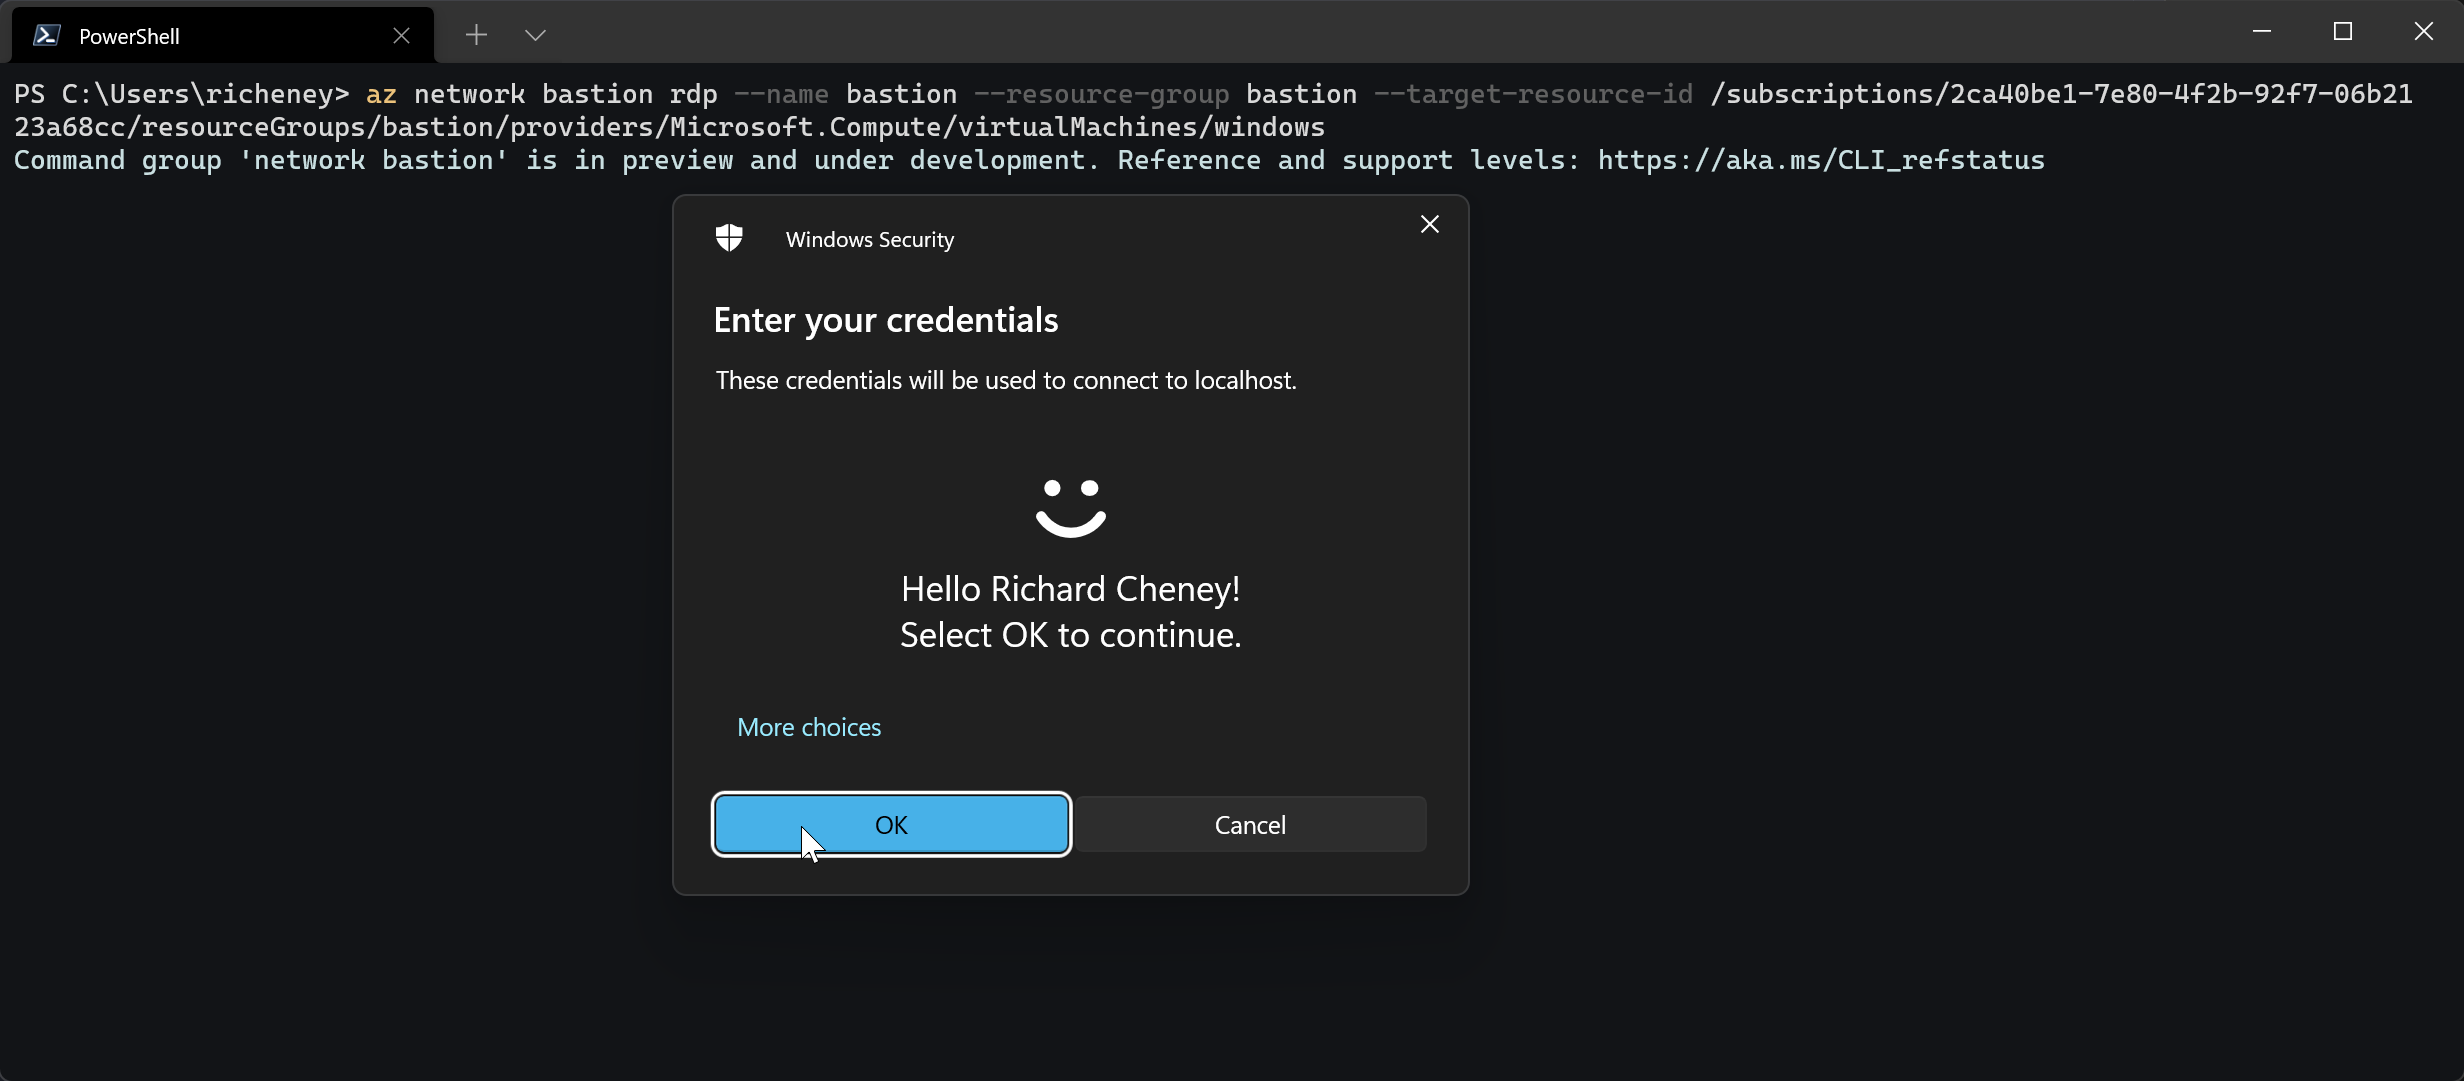
The RDP session will open if you have Virtual Machine Administrator Login or Virtual Machine User Login on the target VM.
-
Check identity access to the secret
Optional.
The Windows VM’s custom data has installed the Azure CLI and PowerShell 7 plus the Az PowerShell module. The VM has a system assigned managed identity that has been given an access policy on the key vault enabling it to get secrets.
Use the identity to read the example sql secret from the key vault.
-
Copy the command
terraform output example_secret_powershellExample command:
Connect-AzAccount -Identity | Out-Null; Get-AzKeyVaultSecret -Name sql -VaultName bastion-<uniq>-kv -AsPlainText -
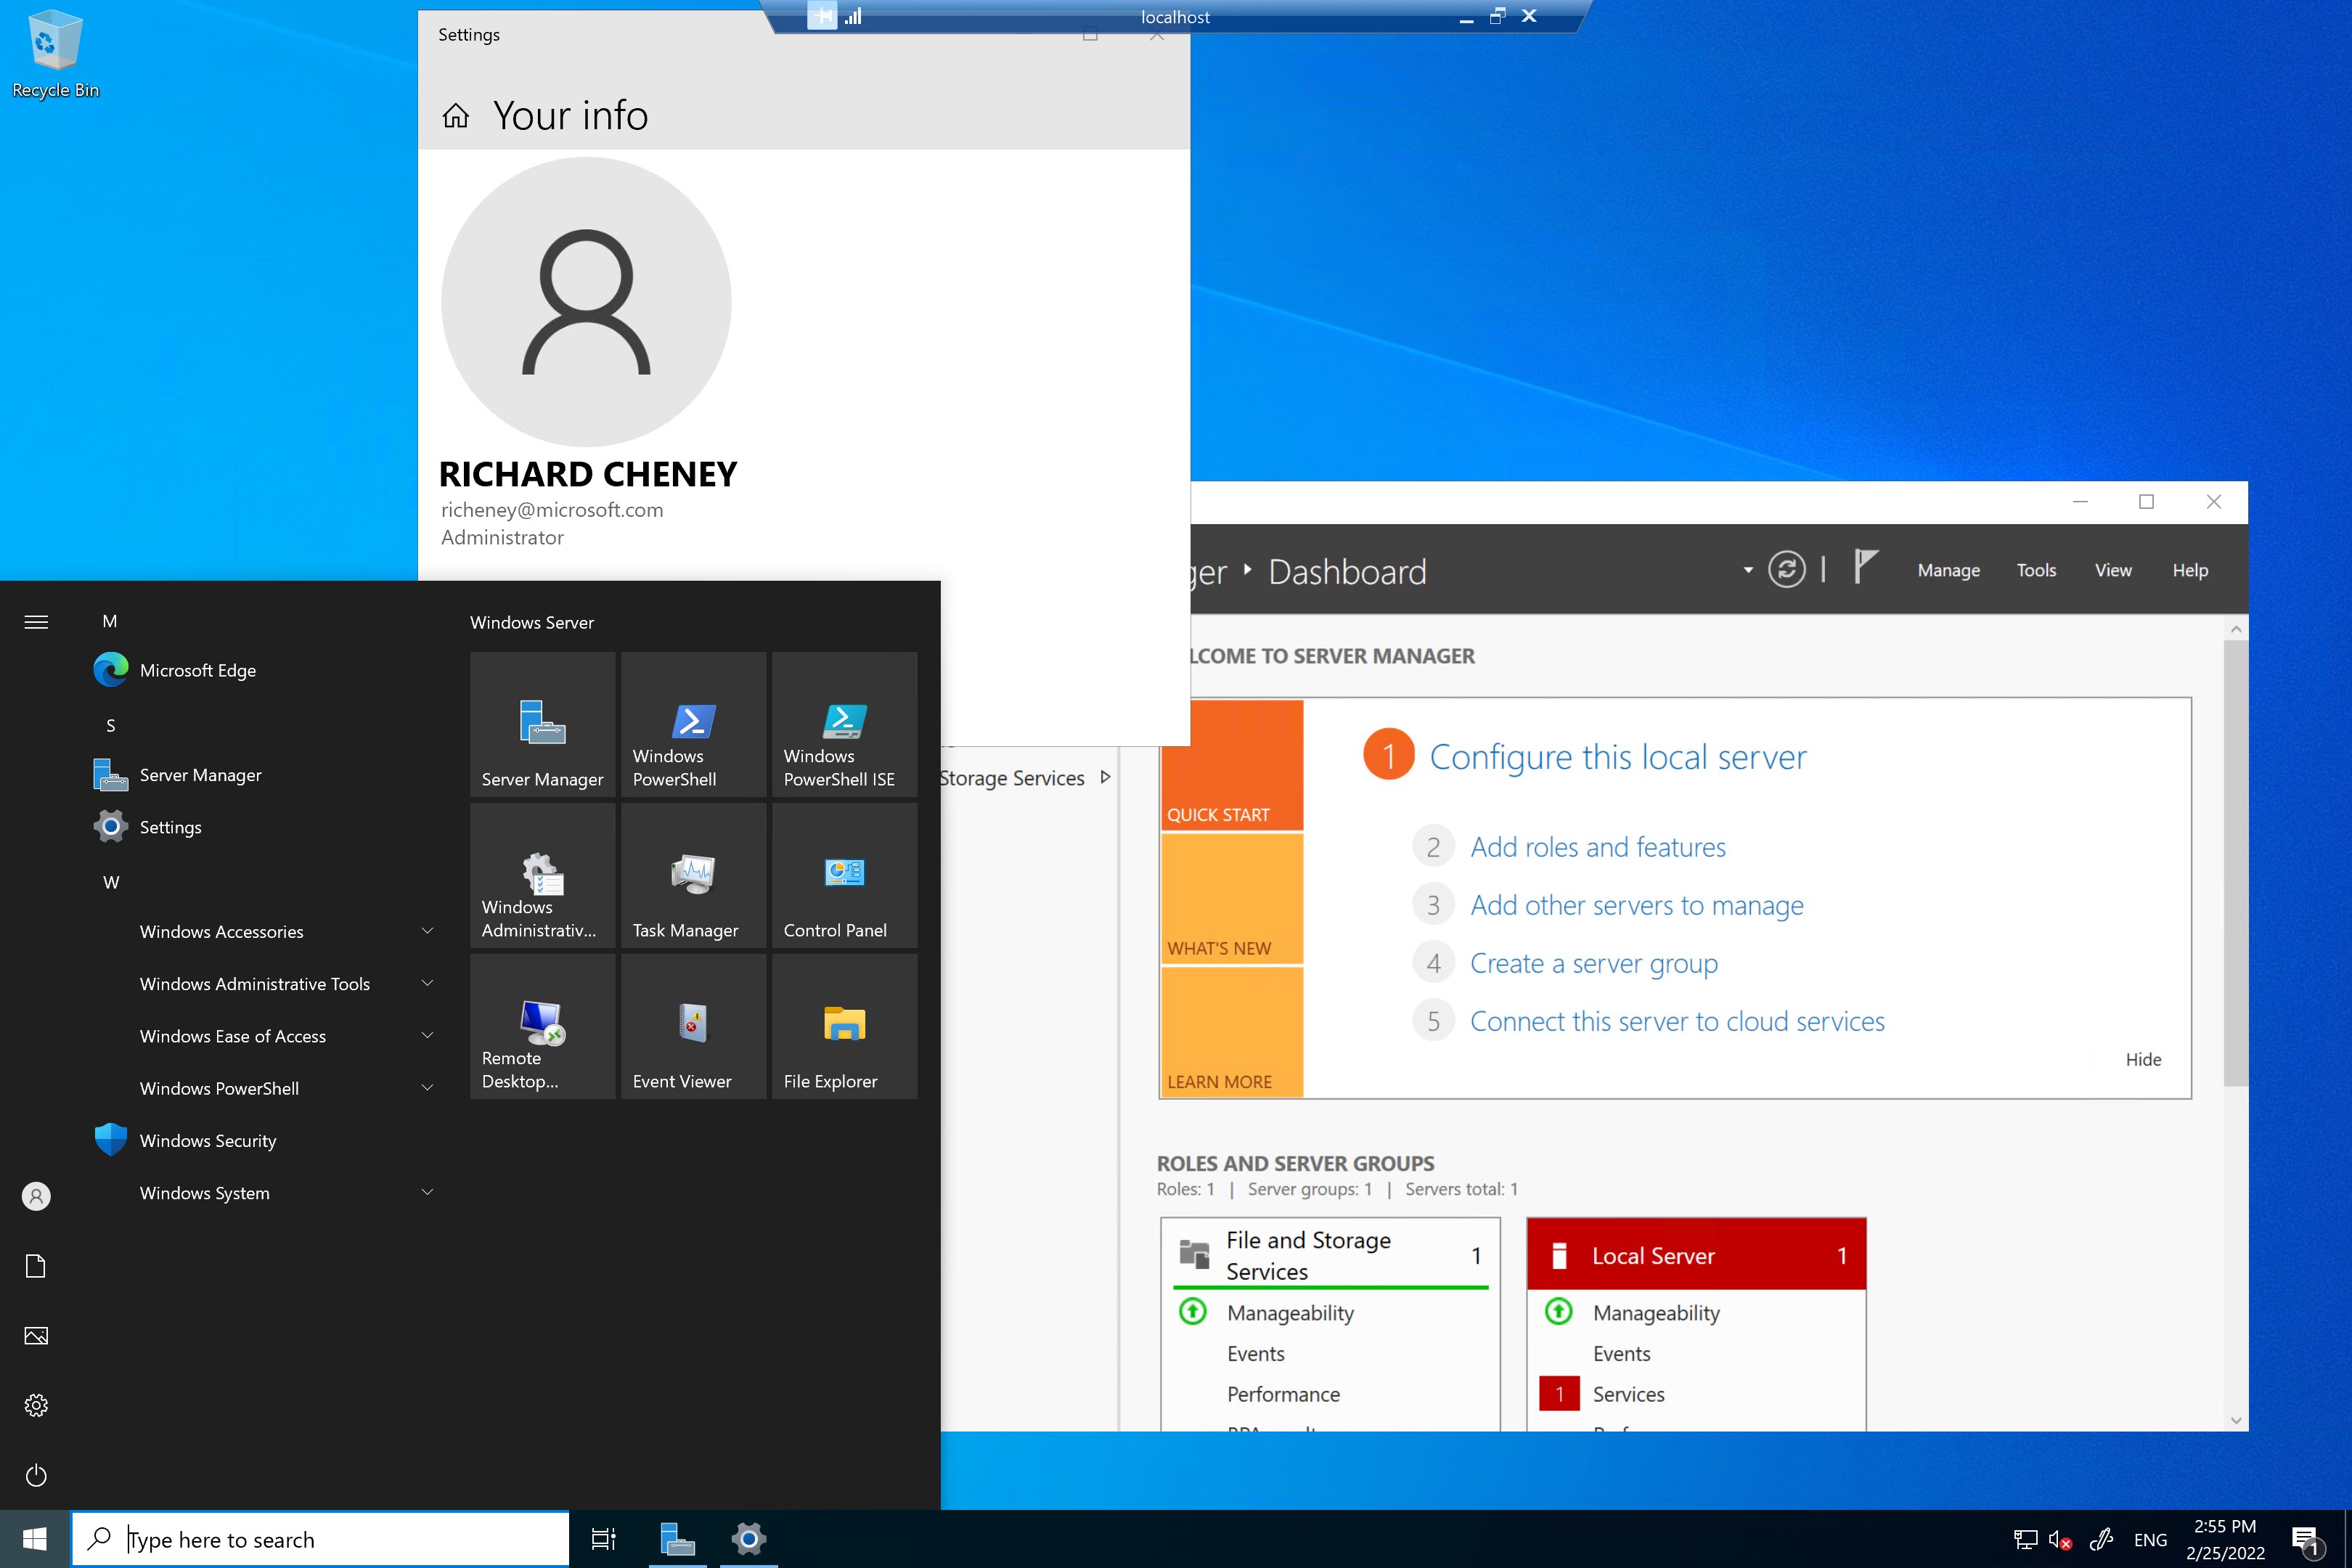
Open a PowerShell 7 (x64) terminal from the remote desktop session’s Start menu
-
Paste the PowerShell command
You will authenticate as the managed identity and retrieve the secret from the key vault.
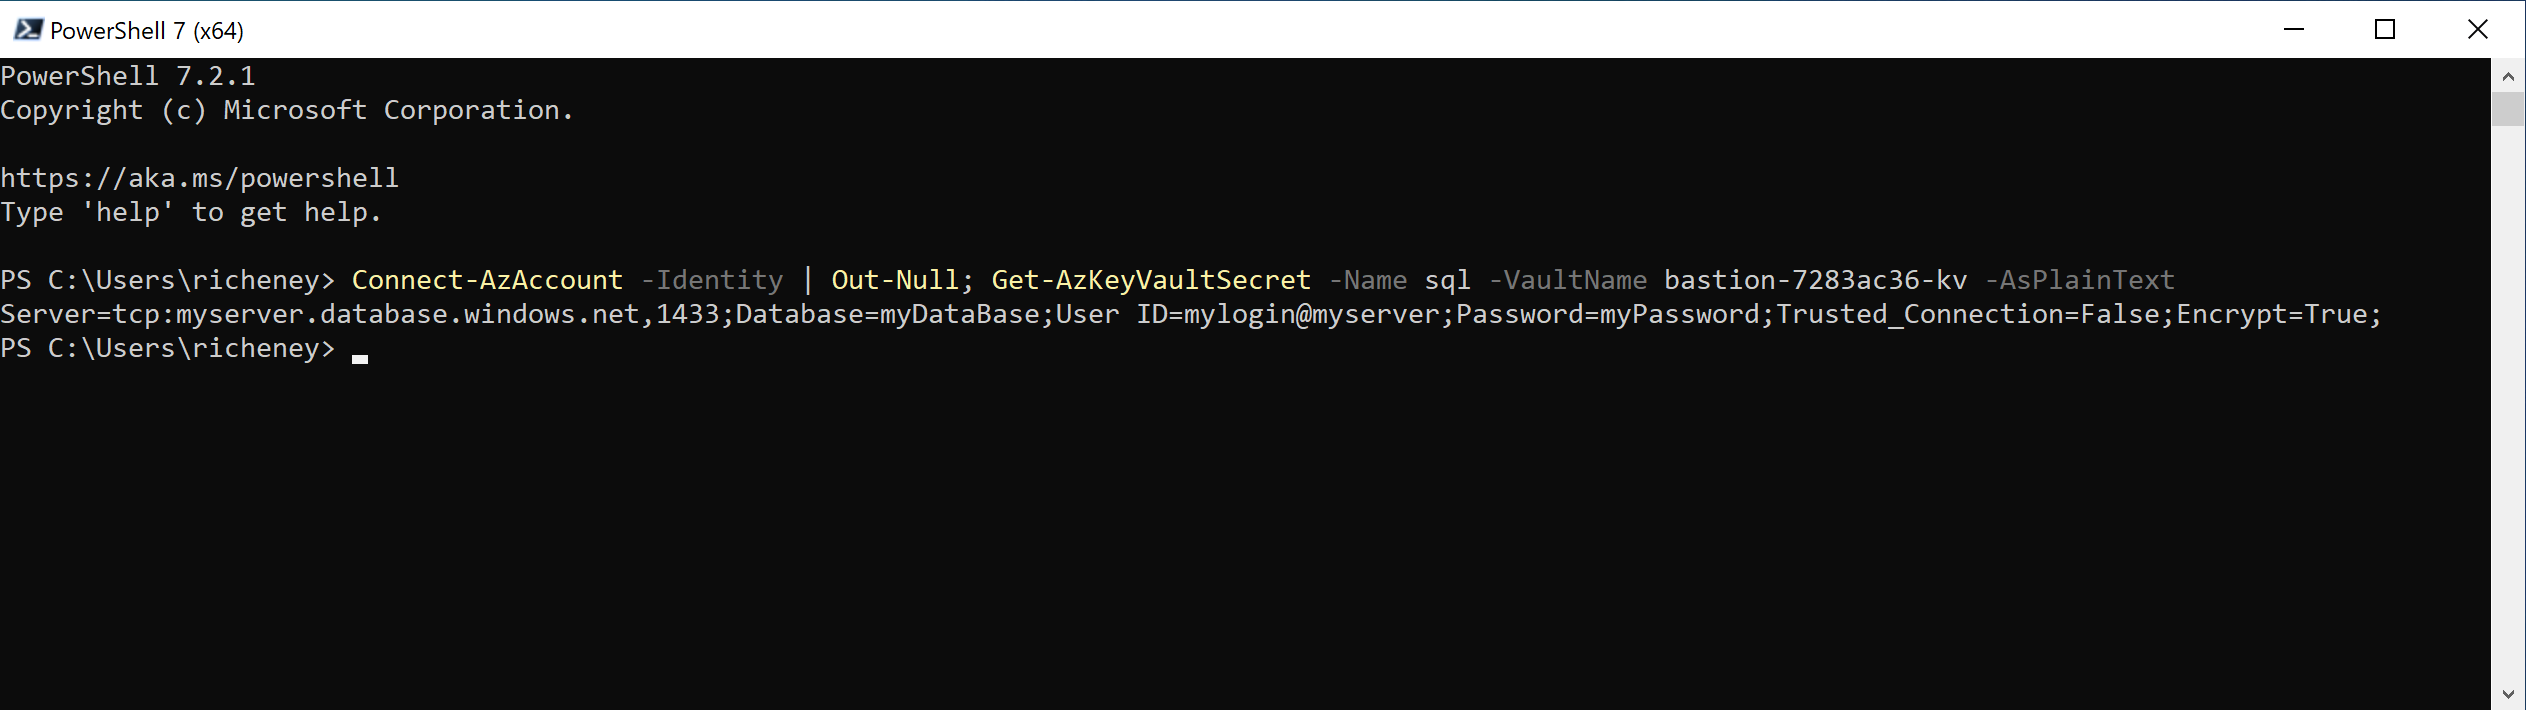
Expected output:
Server=tcp:myserver.database.windows.net,1433;Database=myDataBase;User ID=mylogin@myserver;Password=myPassword;Trusted_Connection=False;Encrypt=True;
The managed identity successfully retrieved the secret. This is a very useful pattern when using a config management server and you need to be able to add keys, secrets and certs into your automation without compromising security.
-
-
Disconnect from the remote desktop session
SSH
Now you will SSH via Azure Bastion to the linux VM and authenticate using AAD.
This command works from both Windows (which now has the native openssh client) and from linux systems such as WSL2.
-
Copy the command
terraform output user_ssh_to_linux_serverExample output:
az network bastion ssh --name bastion --resource-group bastion --target-resource-id <vmid> --auth-type AAD -
Open a PowerShell terminal on your machine
-
Paste the
az network bastion sshcommandYou may be prompted to re-authenticate using your AAD credentials if the token needs refreshing.
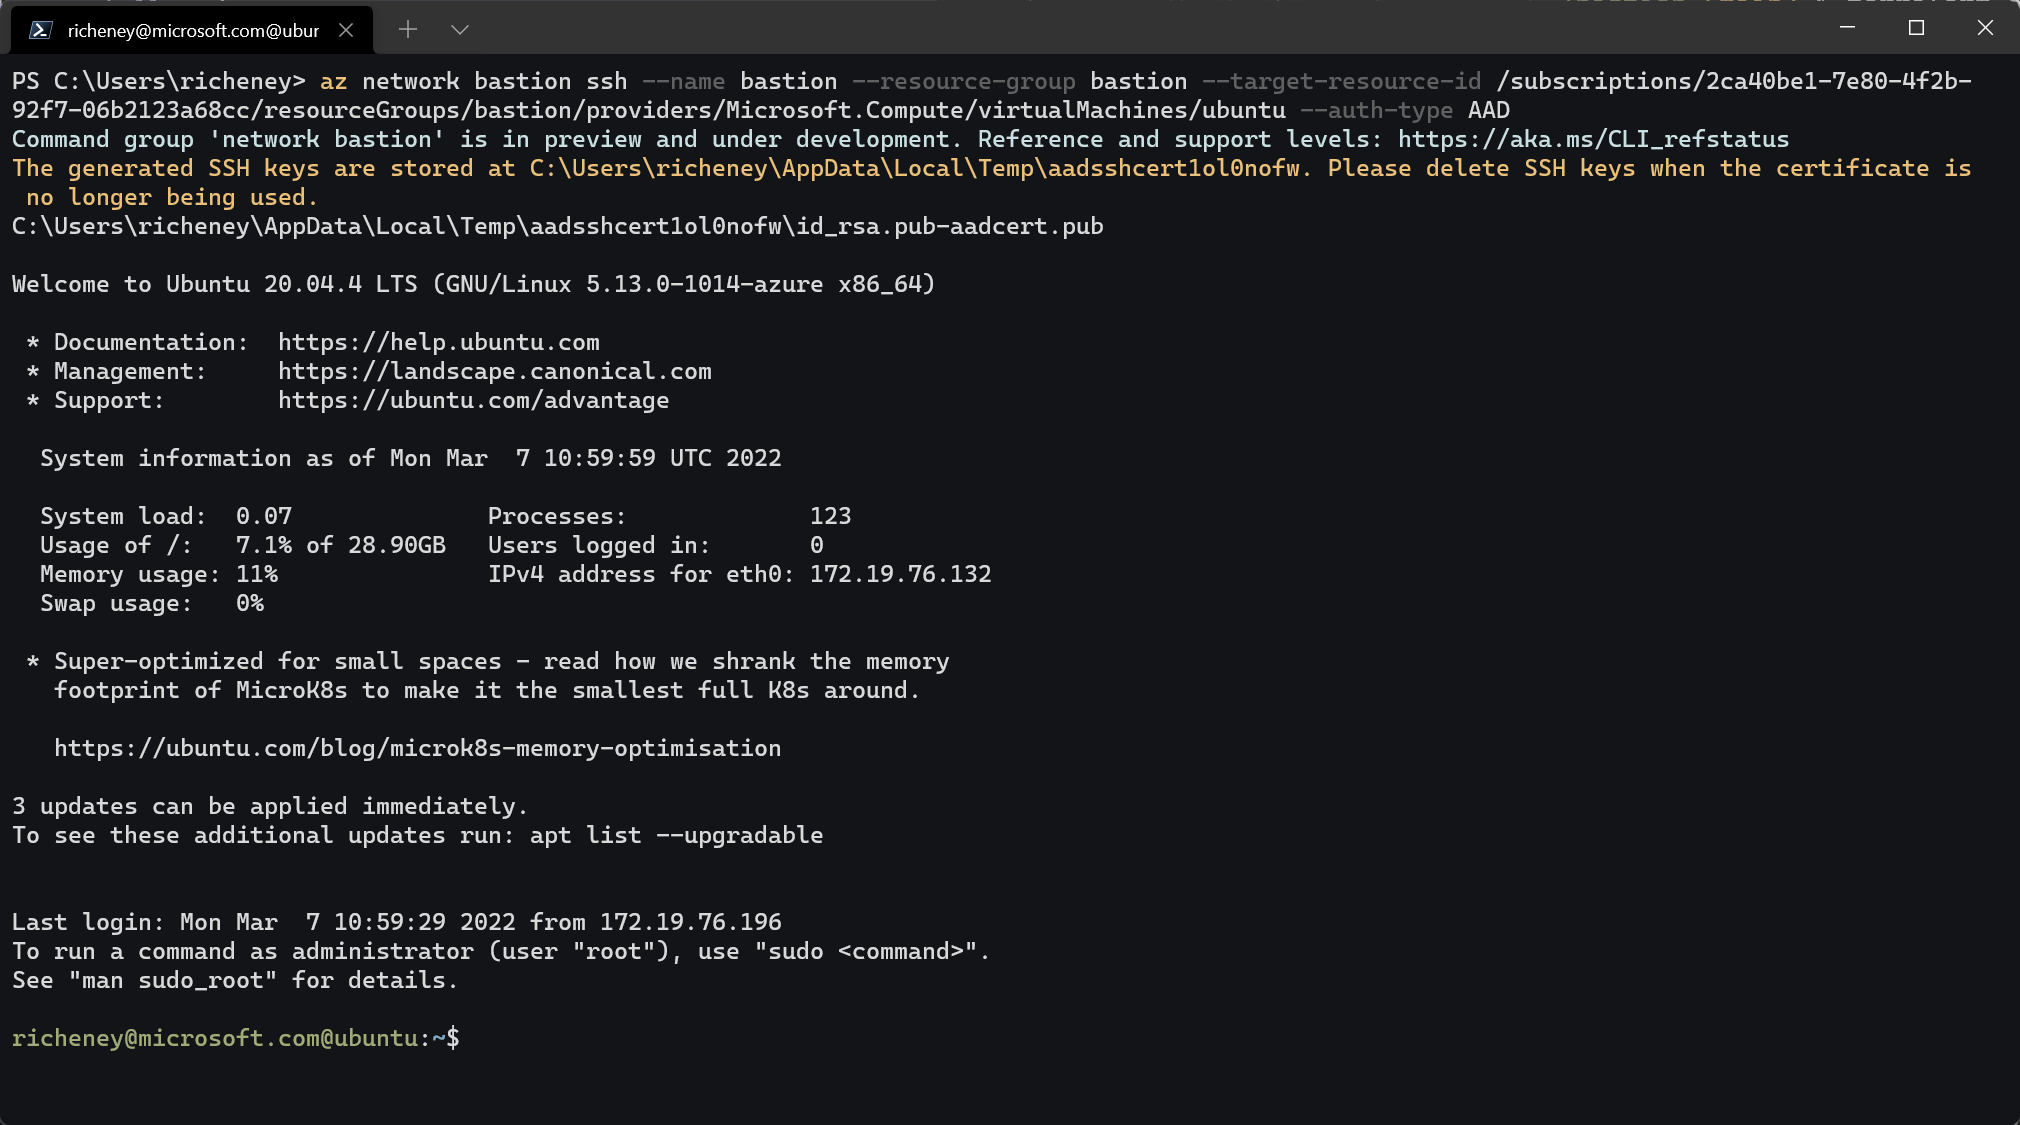
Note that you are logged in as your Azure AD user principal name.
-
Use the Instance Metadata Service (IMDS)
Optional.
The Ubuntu VM used cloud-init to install the Azure CLI, Terraform, jq, stress and tree. It has also set the JQ_COLORS environment variable to match the jsonc output form the Azure CLI.
Access the instance metadata service using the command below.
curl -H Metadata:true --noproxy "*" "http://169.254.169.254/metadata/instance?api-version=2021-02-01" | jqThere is some useful information in there which may be useful in scripts.
Here are some example techniques to set variables from the IMDS output JSON.
-
straight IMDS REST API call
image_reference=$(curl -sSLH Metadata:true --noproxy "*" "http://169.254.169.254/metadata/instance/compute/storageProfile/imageReference?api-version=2021-02-01") -
extracting a sub-value using jq
subscription_id=$(curl -sSLH Metadata:true --noproxy "*" "http://169.254.169.254/metadata/instance/compute/?api-version=2021-02-01" | jq -r .subscriptionId) -
slurping the JSON into a variable used as a here string
imds=$(curl -sSLH Metadata:true --noproxy "*" "http://169.254.169.254/metadata/instance/?api-version=2021-02-01")
id=$(jq -r .compute.resourceId <<< $imds)
subscription_id=$(jq -r .compute.subscriptionId <<< $imds)
resource_group_name=$(jq -r .compute.resourceGroupName <<< $imds)
resource_group_id=${id%%/providers/Microsoft.Compute/*}
This approach has a modest speed gain.
-
-
Check managed identity access to the secret
Optional.
The Ubuntu VM also has a managed identity and an access policy to get secrets.
-
Copy the command
terraform output example_secret_cliExample command:
az login --identity --allow-no-subscriptions --output none; az keyvault secret show --name sql --vault-name bastion-<uniq>-kv --query value --output tsv -
Paste the command into your Ubuntu VM ssh session
Expected output:
Server=tcp:myserver.database.windows.net,1433;Database=myDataBase;User ID=mylogin@myserver;Password=myPassword;Trusted_Connection=False;Encrypt=True;
-
Tunneling
The core SSH and RDP commands will be all that most admins will need. But what if you want to punch through to another port? For instance, an admin portal web page that is running on one of those servers?
Let’s use the example of Jenkins, which runs a web UI defaulting to port 8080. We’ll emulate that with a simple HTML page.
Create a basic web server
You should still be on the Ubuntu VM as your AAD credentials. Spin up a simple web server.
-
Create a directory
sudo mkdir -m 755 /web -
Create an index.html file
sudo curl https://raw.githubusercontent.com/terraform-azurerm-examples/bastion/main/index.html --output /web/index.html -
Start the web server on port 8080
sudo /usr/bin/python3 -m http.server --directory /web 8080Expected output:
Serving HTTP on 0.0.0.0 port 8080 (http://0.0.0.0:8080/) ... -
Keep this session open
Tunnel
On your machine, start up the tunnel and then access the site via the browser.
-
Open a new terminal session and go back into your Terraform folder
-
Display the tunnel command
terraform output tunnel_to_linux_serverCopy the command between the prompts.
Example command format:
az network bastion tunnel --name bastion --resource-group bastion --target-resource-id <vmid> --resource-port 8080 --port 8080The
resource portis the one on the VM. It will be mapped to the--portvalue. -
Run the
az network bastion tunnelcommand at the OS level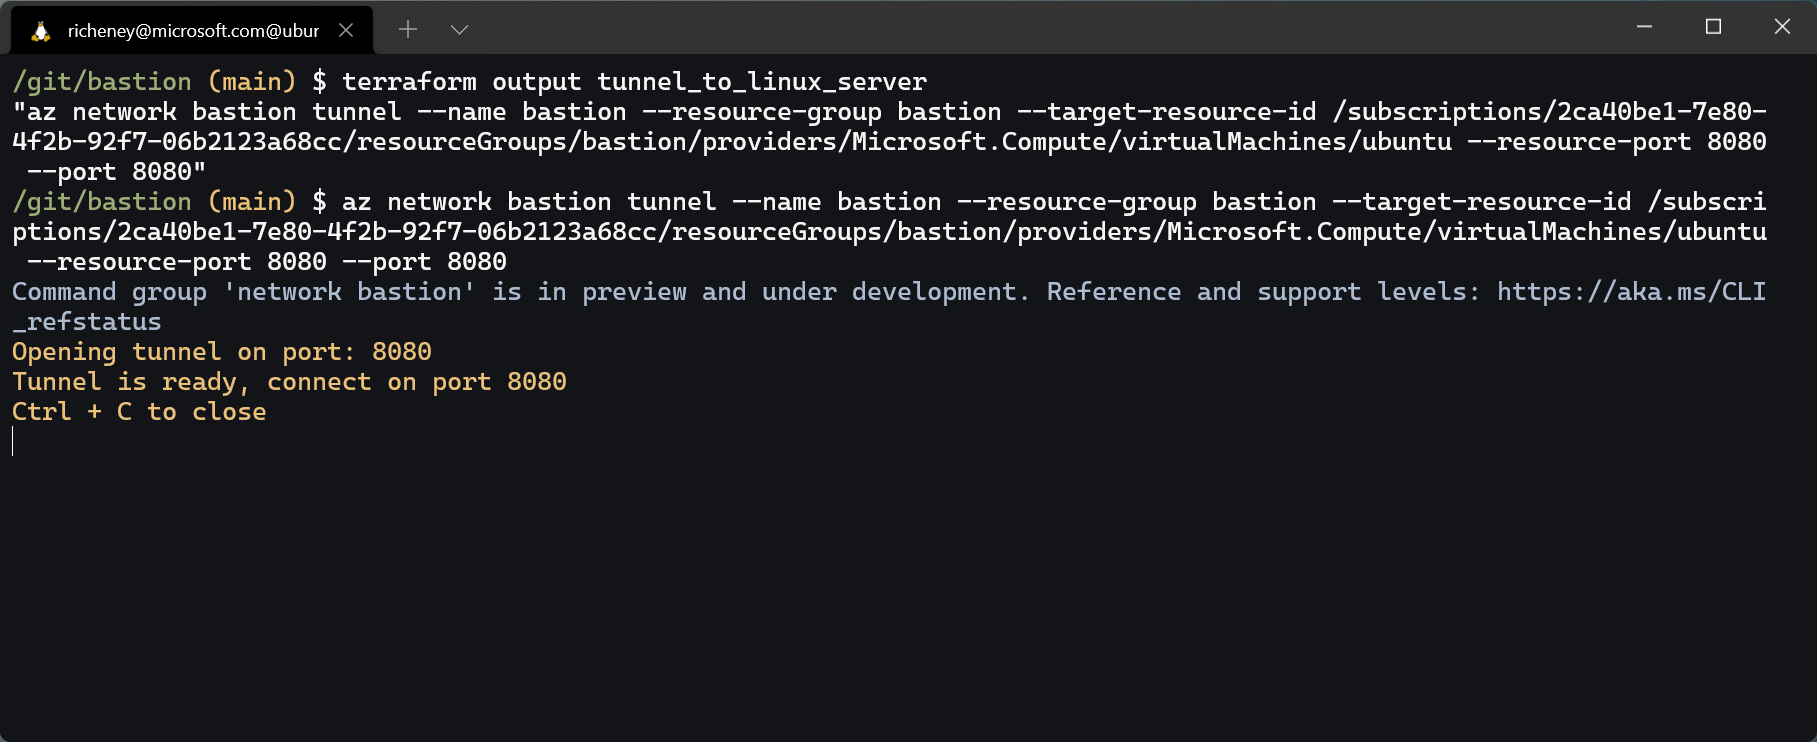
-
Open the web page
Open up a browser and go to http://localhost:8080.
If you see the basic web page below then you have traversed the tunnel through Azure Bastion and accessed the web page running on the virtual machine.
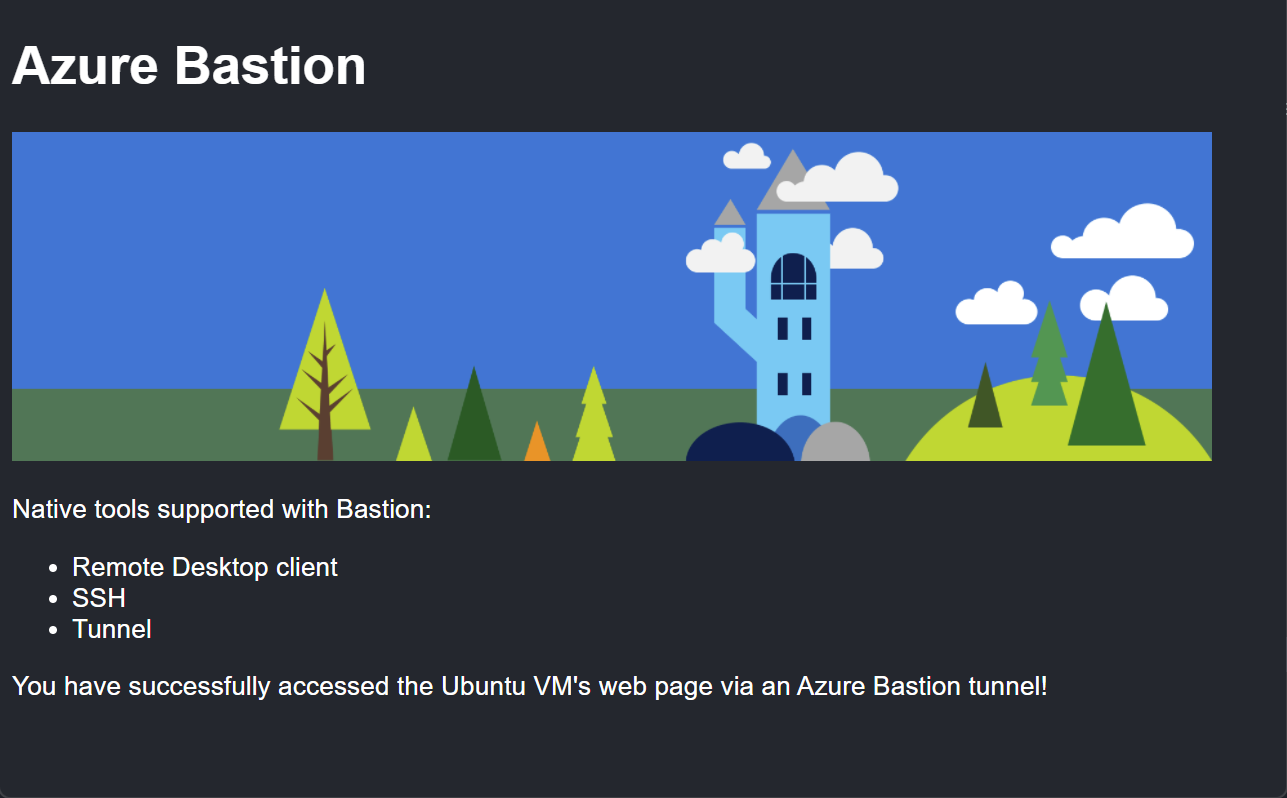
Success!
Cleanup
You can use Terraform to remove all of the resources.
terraform destroy
Alternatively, delete the resource group manually with the CLI or Azure portal.
Summary
The combination of Azure AD authentication for virtual machines, native client access through Azure Bastion and managed identity is potent.
Azure Bastion’s native client access is a far better way of accessing your Azure virtual machines. Rich functionality, improved copy and paste and file upload and download make an admin’s life simpler. This is achieved without requiring public IPs and increasing the attack surface.
Add in AAD auth and you can manage access with conditional access and MFA. Limit who can access by assigning the Virtual Machine Administrator Login and Virtual Machine User Login roles to the right scope points for the right Azure AD security groups. In the example repo we add this in using a standard Terraform resource type, but you could use Azure Policy and the deploy if not exist (DINE) effect to auto-install the extensions.
Many of you use linux and Windows machines as jumpboxes, or configuration management hosts. Using the instance metadata service and managed identity access to other Azure Resource such as Azure Key Vault, Azure Storage, Shared Image Gallery etc. opens up a number of automation possibilities.
The best practices for virtual machine remote access in the Cloud Adoption Framework are recommended reading.