Azure Citadel
  • Blogs

  • ARM
  • Azure Arc
    • Overview
    • Azure Arc-enabled Servers
      • Prereqs
      • Scenario
      • Hack Overview
      • Azure Landing Zone
      • Arc Pilot resource group
      • Azure Monitoring Agent
      • Additional policy assignments
      • Access your on prem VMs
      • Create onboarding scripts
      • Onboarding using scripts
      • Inventory
      • Monitoring
      • SSH
      • Windows Admin Center
      • Governance
      • Custom Script Extension
      • Key Vault Extension
      • Managed Identity
    • Azure Arc-enabled Kubernetes
      • Prereqs
      • Background
      • Deploy Cluster
      • Connect to Arc
      • Enable GitOps
      • Deploy Application
      • Enable Azure AD
      • Enforce Policy
      • Enable Monitoring
      • Enable Azure Defender
      • Enable Data Services
      • Enable Application Delivery
    • Useful Links
  • Azure CLI
    • Install
    • Get started
    • JMESPATH queries
    • Integrate with Bash
  • Azure Landing Zones
    • Prereqs
    • Day 1
      • Azure Baristas
      • Day 1 Challenge
    • Day 2
      • Example
      • Day 2 Challenge
    • Day 3
      • Day 3 Challenge
    • Useful Links
  • Azure Policy
    • Azure Policy Basics
      • Policy Basics in the Azure Portal
      • Creating Policy via the CLI
      • Deploy If Not Exists
      • Management Groups and Initiatives
    • Creating Custom Policies
      • Customer scenario
      • Policy Aliases
      • Determine the logic
      • Create the custom policy
      • Define, assign and test
  • Azure Stack HCI
    • Overview
    • Useful Links
    • Updates from Microsoft Ignite 2022
  • Marketplace
    • Introduction
      • Terminology
      • Offer Types
    • Partner Center
    • Offer Type
    • Publish a VM Offer HOL
      • Getting Started
      • Create VM Image
      • Test VM Image
      • VM Offer with SIG
      • VM Offer with SAS
      • Publish Offer
    • Other VM Resources
    • Publish a Solution Template HOL
      • Getting Started
      • Create ARM Template
      • Validate ARM Template
      • Create UI Definition
      • Package Assets
      • Publish Offer
    • Publish a Managed App HOL
      • Getting Started
      • Create ARM Template
      • Validate ARM Template
      • Create UI Definition
      • Package Assets
      • Publish Offer
    • Managed Apps with AKS HOL
    • Other Managed App Resources
    • SaaS Offer HOLs
    • SaaS Offer Video Series
      • Video 1 - SaaS Offer Overview
      • Video 2 - Purchasing a SaaS Offer
      • Video 3 - Purchasing a Private SaaS Plan
      • Video 4 - Publishing a SaaS Offer
      • Video 5 - Publishing a Private SaaS Plan
      • Video 6 - SaaS Offer Technical Overview
      • Video 7 - Azure AD Application Registrations
      • Video 8 - Using the SaaS Offer REST Fulfillment API
      • Video 9 - The SaaS Client Library for .NET
      • Video 10 - Building a Simple SaaS Landing Page in .NET
      • Video 11 - Building a Simple SaaS Publisher Portal in .NET
      • Video 12 - SaaS Webhook Overview
      • Video 13 - Implementing a Simple SaaS Webhook in .NET
      • Video 14 - Securing a Simple SaaS Webhook in .NET
      • Video 15 - SaaS Metered Billing Overview
      • Video 16 - The SaaS Metered Billing API with REST
  • Microsoft Fabric
    • Theory
    • Prereqs
    • Fabric Capacity
    • Set up a Remote State
    • Create a repo from a GitHub template
    • Configure an app reg for development
    • Initial Terraform workflow
    • Expanding your config
    • Configure a workload identity
    • GitHub Actions for Microsoft Fabric
    • GitLab pipeline for Microsoft Fabric
  • Packer & Ansible
    • Packer
    • Ansible
    • Dynamic Inventories
    • Playbooks & Roles
    • Custom Roles
    • Shared Image Gallery
  • Partner
    • Lighthouse and Partner Admin Link
      • Microsoft Cloud Partner Program
      • Combining Lighthouse and PAL
      • Minimal Lighthouse definition
      • Using service principals
      • Privileged Identity Management
    • Useful Links
  • REST API
    • REST API theory
    • Using az rest
  • Setup
  • Terraform
    • Fundamentals
      • Initialise
      • Format
      • Validate
      • Plan
      • Apply
      • Adding resources
      • Locals and outputs
      • Managing state
      • Importing resources
      • Destroy
    • Working Environments for Terraform
      • Cloud Shell
      • macOS
      • Windows with PowerShell
      • Windows with Ubuntu in WSL2
    • Using AzAPI
      • Using the REST API
      • azapi_resource
      • Removing azapi_resource
      • azapi_update_resource
      • Data sources and outputs
      • Removing azapi_update_resource
  • Virtual Machines
    • Azure Bastion with native tools & AAD
    • Managed Identities

  • About
  • Archive
  1. Home
  2. Archive
  3. Network
  4. Core Concepts
  5. Routing Tables

Table of Contents

  • Lab Overview
  • Lab Diagram
  • Create a route table
  • Create a route
  • Associate a route table to a subnet
  • Enable IP Forwarding on the NVA
  • Test the routing

Routing Tables

Understand how Azure routes traffic in a virtual network and how user defined routes can be used to change the default behaviour.

Lab Overview

Let’s look at how routing and custom routes work in a virtual network. We spun up a CSR in the previous lab. We will check how user defined routes work through a network virtual appliance with CSR as an example NVA.
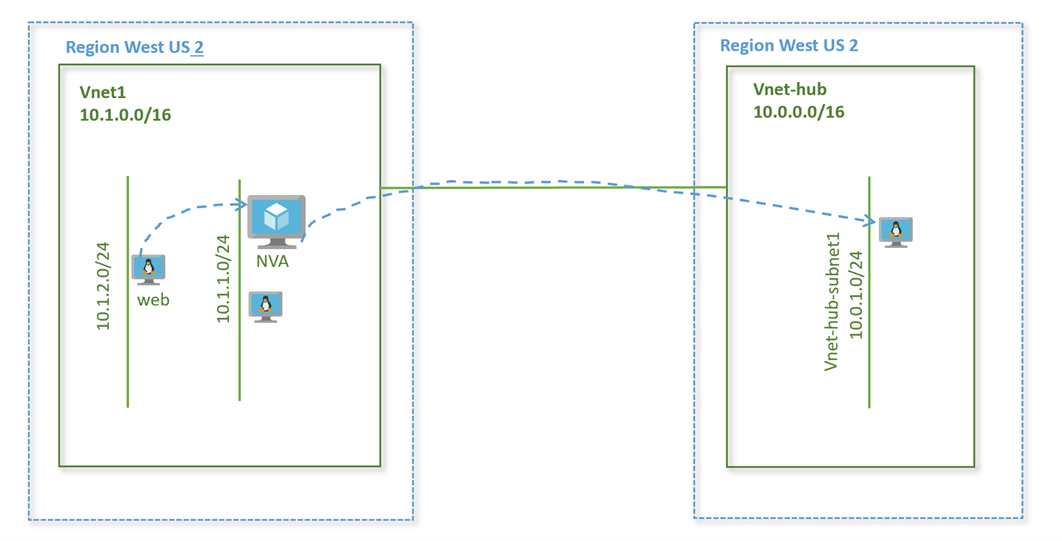
Lab Diagram

Diagram

Create a route table

  1. On the upper-left side of the screen, select Create a resource > Networking > Route table.

  2. In Create route table, enter or select this information:

    Setting Value
    Name rt-nva
    Subscription Select your subscription
    Resource group Create new, enter rg-lab, and select OK
    Location Leave the default West US 2
  3. Select Create.

The new route table should show up in the list.

Create a route

  1. Click on the route table ‘rt-nva’ that you just created.

  2. Under Settings, select Routes > + Add.

  3. In Add route, enter or select this information

    Setting Value
    Route name route-to-nva
    Address prefix 10.0.1.0/24
    Next hop type Virtual appliance
    Next hop address 10.1.1.5 (or IP of the NVA CSR)
  4. Select OK.

Associate a route table to a subnet

Click on the route table ‘rt-nva’ that you just created.

  1. From the route table rt-nva page, under Settings, select Subnets

  2. Click Associate, enter or select this information:

    Setting Value
    Virtual network vnet1
    Subnet vnet1-subnet2
  3. Select OK

Enable IP Forwarding on the NVA

Enable IP Forwarding on the NVA VM’s network interface.

  1. Go to the virtual machines page and click on VM csr1
  2. Select Networking from the VM blade on the left and click on the network interface for the VM
  3. Click on IP Configuration tab in the left blade under Settings
  4. Verify IP forwarding is enabled

Test the routing

Test routing from the vnet2-vm-web1 VM to the 10.0.1.0/24 subnet.

  1. SSH into the virtual machine vnet1-vm-web1

    • Ping the CSR1000v VM csr1
    • Verify pings are successful
  2. Now ping the destination vm vnet-hub-vm1 using its private IP address 10.0.1.4

    • Pings should be successful
  3. Run traceroute to the vnet-hub-vm1 virtual machine

    azuser@vnet1-vm-web1:~$ traceroute 10.0.1.4
    traceroute to 10.0.1.4 (10.0.1.4), 30 hops max, 60 byte packets
    1  10.1.1.6 (10.1.1.6)  1.913 ms  1.900 ms  1.873 ms
    2  * 10.0.1.4 (10.0.1.4)  3.760 ms *
    

    The next hop for the destination shows as the IP address of the CSR1000v virtual machine. This is our user defined routes in action.

NVA CSR1000v Routing Tables Next