Managed Identities
Each virtual machine can have an identity to access other Azure services. Work with VMs, the Instance Metadata Service and Azure Key Vault. Initially use the REST API via curl and then move on to the Azure CLI.
Introduction
Managed identities are the preferred security principal to use for trusted compute as it provides a sensible start of the trust chain.
Rather than going through an authentication process for their access token, the logon process for a managed identity gets the token from the Instance Metadata Service. There is an internal IMDS endpoint at https://169.254.169.254 which provides the token. The same service can also be used to query Azure for other information such as resourceID, tenant and subscription IDs, tags, location etc.
Managed identities are used extensively across Azure for virtual machines, containers, and services. They can be system assigned, with the same lifecycle as the compute they are associated with, or user created and assigned.
At the moment the functionality only works with REST API calls, so we will look at how managed identities work with REST APIs on a standard Azure VM and then look at doing the same with one of our on prem machines.
We will work through this slowly, step by step, so that you understand the API calls, the tokens, RBAC assignments, plus management plane v data plane actions.
Resource group
-
Create the resource group and set default environment variables.
az group create --name managed_identity_lab --location uksouth
export AZURE_DEFAULTS_GROUP=managed_identity_lab
export AZURE_DEFAULTS_LOCATION=uksouth
Exporting the two Azure defaults environment variables overrides and defaults set with
az configure --defaults, but only for the duration of the session. Using these defaults saves having to specify the--resource-groupand--locationswitches for the remainder of the lab.
Create the key vault and secret
Key Vault has a choice of permission models - the original access policies plus the newer RBAC roles.
-
Create a key vault
- use the access policies
- set soft delete retention to the minimum
resourceGroupId=$(az group show --name managed_identity_lab --query id --output tsv)
vault=keyvault-$(md5sum <<< $resourceGroupId | cut -c1-8)
az keyvault create --name $vault --retention-days 7
keyvaultId=$(az keyvault show --name $vault --query id --output tsv)
Using md5sum on the resource group ID gives us a predictable uniq code to include in the FQDN.
-
Add an access policy
Add an access policy for yourself so that you can get, list and set secrets.
objectId=$(az ad signed-in-user show --query objectId --output tsv) az keyvault set-policy --secret-permissions get list set --name $vault --object-id $objectId -
Add a secret called portal-phrase
az keyvault secret set --vault-name $vault --name "portal-phrase" --value "TheCakeIsALie"
secretId=$(az keyvault secret show --vault-name $vault --name portal-phrase --query id --output tsv)
The key vault can store anything useful to scripting within a virtual machine, such as client IDs and secrets fpr service principals, connection strings to databases, certificates for host to host SSL, etc.
Create a virtual machine
-
Virtual machine
az vm create --name ubuntu \
--image UbuntuLTS --os-disk-name ubuntu-os \
--vnet-name myVnet --subnet mySubnet --public-ip-address ubuntu-pip \
--assign-identity '[system]' \
--tags site=citadel lab=identity vault=$vault \
--generate-ssh-keys
The vault name is one of the tags for the VM.
Note that we could have used the
--scopeand--roleswitches to create an RBAC role assignment for the system identity. We want to do this manually later so have omitted these intentionally.We could also have created an identity user with the
az identity createcommand and then use assigned that identity to the VM. This is very useful when separating out the Contributor actions such as creating VMs and assigning identities, and the User Access Administrator actions such as role assignment creation.Multiple identities can be assigned.
Variables
This lab uses variables extensively. If you are using CLoud Shell then you may lose your session. If so, rest the variables using this code block:
export AZURE_DEFAULTS_GROUP=managed_identity_lab
export AZURE_DEFAULTS_LOCATION=uksouth
resourceGroupId=$(az group show --name managed_identity_lab --query id --output tsv)
publicIp=$(az network public-ip show --name ubuntu-pip --query ipAddress --output tsv)
vault=keyvault-$(md5sum <<< $resourceGroupId | cut -c1-8)
keyvaultId=$(az keyvault show --name $vault --query id --output tsv)
secretId=$(az keyvault secret show --vault-name $vault --name portal-phrase --query id --output tsv)
Instance Metadata Service
OK, let’s use rest to talk to the Instance Metadata Service, or IMDS. This is a REST API endpoint that is only available within compute such as VMs, VMSS, or containers. It provides JSON output with very useful information about the Azure context for that VM.
-
SSH to the VM
publicIp=$(az network public-ip show --name ubuntu-pip --query ipAddress --output tsv)
ssh $publicIp
Your lab VM should have a default NSG allowing port 22 from the internet so we can SSH in.
-
Install jq
sudo apt update && sudo apt install jq -yThe jq utility is used to filter and manipulate JSON.
-
Show the IMDS output JSON
Run this REST API call to see the output for the Instance Metedata Service for an Azure VM.
curl -H Metadata:true "http://169.254.169.254/metadata/instance?api-version=2020-09-01" | jq -
Example bash commands, setting variables to values taken from the IMDS output.
imds=$(curl -sSL -H Metadata:true "http://169.254.169.254/metadata/instance?api-version=2020-09-01")

id=$(jq -r .compute.resourceId <<< $imds)
publicIpAddress=$(jq -r .network.interface[0].ipv4.ipAddress[0].publicIpAddress <<< $imds)
site=$(jq -r '.compute.tagsList[]|select(.name == "site").value' <<< $imds)

echo "My id is $id."
echo "My public IP address is $publicIpAddress and my site tag is set to $site."
Identity tokens
When you log in to Azure using the CLI it generates a token that is used in the calls. You can see the token cache by running jq . ~/.azure/accessTokens.json. When that expires you are prompted to authenticate again. The same is true of service principals that need to provide a secret or a certificate to be authenticated.
Your identity can get a token from the IMDS and it does not need to authenticate to do so. The identity is associated to the VM, and the VM is considered trusted compute.
-
Get the management plane access token
token=$(curl 'http://169.254.169.254/metadata/identity/oauth2/token?api-version=2018-02-01&resource=https%3A%2F%2Fmanagement.azure.com%2F' -H Metadata:true -s | jq -r .access_token)Note the query specifies both the API version and the
https://management.azure.comresource. -
List the resources in the VM’s resource group
We’ll grab a couple of the IMDS values and then use the token with the Resources - List by Resource Group call.
This operation should fail.
imds=$(curl -sSL -H Metadata:true "http://169.254.169.254/metadata/instance?api-version=2020-09-01")
resourceGroupName=$(jq -r .compute.resourceGroupName <<< $imds)
subscriptionId=$(jq -r .compute.subscriptionId <<< $imds)
curl -X GET -H "Authorization: Bearer $token" -H "Content-Type: application/json" https://management.azure.com/subscriptions/$subscriptionId/resourceGroups/$resourceGroupName/resources?api-version=2020-06-01
You should see an error as the managed identity does not have RBAC access to read the resources in the resource group.
-
Exit the SSH session
exitYou will be back to your computer’s bash session.
-
Assign a role to the managed identity
We’ll grab the object ID for the system assigned managed identity and assign the Reader role for the resource group.
identityObjectId=$(az vm show --name ubuntu --query identity.principalId --output tsv) az role assignment create --assignee $identityObjectId --resource-group $AZURE_DEFAULTS_GROUP --role "Reader" -
SSH back into the Ubuntu VM
ssh $publicIp -
List the resources successfully
imds=$(curl -sSL -H Metadata:true "http://169.254.169.254/metadata/instance?api-version=2020-09-01")
resourceGroupName=$(jq -r .compute.resourceGroupName <<< $imds)
subscriptionId=$(jq -r .compute.subscriptionId <<< $imds)

token=$(curl 'http://169.254.169.254/metadata/identity/oauth2/token?api-version=2018-02-01&resource=https%3A%2F%2Fmanagement.azure.com%2F' -H Metadata:true -s | jq -r .access_token)
curl -X GET -H "Authorization: Bearer $token" -H "Content-Type: application/json" https://management.azure.com/subscriptions/$subscriptionId/resourceGroups/$resourceGroupName/resources?api-version=2020-06-01 | jq .
You should get a JSON representation of all of the resources in the resource group. Success!
Working with secrets
OK, we know that we can give the managed identity roles and use REST API calls to the management plane. Let’s look at the data plane and working with secrets in key vaults.
-
Get the secret from the keyvault
We’ll try to use the Get Secret REST API call.
You
imds=$(curl -sSL -H Metadata:true "http://169.254.169.254/metadata/instance?api-version=2020-09-01")
vault=$(jq -r '.compute.tagsList[]|select(.name == "vault").value' <<< $imds)
secret="portal-phrase"
curl -X GET -H "Authorization: Bearer $token" -H "Content-Type: application/json" https://$vault.vault.azure.net/secrets/$secret?api-version=7.1
You should get an error message like this:
"AKV10022: Invalid audience. Expected https://vault.azure.net, found: https://management.azure.com/."Remember that the original token request specified the resource in the query and the output JSON also included the resource name.
-
JSON Web Tokens
You can
echo $tokenand paste the string into sites such as https://jwt.io or https://jwt.ms to see the content of the token.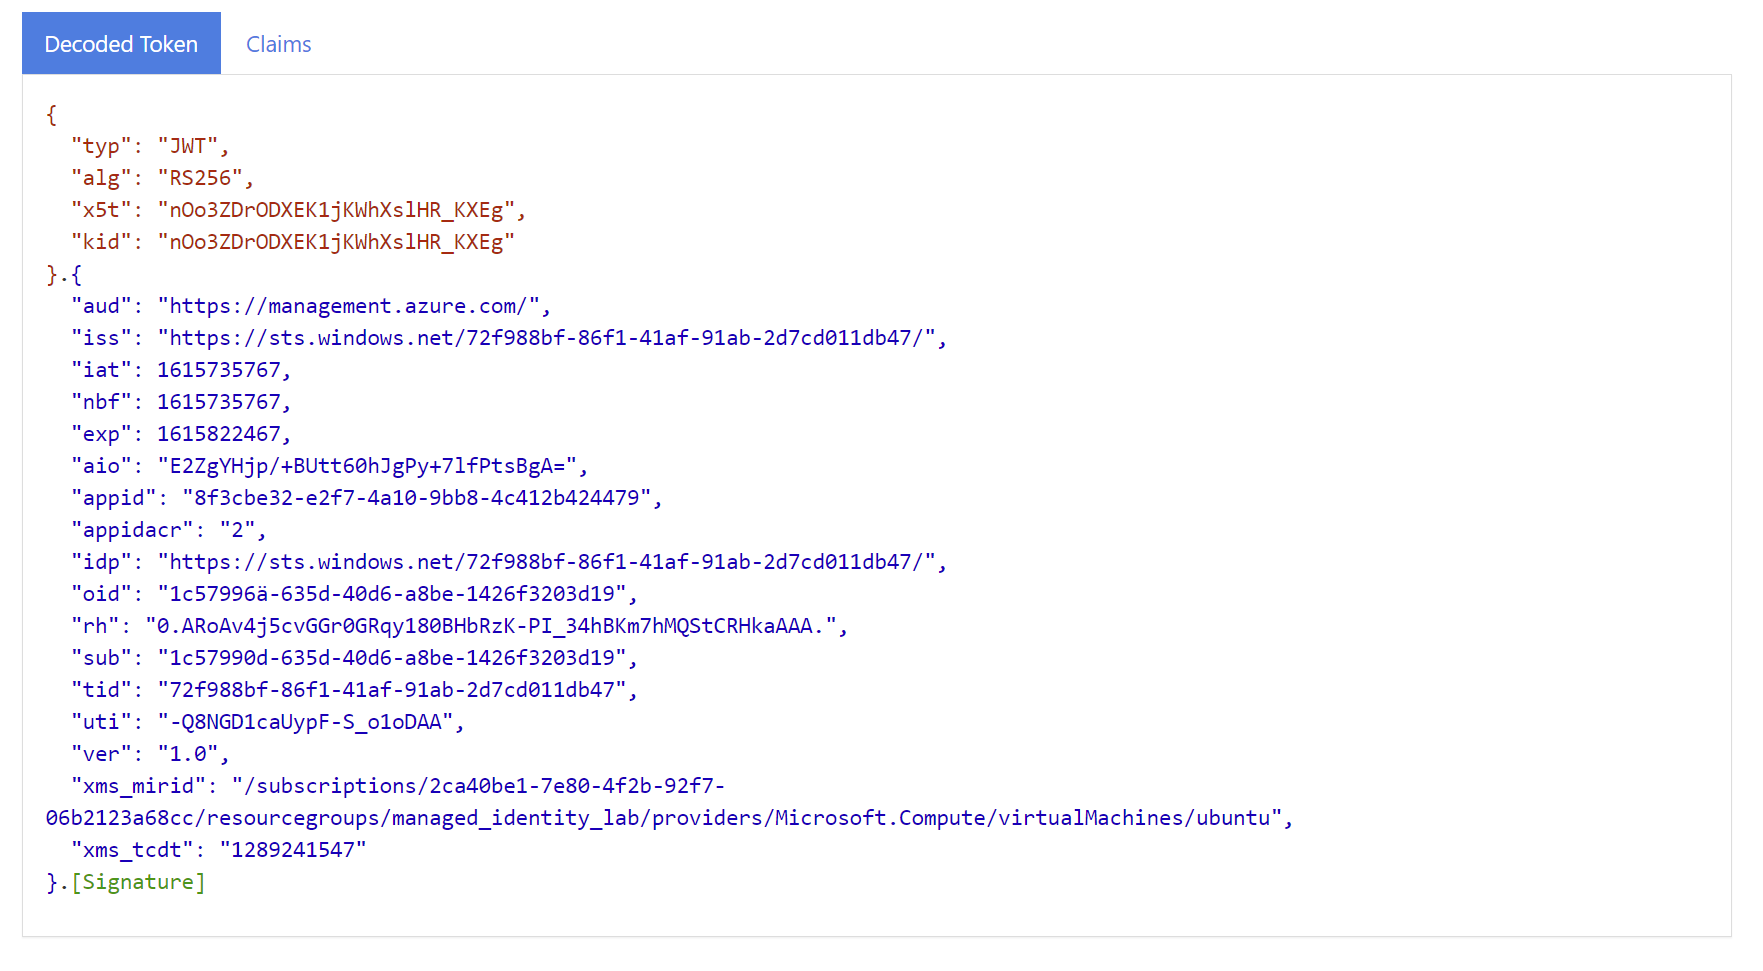
Note that the aud (audience) value is the resource and the oid is the object ID of the managed identity.
-
Get a key vault token and retry
Request a token for the key vault service instead and retry the REST API call.
vaultToken=$(curl 'http://169.254.169.254/metadata/identity/oauth2/token?api-version=2018-02-01&resource=https%3A%2F%2Fvault.azure.net' -H Metadata:true -s | jq -r .access_token)
curl -X GET -H "Authorization: Bearer $vaultToken" -H "Content-Type: application/json" https://$vault.vault.azure.net/secrets/$secret?api-version=7.1
OK, still erroring, but that it to be expected as there is no access policy for the identity.
Add the access policy
-
Exit the SSH session
-
Give the identity an access policy to read secrets in the key vault
identityObjectId=$(az vm show --name ubuntu --query identity.principalId --output tsv)
az keyvault set-policy --secret-permissions get --name $vault --object-id $identityObjectId
Get the secret
-
SSH back to the VM
ssh $publicIp -
Get the secret
imds=$(curl -sSL -H Metadata:true "http://169.254.169.254/metadata/instance?api-version=2020-09-01")
vault=$(jq -r '.compute.tagsList[]|select(.name == "vault").value' <<< $imds)
vaultToken=$(curl 'http://169.254.169.254/metadata/identity/oauth2/token?api-version=2018-02-01&resource=https%3A%2F%2Fvault.azure.net' -H Metadata:true -s | jq -r .access_token)
phrase=$(curl -X GET -H "Authorization: Bearer $vaultToken" -H "Content-Type: application/json" https://$vault.vault.azure.net/secrets/portal-phrase?api-version=7.1 | jq -r .value)
echo "The phrase is \"$phrase\"."
More success!!
-
Exit the VM
exitOK, you now know the basics of using identity to get secrets using the APIs.
Using the Azure CLI
OK, we will set a service principal with Contributor access on the resource group and put the credentials into the key vault. We’ll also start using the Azure CLI within the VM.
-
Create the service principal
sp=$(az ad sp create-for-rbac --name "http://contributor-$uniq" --role Contributor --scope $resourceGroupId) -
Add the secrets
You can add multiple string secrets.
az keyvault secret set --vault-name $vault --name tenant-id --value $(jq -r .tenant <<< $sp)
az keyvault secret set --vault-name $vault --name client-id --value $(jq -r .appId <<< $sp)
az keyvault secret set --vault-name $vault --name client-secret --value $(jq -r .password <<< $sp)
Or you can add the minified JSON string and unpick it later within the VM.
az keyvault secret set --name service-principal --vault-name $vault --value $(jq -c <<< $sp)The
-cswitch for jq compacts (or “minifies”) the JSON.
Install the Azure CLI
-
Log into the VM
ssh $publicIp -
Install the CLI
curl -sL https://aka.ms/InstallAzureCLIDeb | sudo bashThe Azure CLI takes a while to install, which is why curl REST API calls are the quickest ways for a script to make simple API calls. For more complex scripting then the CLI is very useful.
-
Log in as the managed identity
az login --identityWell, that was easy! 🙂
Giving the managed identity access the required RBAC role assignments massively simplifies scripting on VM.
rg=$() But let's try elevating from our managed identity to the service principal. -
Get the key vault name from the tags
vault=$(curl -sSL -H Metadata:true "http://169.254.169.254/metadata/instance/compute/tagsList?api-version=2020-09-01" | jq -r '.[]|select(.name == "vault").value')Note the longer URI path. You can drill down into subsections of the instance metadata by extending the URI path.
-
Get the secrets
Either get all of the individual secrets:
tenantId=$(az keyvault secret show --vault-name $vault --name tenant-id --query value --output tsv)
clientId=$(az keyvault secret show --vault-name $vault --name client-id --query value --output tsv)
clientSecret=$(az keyvault secret show --vault-name $vault --name client-secret --query value --output tsv)
Or get that minified JSON string and unpick it.
sp=$(az keyvault secret show --vault-name $vault --name service-principal --query value --output tsv) tenantId=$(jq -r .tenant <<< $sp); clientId=$(jq -r .appId <<< $sp); clientSecret=$(jq -r .password <<< $sp) -
Log in as the service principal
az login --service-principal --user $clientId --password $clientSecret --tenant $tenantIdExample output:
[
  {
    "cloudName": "AzureCloud",
    "homeTenantId": "72f988bf-86f1-41af-91ab-2d7cd011db47",
    "id": "2ca40be1-7e80-4f2b-92f7-06b2123a68cc",
    "isDefault": true,
    "managedByTenants": [
      {
        "tenantId": "2f4a9838-26b7-47ee-be60-ccc1fdec5953"
      }
    ],
    "name": "Azure Citadel",
    "state": "Enabled",
    "tenantId": "72f988bf-86f1-41af-91ab-2d7cd011db47",
    "user": {
      "name": "770e8ab0-b7aa-4adf-84b6-4d14ebdca3fd",
      "type": "servicePrincipal"
    }
  }
]
In most cases a user assigned managed identity would be far simpler.
But a service principal could be for something more complex. E.g.:
- a multi-tenant service principal
- a service principal with specific role assignments, such as peering vNets across multiple subscriptions
- a service principal with API permissions added into the manifest so that it can use other Microsoft APIs such as the Microsoft Graph API
It does open up some additional possibilities.
Summary
Managed identities are fantastic, and when combined with scripts and code on VMs, VMss or containers then everything opens up.
You should now have a better understanding of managed identities, of the instance metadata service and how to work with Azure RBAC role assignments and Azure Key Vaults.