vNet Integration
Configure a web app running a linux container, integrating the back end into a vNet so that the application can access the private endpoint for the SQL DB.
Introduction
The private endpoint microhack covers accessing the frontend of PaaS services and integrating those with virtual networks. You can do exactly the same with the Premium SKUs for web apps, creating private endpoints which are great for providing internal apps to companies rather than using ASEs.
That is still the Private Link functionality, so what is vNet Integration?
Many web apps are standalone and self contained, but a common application pattern is to have the web app as the front tier for an app, but the outbound traffic then punches through to a public database, or into a logic tier that runs in VMs or APIs running on containers. This outbound, or backend traffic is usually public, but you can integrate the backend of the web app with a vNet using Regional vNet Integration. This is useful regardless of whether or not you have used Private Endpoints for the front end.
Note where Private Endpoints and vNet Integration are on the web app networking overview screen:
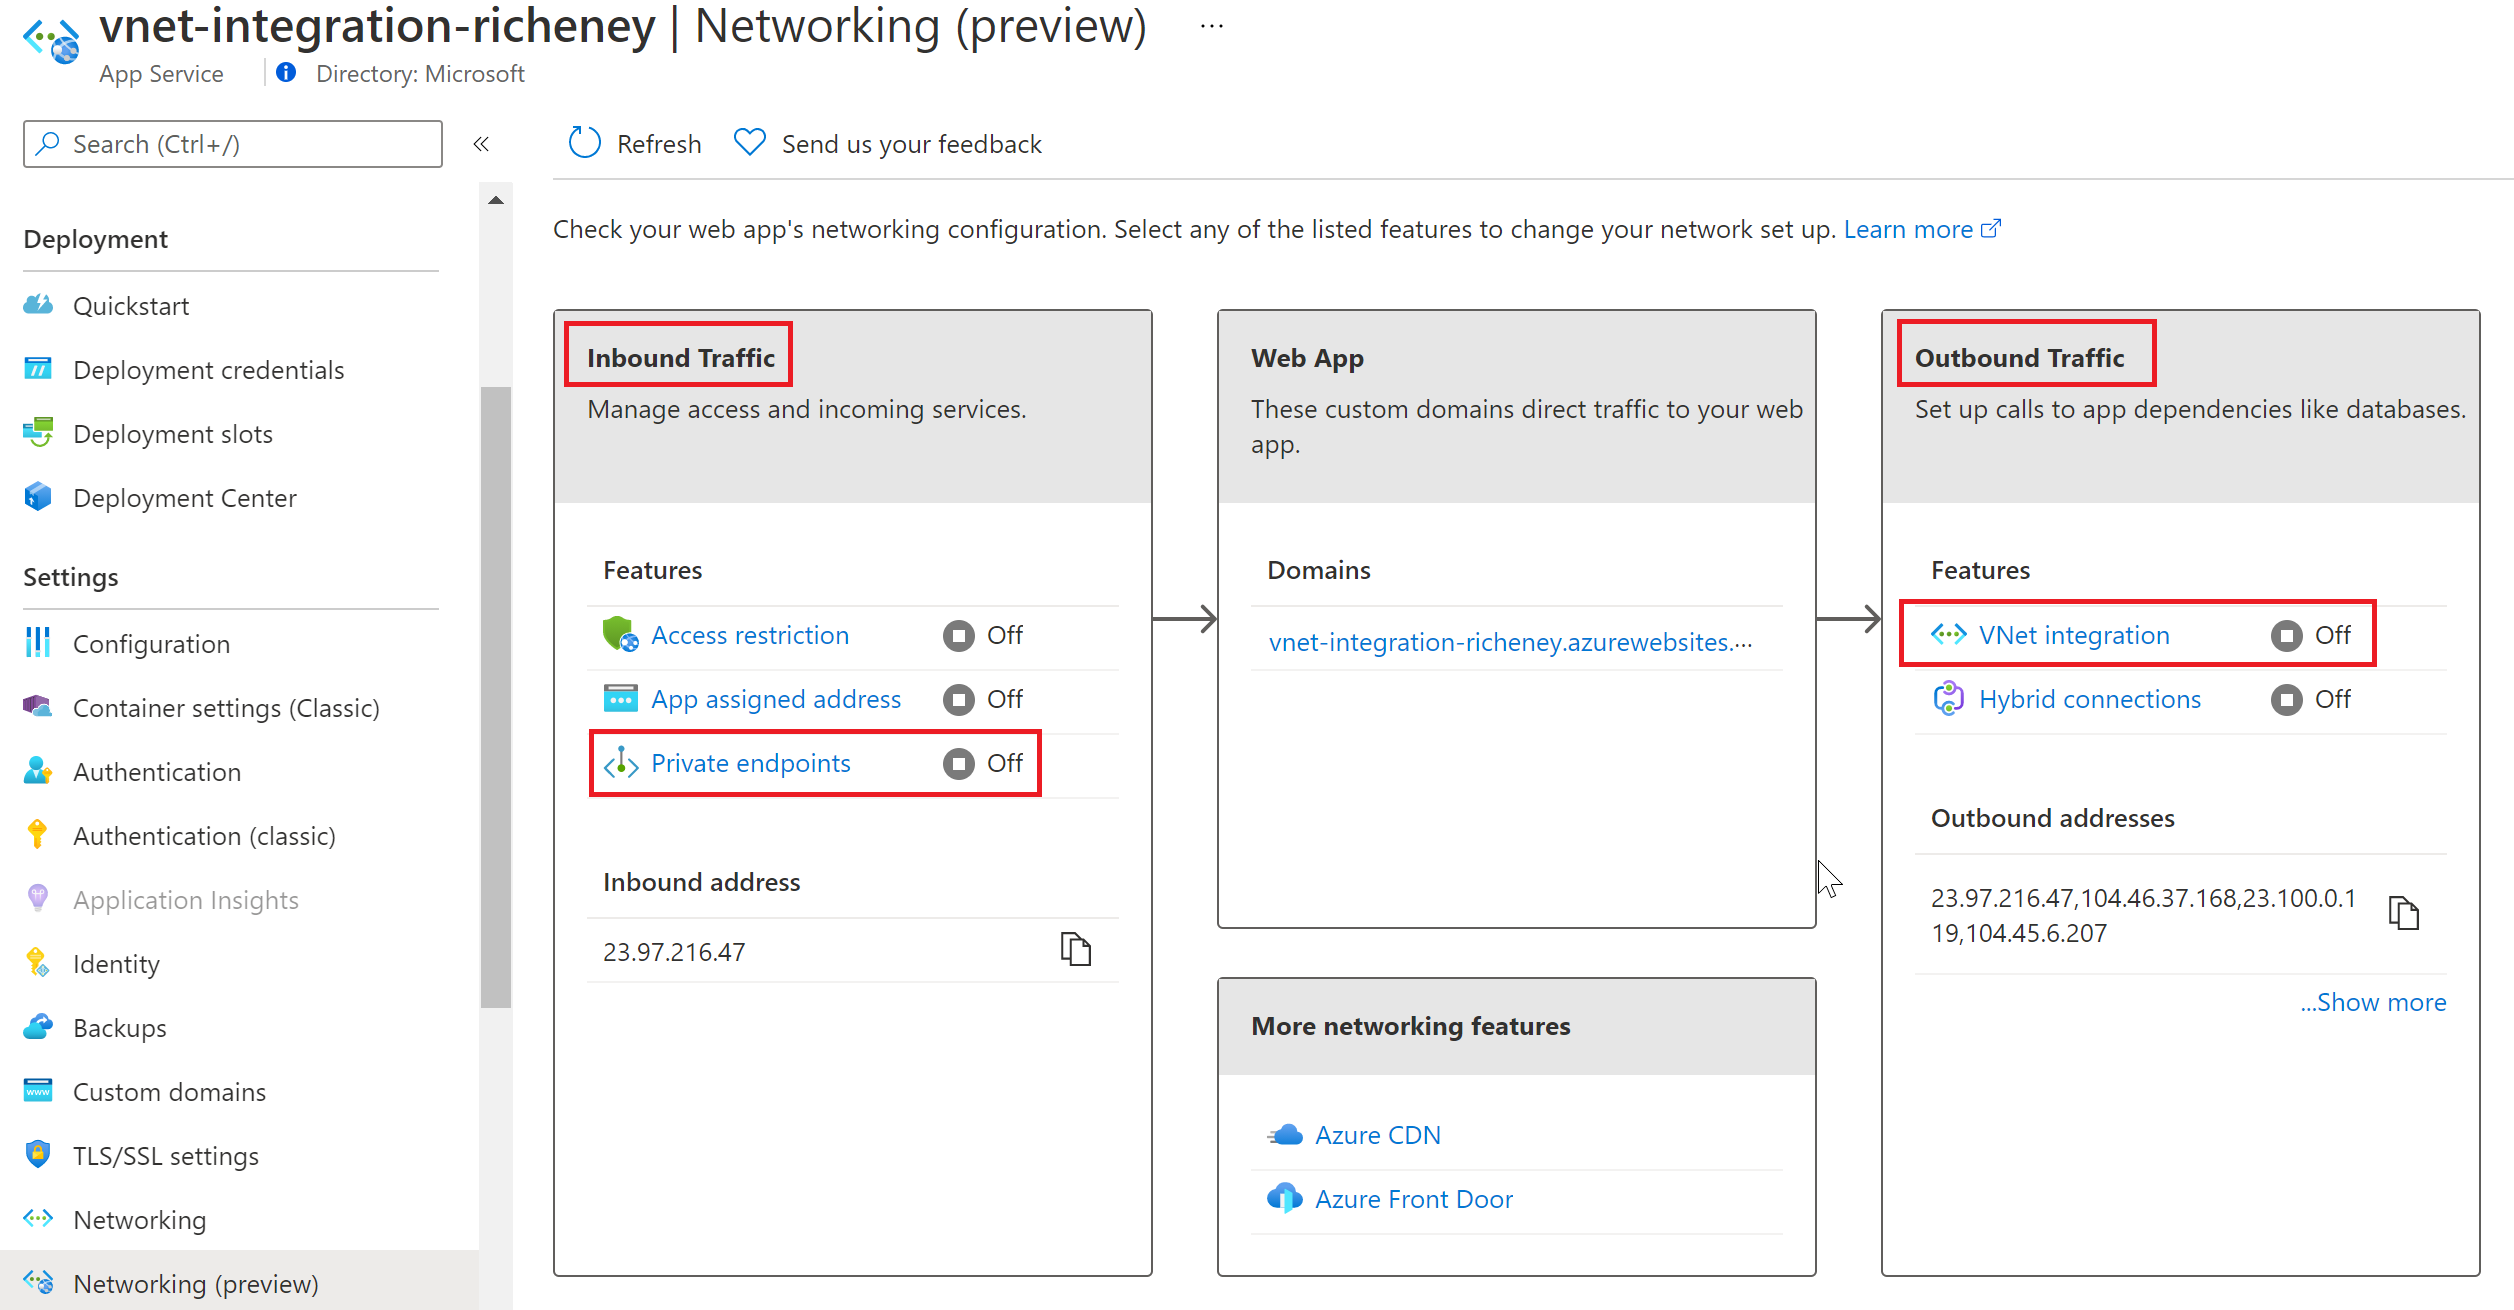
Overview
In this lab we will stand up a simple linux web app running the Inspector Gadget container image. The image gives us a wealth of useful information plus the ability to connect to SQL databases. We’ll initially show that cannot access the SQL database from the private link microhack as the public endpoint was blocked following the creation of the private endpoint.
We will integrate the app into the vNet and then connect to the SQL database’s private endpoint.
Finally we will cover a couple of key environment variables and the effect that they have.
This lab uses CLI commands in a Bash shell, but you can also follow the Portal screenshots and instructions if you prefer.
Prereqs
This lab is an addition to the main Private Link microhack and you will build on that environment.
If there is interest then we will create a short script to re-generate enough of that environment to make this lab standalone..
SQL Connection String
You will need a SQL connection string for testing. Run the command below to generate the connection string for the SQL server in your microhack environment. Don’t forget to modify the –server value to match your SQL server’s name.
az sql db show-connection-string --name microhack-sql --server microhack-richeney --client ado.net --output tsv
This will show a string without the username and password.
Server=tcp:microhack-richeney.database.windows.net,1433;Database=microhack-sql;User ID=<username>;Password=<password>;Encrypt=true;Connection Timeout=30;
Manually add in your SQL username, AzureAdmin and your SQL password to finalise the string.
Save it as you’ll need it later.
Resource group
Create a resource group called privatelink-int-microhack-rg.
Set location to the region used in the private link microhack environment and use it consistently throughout the lab.
export AZURE_DEFAULTS_GROUP="privatelink-int-microhack-rg"
export AZURE_DEFAULTS_LOCATION="West Europe"
az group create --name $AZURE_DEFAULTS_GROUP
The commands above set temporary environment variables to default the resource group name and location. This shortens the following commands.
Portal: Resource Group

Web App
Use the Inspector Gadget linux container in a Premium V2 P1v2 web app.
Use the Premium V2 or Premium V3 SKU for vNet integration. Or the Standard SKU but only from the newer App Service scale units. Note that Standard supports vNet integration for the back end, but you need Premium if you also plan to have private endpoints for the front end.
az appservice plan create --name vnet-integration --sku P1V2 --is-linux
az webapp create --deployment-container-image-name jelledruyts/inspectorgadget:latest \
                 --name vnet-integration-richeney \
                 --plan vnet-integration
Ensure that your web app has a unique FQDN. Don’t use
-richeneyin your app’s name! Throughout this lab you will see-richeneyused as my identifier, so make sure that you change this to your own identifier for uniqueness.
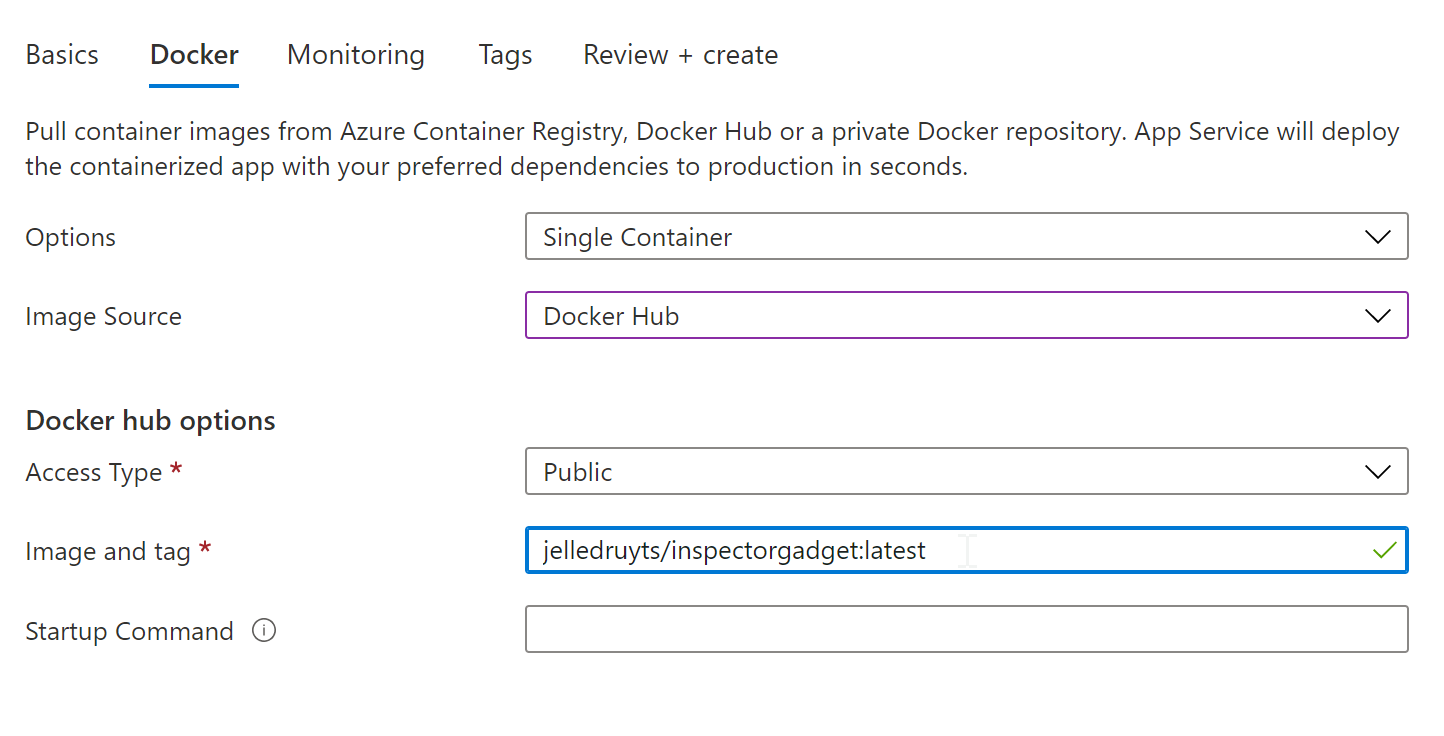
Portal: Web App
Basics

Ensure that your web app has a unique FQDN. (Don’t use -richeney!)
Docker
- Image source: Docker Hub
- Image and tag:
jelledruyts/inspectorgadget:latest
Inspector Gadget
OK, we’ll check the default behaviour before we integrate with the vNet.
Browse the homepage for your web app, e.g. http://vnet-integration-richeney.azurewebsites.net.
Across the top you will see a number of gadgets. We’ll start with DNS.
DNS
Click on the DNS tab at the top of the Inspector Gadget webpage.
Enter in the SQL server’s FQDN, e.g. microhack-richeney.database.windows.net.
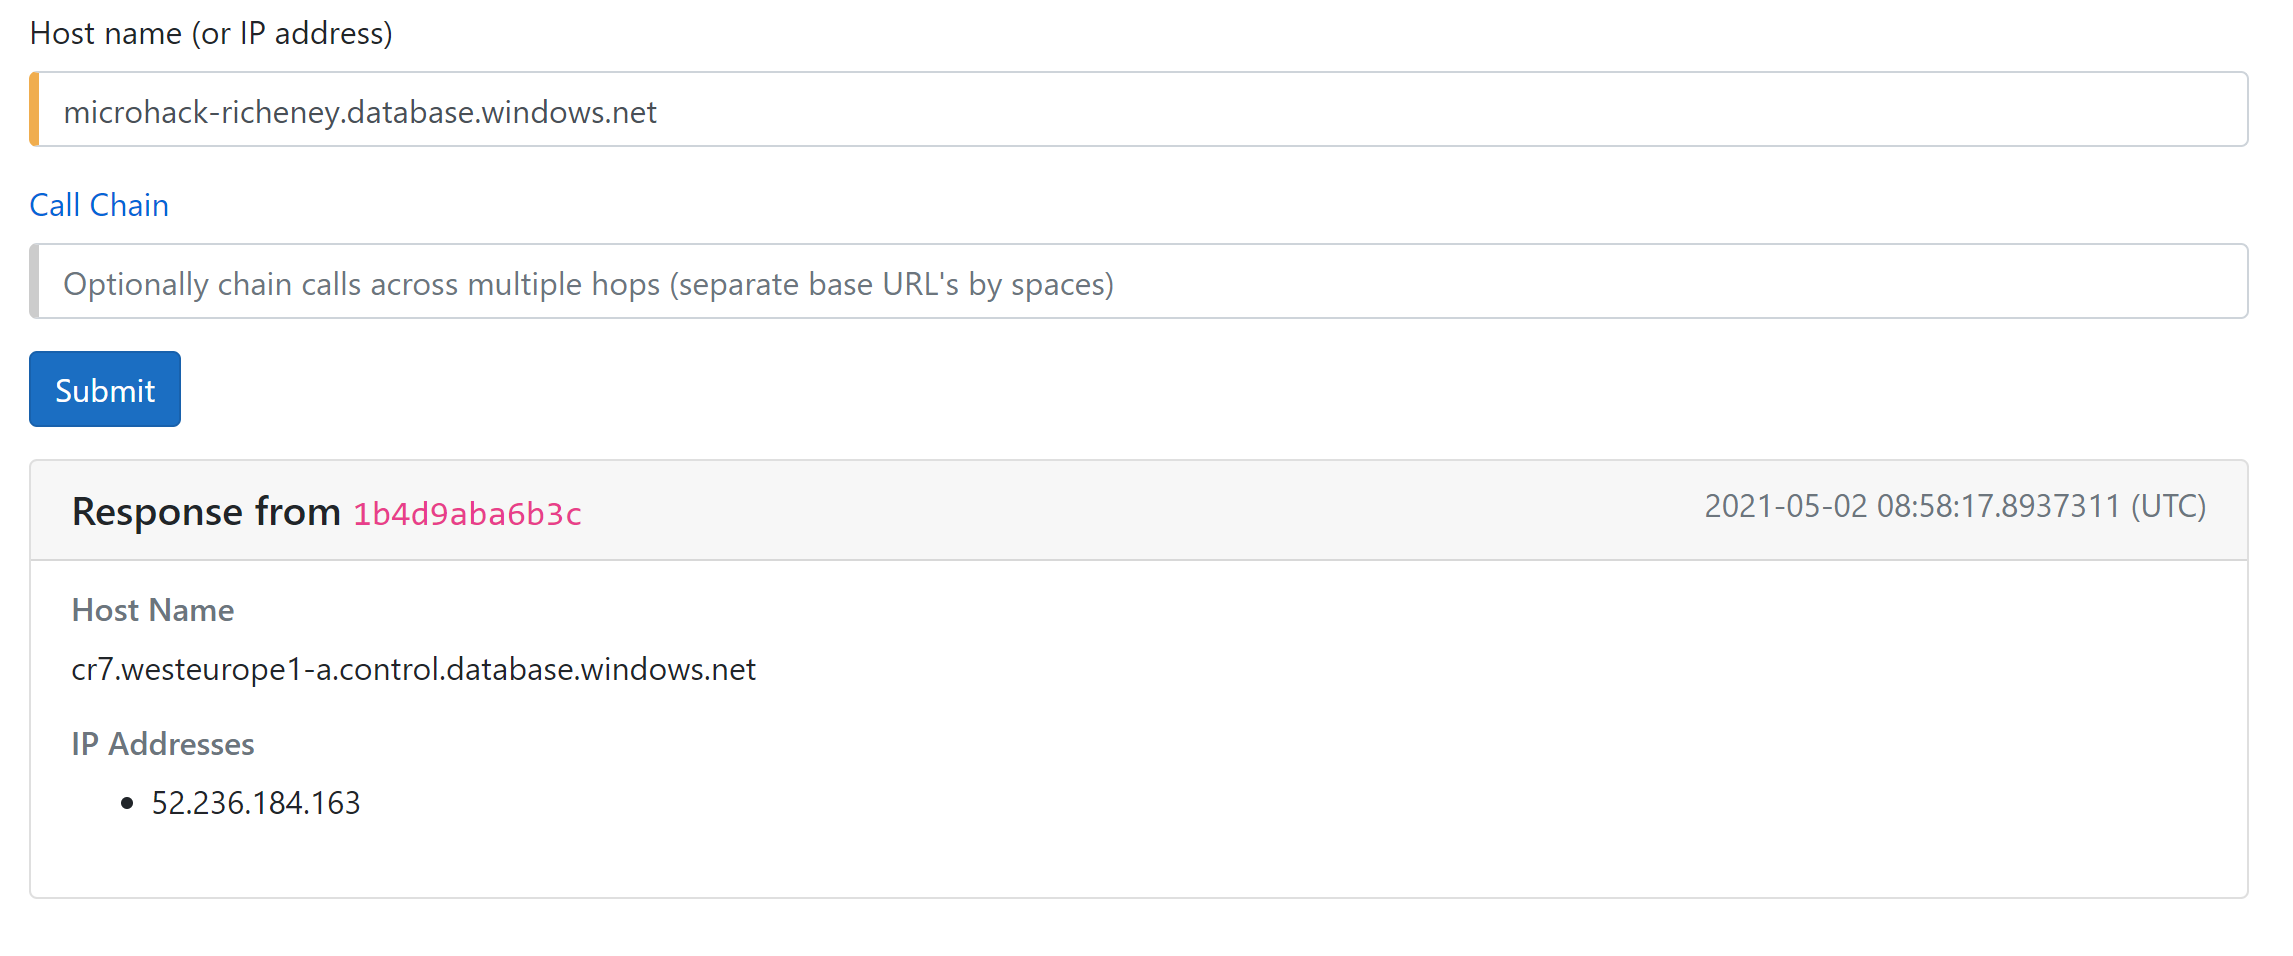
This nslookup should return the public IP of the SQL databases’s public endpoint.
HTTP
Click on the HTTP tab at the top of the Inspector Gadget webpage.
Curl the default page, http://ipinfo.io/ip. This page will display the source IP address, so you know where the traffic is coming from.
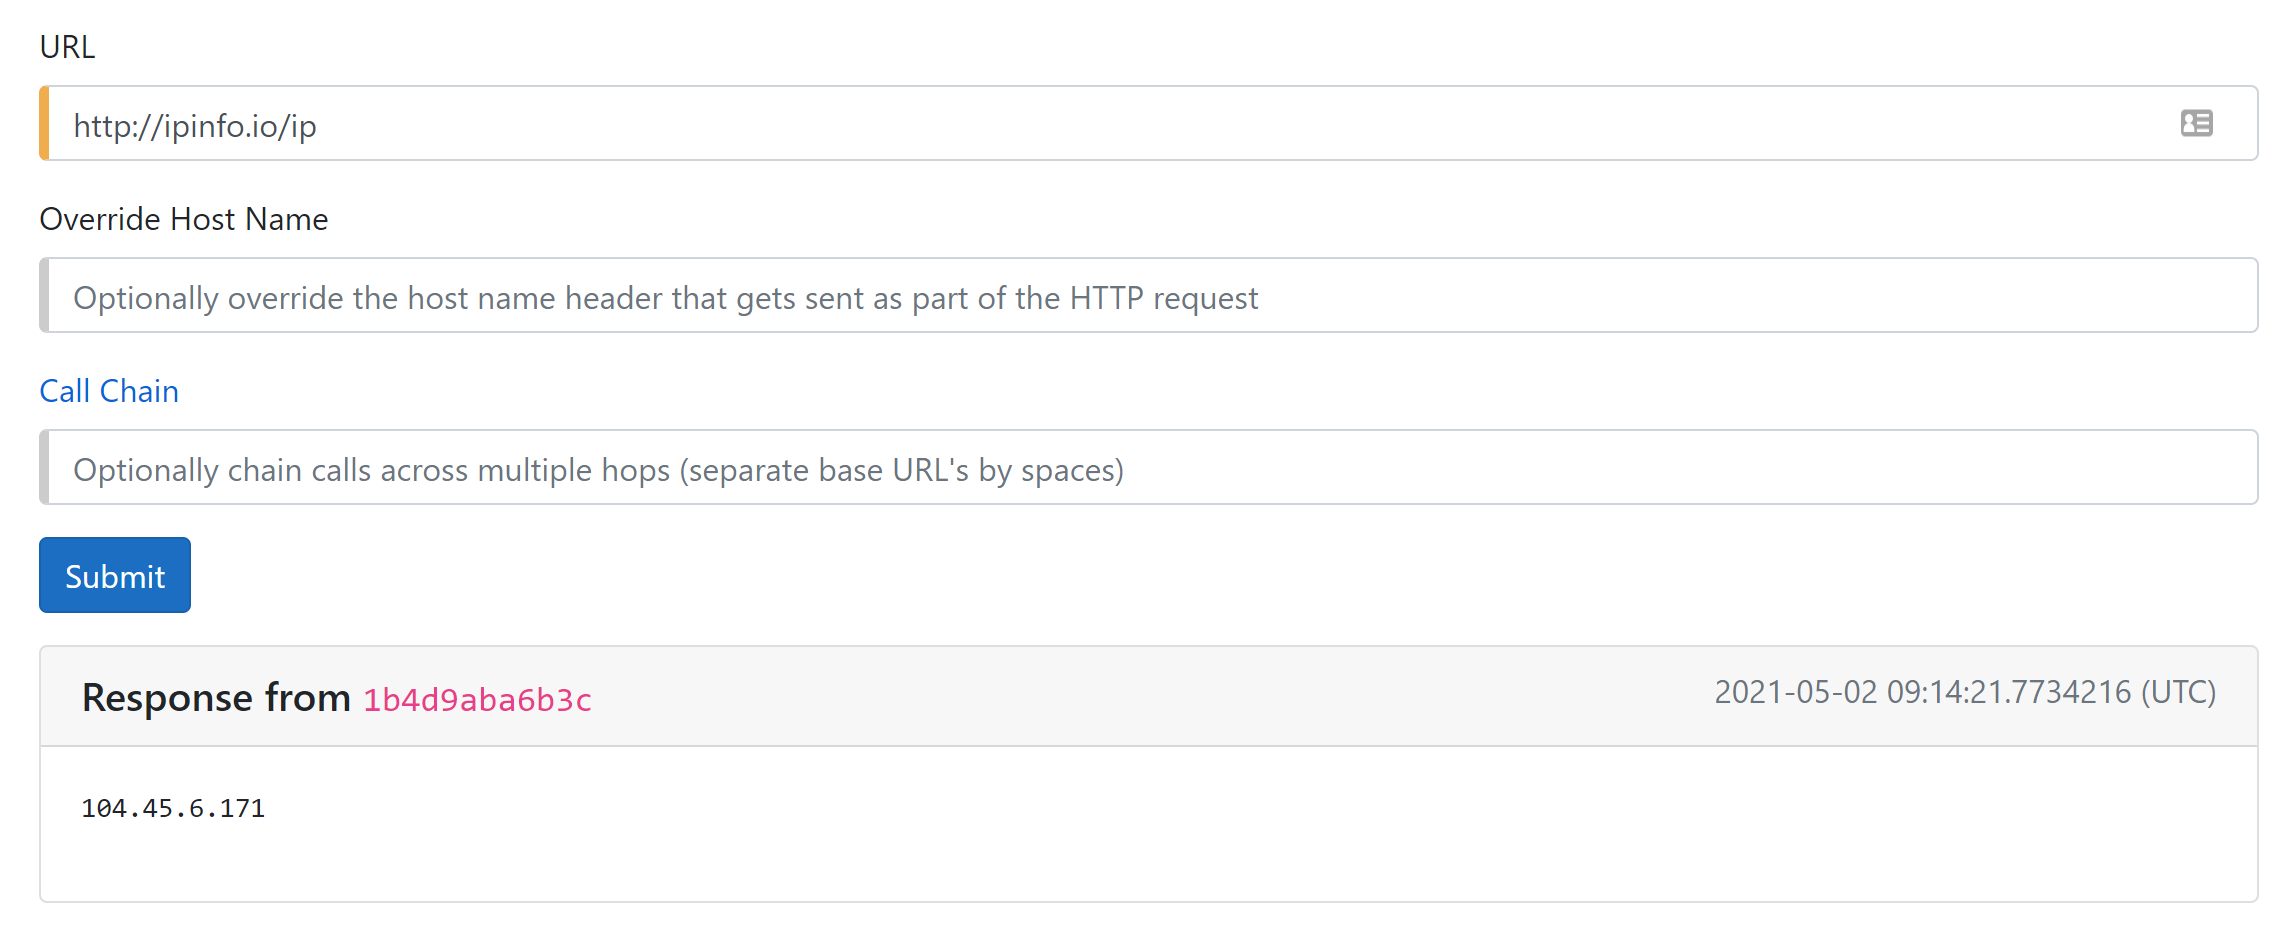
The gadget show’s your web app’s current outbound IP address.
SQL
OK, let’s confirm we cannot connect to the SQL endpoint.
Click on the SQL tab at the top of the Inspector Gadget webpage.
-
Database Type
Use the default SQL database type.
(The SQL gadget also supports MySQL, PostgreSQL, MariaDB, CosmosDB etc.)
-
Connection string
Use the connection string you constructed earlier. I.e.:
Server=tcp:microhack-richeney.database.windows.net,1433;Database=microhack-sql;User ID=AzureAdmin;Password=<password>;Encrypt=true;Connection Timeout=30;
If you then click on the Submit button then you should see an error as we have previously blocked access to the public endpoint. The error will include the following text:
Reason: An instance-specific error occurred while establishing a connection to SQL Server. Connection was denied since Deny Public Network Access is set to Yes.
Optional: Temporarily enable public endpoint access
If you wanted to see the public endpoint working in the SQL gadget then re-open public access on the firewall for the SQL server.
- Stop denying public network access
- Add in the outbound IP address for the web app
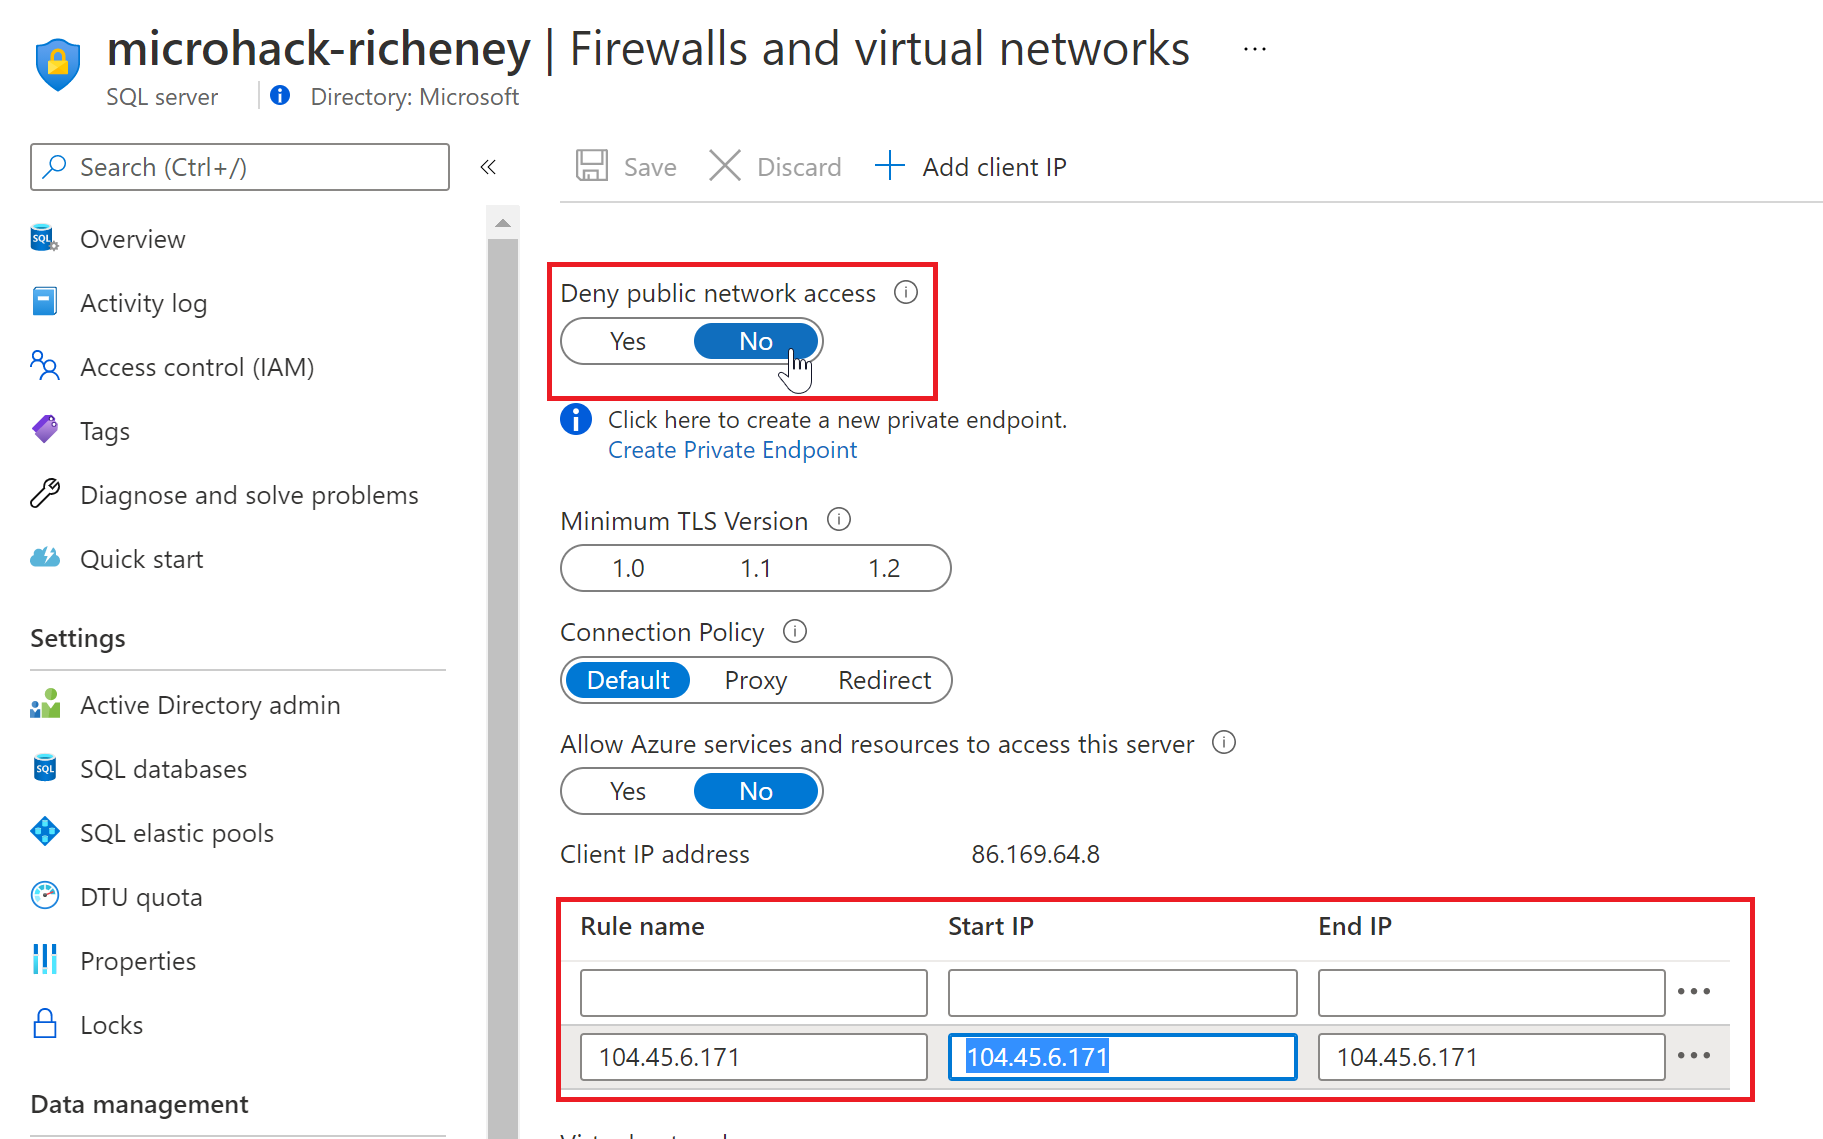
Click on Submit again with the same connection string and you should now see a successful connection:
User "dbo" logged in from IP address "104.45.6.171" to database "microhack-sql" on server "microhack-richeney"
Reverse the firewall setting to continue with the lab.
vNet Integration
The vNet Integration feature requires a dedicated subnet. When you integrate using the CLI then you create an empty subnet first and then integrate the app with it.
First, search the environment variables on the Inspector Gadget homepage for WEBSITE_PRIVATE_IP. It should not exist.
Now add the new subnet into the same vNet as the SQL server’s private endpoint.
| Name | Value |
|---|---|
| Virtual network name | spoke-vnet |
| Virtual network resource group | privatelink-dns-microhack-rg |
| Subnet name | vNetIntegration |
| Address space | 10.1.1.32/27 |
Note that vNet integrated apps can route to any subnet in the vNet, or to those in peered or vNet Gateway connected vNets. They cannot route to on prem via ExpressRoute or S2S VPN connections.
If you are using the older Service Endpoints (rather than Private Endpoints) then they should be configured on the vNet integration subnet as service endpoints work at layer 2.
az network vnet subnet create --name vNetIntegration --address-prefixes 10.1.1.32/27 \
   --resource-group privatelink-dns-microhack-rg --vnet-name spoke-vnet
Update the web app to integrate with the subnet:
vnetId=$(az network vnet show --resource-group privatelink-dns-microhack-rg --name spoke-vnet --query id --output tsv)
az webapp vnet-integration add --name vnet-integration-richeney --vnet $vnetId --subnet vNetIntegration
Portal: Regional vNet Integration
The Portal screen for vNet integration is found in the Networking blade for the web app.
It is well designed as you can create a new subnet on the fly (or pick an existing empty one) whilst seeing which existing subnets exist and which address prefixes they are consuming from the virtual network’s address space(s).
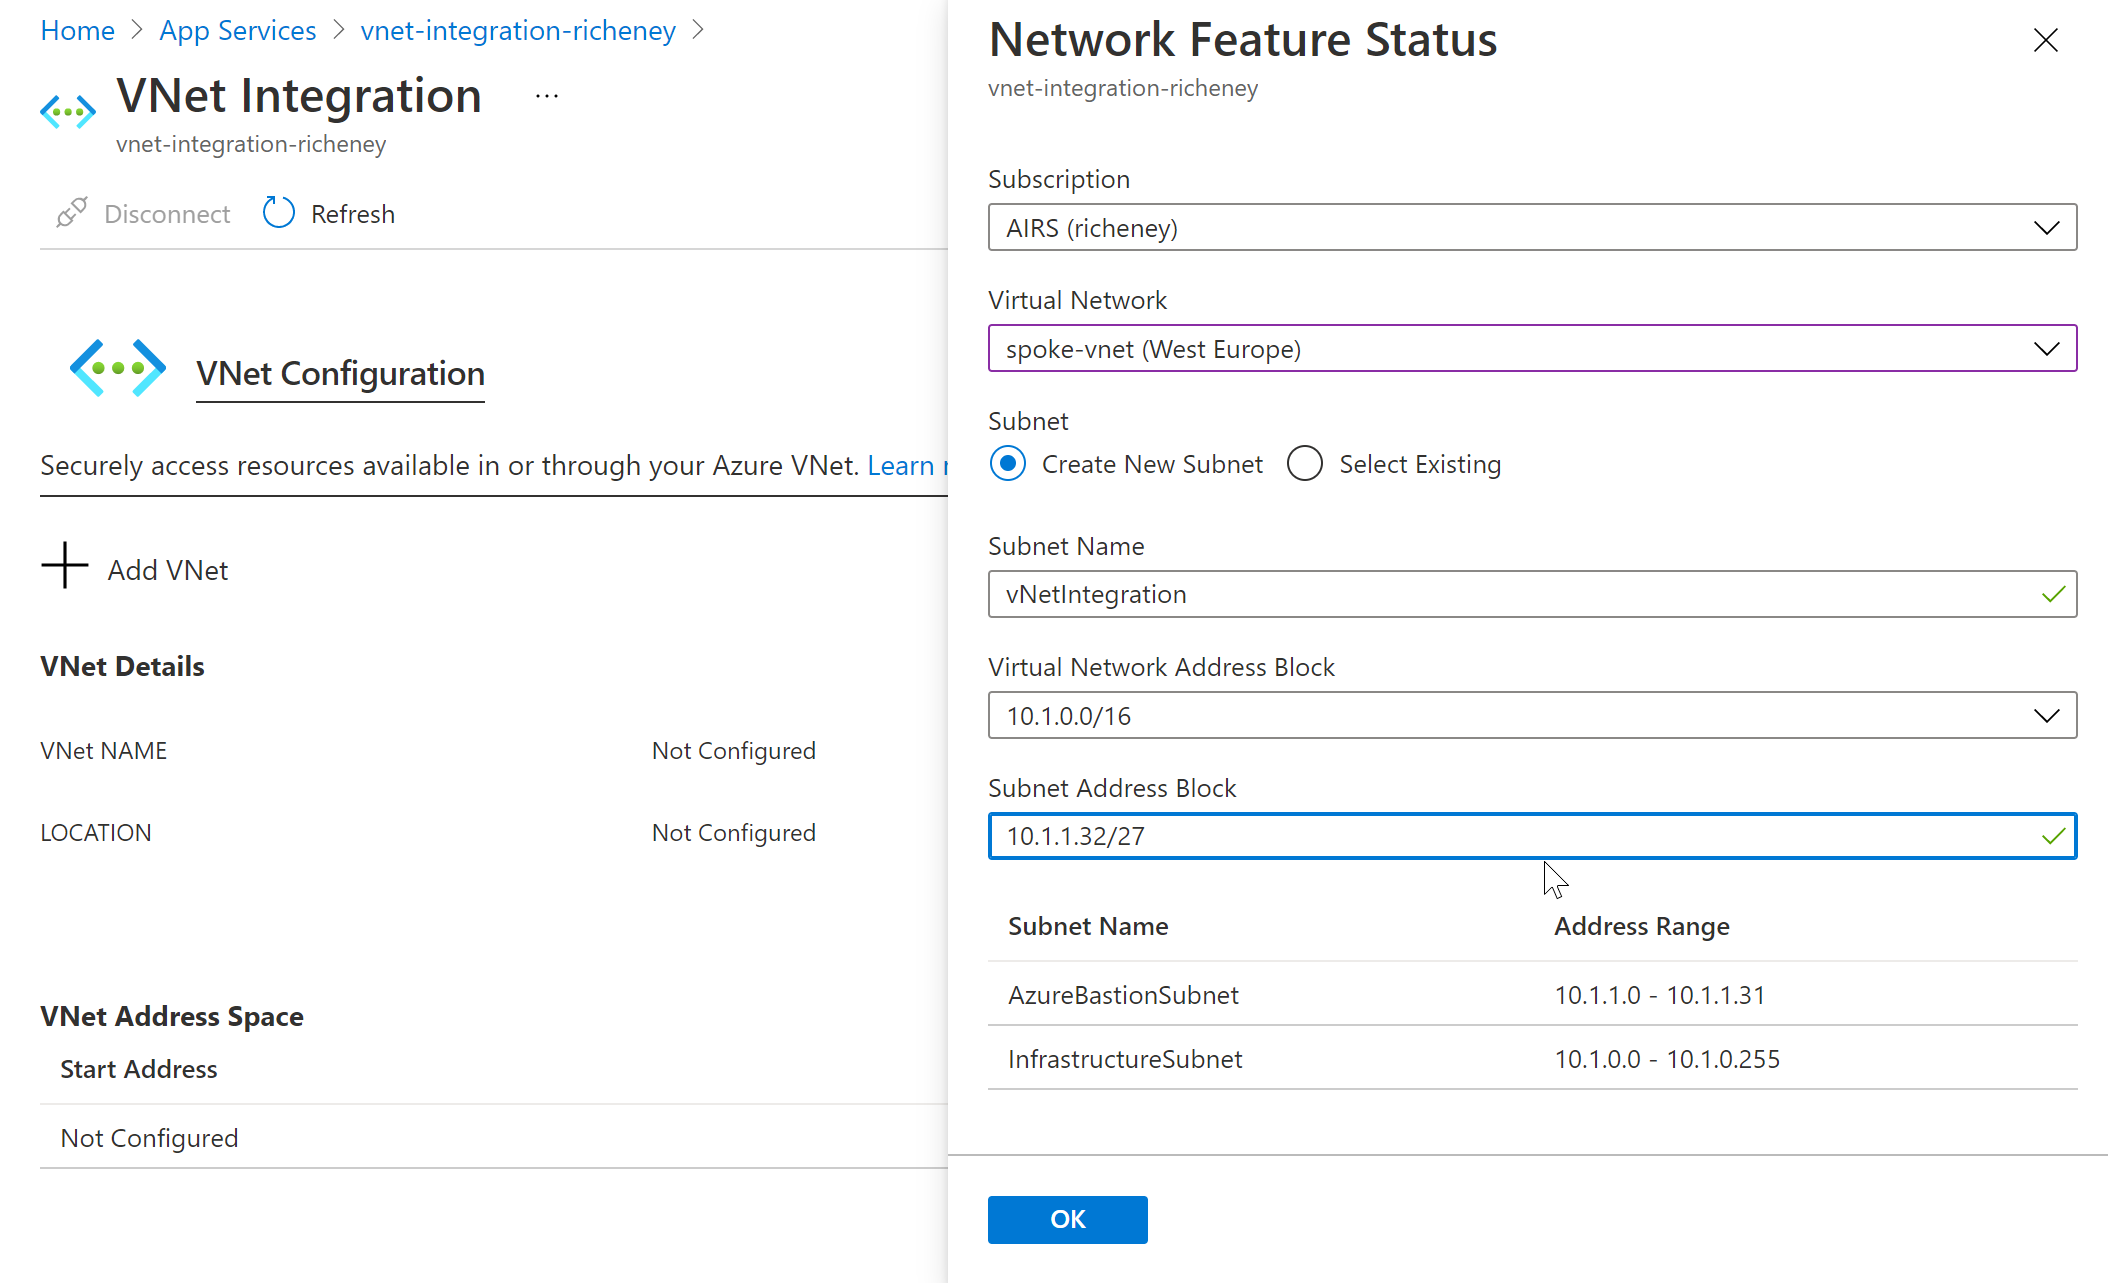
You have to select the virtual network’s address space before adding in the CIDR address for your new subnet.
Recheck the environment variables. (You may need to allow a moment for the site to recycle, and then refresh the Inspector Gadget homepage.)
You should now have a WEBSITE_PRIVATE_IP env var with a value at the end of the subnet’s usable addresses, e.g. 10.1.1.62.
Outgoing traffic to the RFC1918 address space will now go via the new subnet. (The RFC1918 address spaces include 10.0.0.0/8, 172.16.0.0/12 and 192.168.0.0/16.)
The web app’s DNS will be set to match the vNet’s DNS by default. If you are just talking to VMs or other private IPs in your vNet then you are fine.
Retest the SQL and DNS gadgets. Has anything changed?
Environment variables
As always with Private Link, you need to ensure that DNS is resolving the FQDN for your PaaS service to the private IP of the private endpoint.
Time to introduce a couple of important variables to get this to work for the SQL private endpoint. We’ll add them in one by one and see the impact.
Route all traffic
Run the HTTP gadget. It should still return one of the web app’s outbound IP addresses. The ipinfo.io website is on a public IP so this is as expected.
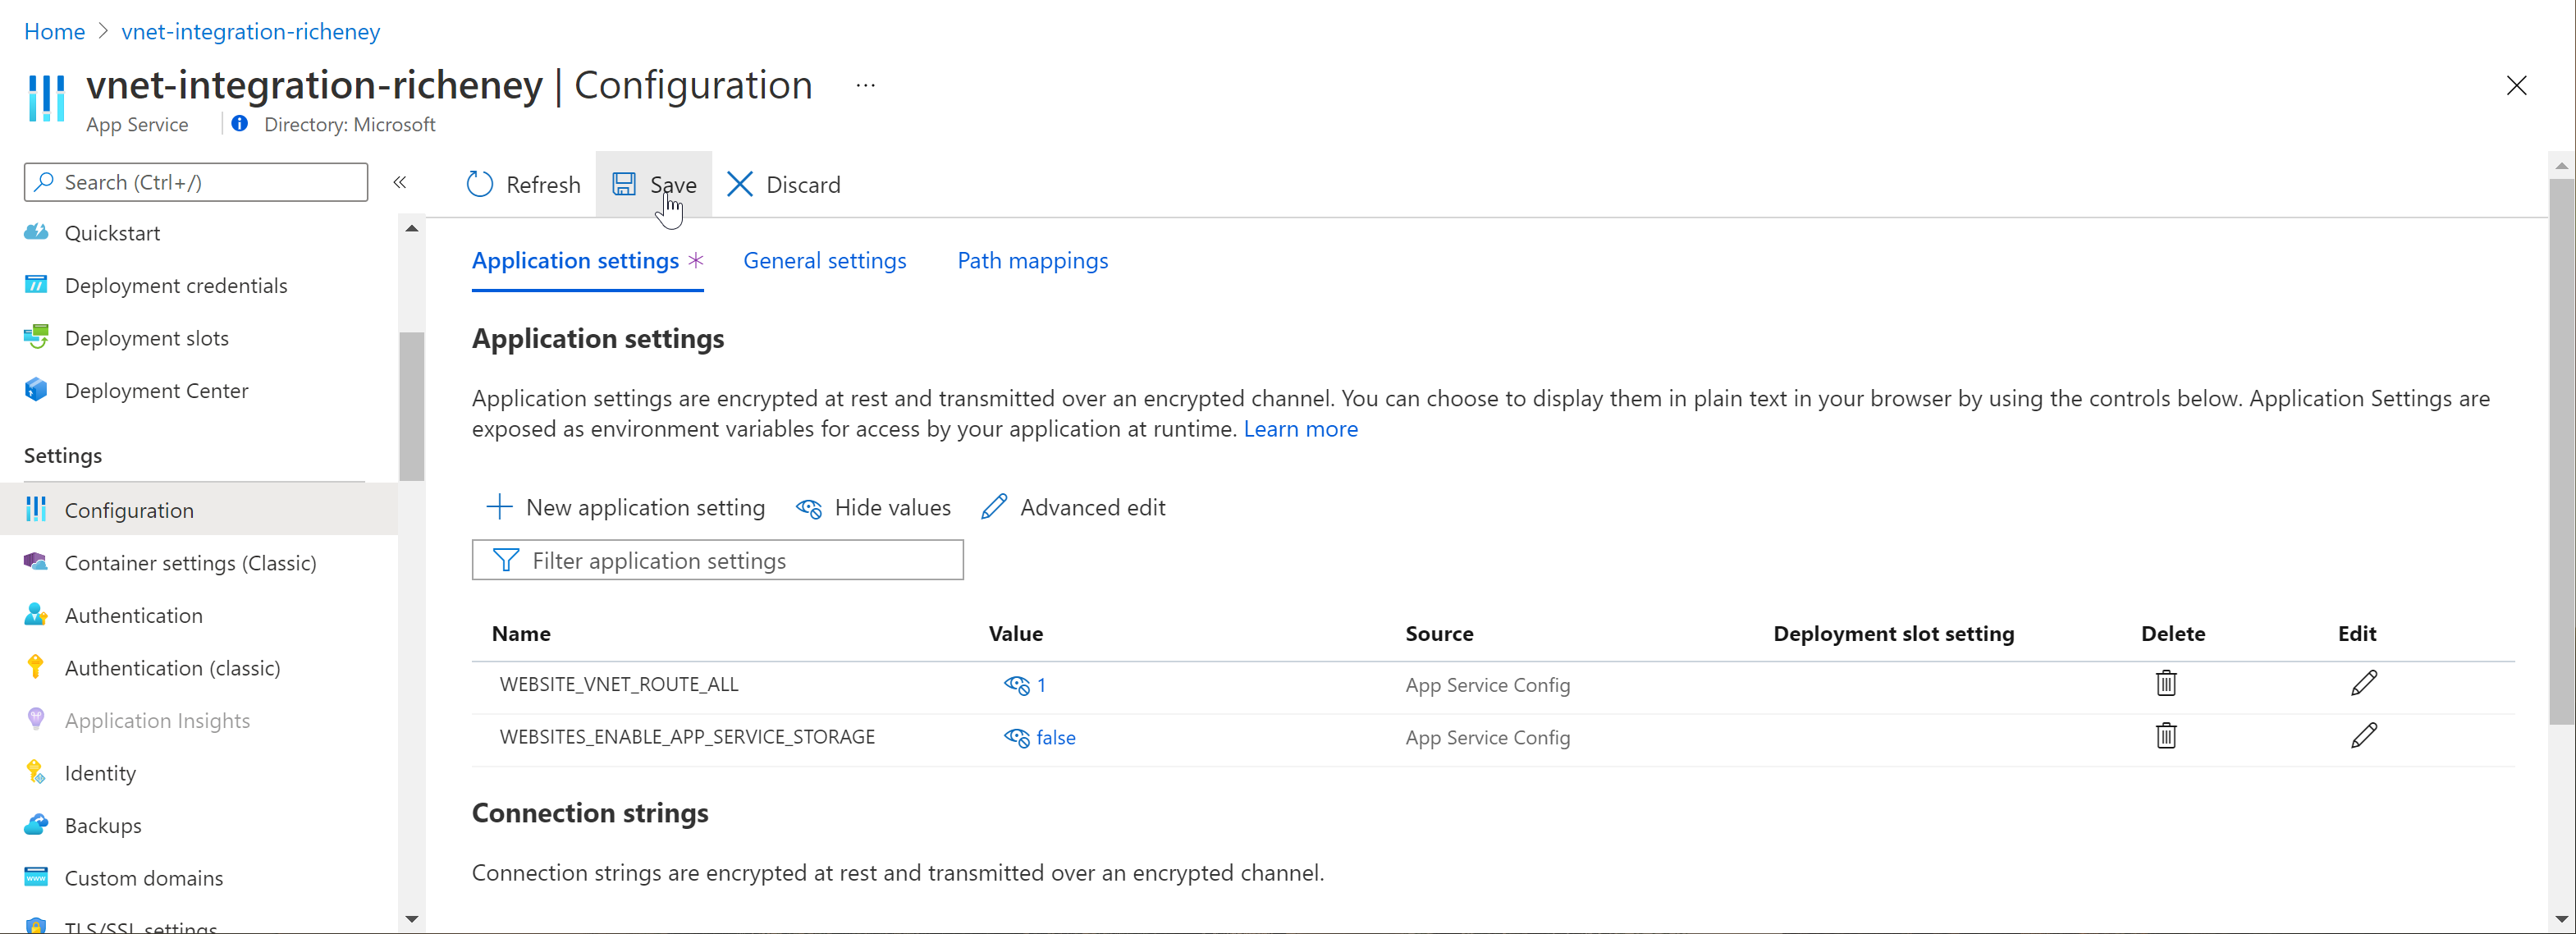
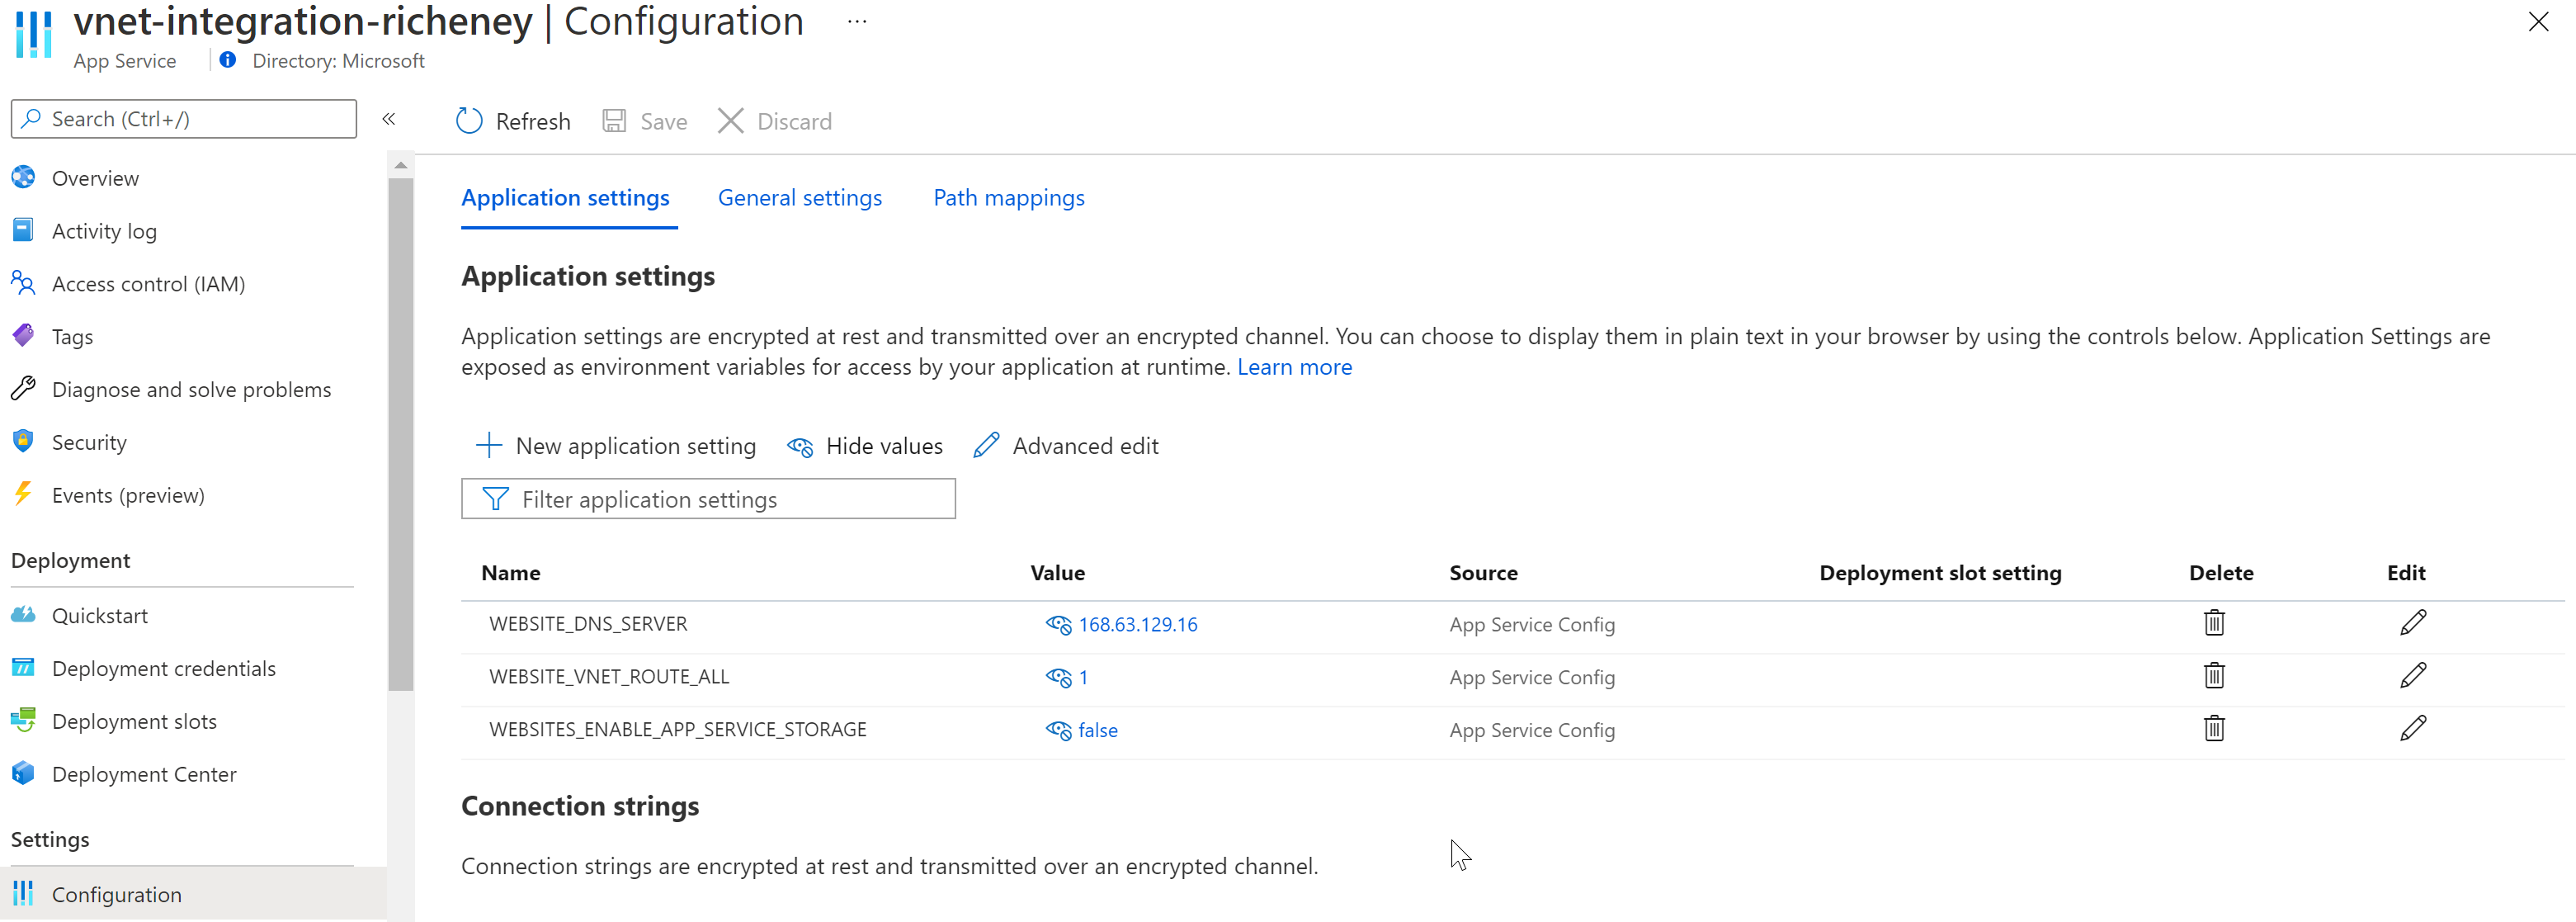
Add the WEBSITE_VNET_ROUTE_ALL env var:
az webapp config appsettings set --name vnet-integration-richeney --settings WEBSITE_VNET_ROUTE_ALL=1
Portal: Web App Settings
The environment variables are added into the Application Settings in the Configuration blade in the Settings group.
Add WEBSITE_VNET_ROUTE_ALL=1.
All egress traffic from the web app is now going through the virtual network and is subject to the routing and controls that we can use. To demonstrate this we’ll temporarily add a NAT gateway to the subnet. All outbound traffic from the subnet will go through the NAT gateway’s public IP. You do not need a NAT Gateway for vNet integration, but it is a great way to prove where the traffic is emanating from.
az network public-ip create --name nat-pip --sku Standard --zone 1 2 3 --allocation-method static
az network nat gateway create --name nat --public-ip-addresses nat-pip
natId=$(az network nat gateway show --name nat --query id --output tsv)
az network vnet subnet update --name vNetIntegration --nat-gateway $natId \
    --resource-group privatelink-dns-microhack-rg --vnet-name spoke-vnet
Portal: NAT Gateway
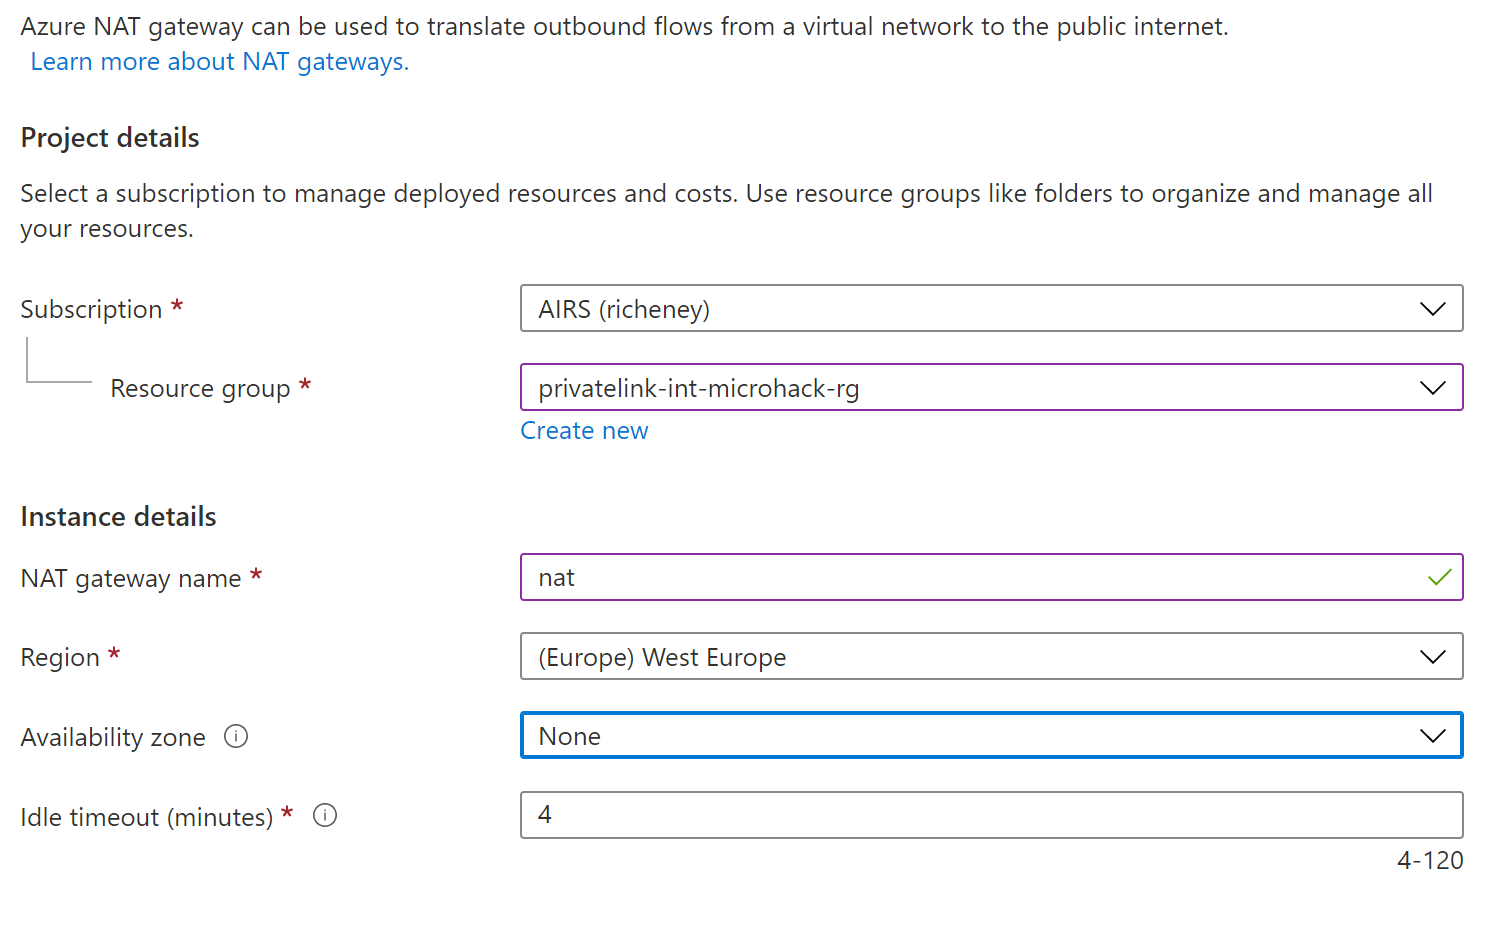
Search the portal for NAT Gateway and create a new one.
NAT Gateway Basics
NAT Gateway Outbound IP
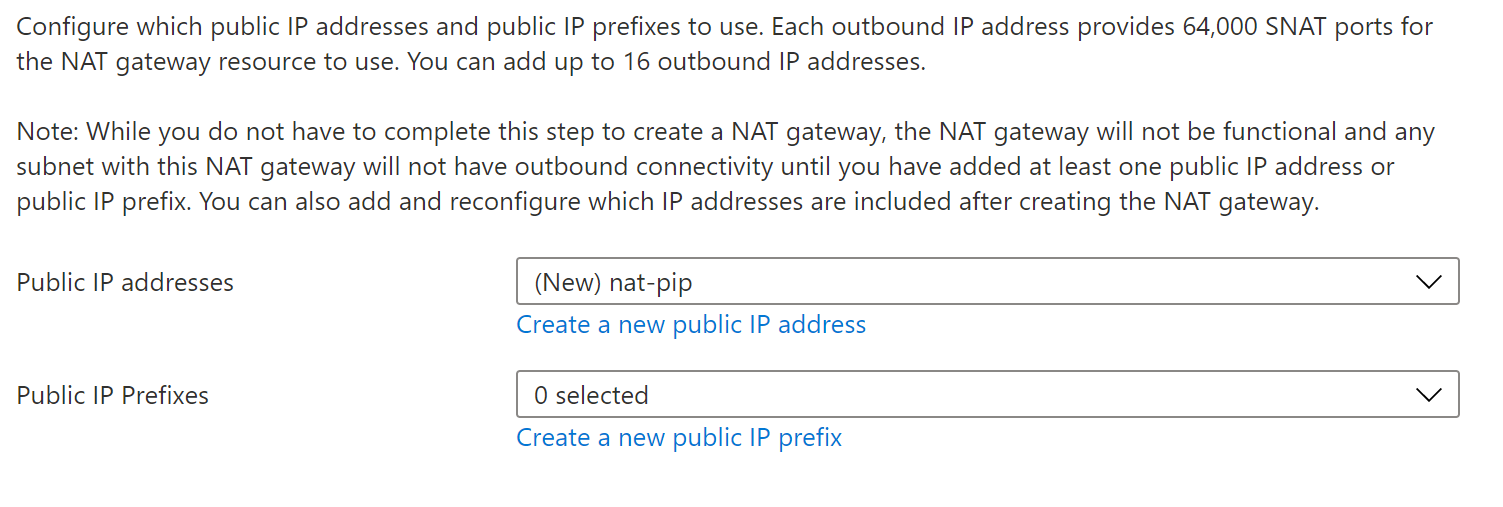
NAT Gateway Subnet
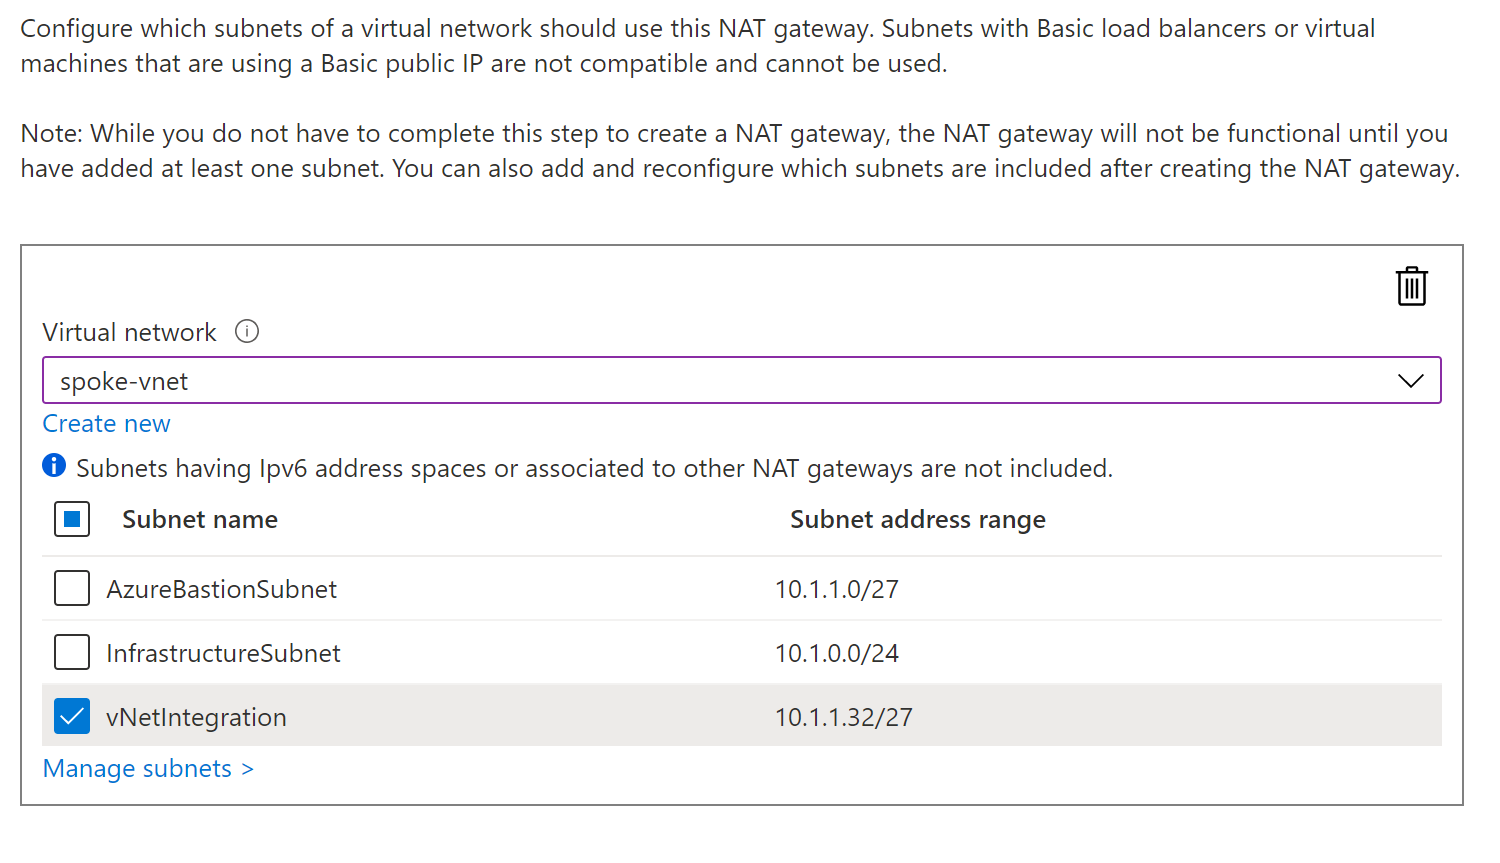
NAT gateway’s are useful if you ever need to have control over the outgoing IP address, notably for customer allowed lists.
Restart the web app, reload the Insepctor Gadget homepage and check the HTTP gadget.
You should now see a different address, matching the public IP on the NAT gateway, proving that non-RFC1918 traffic is no going through the vNet.
az network public-ip show --name nat-pip --query ipAddress
If you want to remove the NAT Gateway then run the following:
az network vnet subnet update --name vNetIntegration --nat-gateway "" \
    --resource-group privatelink-dns-microhack-rg --vnet-name spoke-vnet
az network nat gateway delete --name nat
az network public-ip delete --name nat-pip
Use DNS private zones
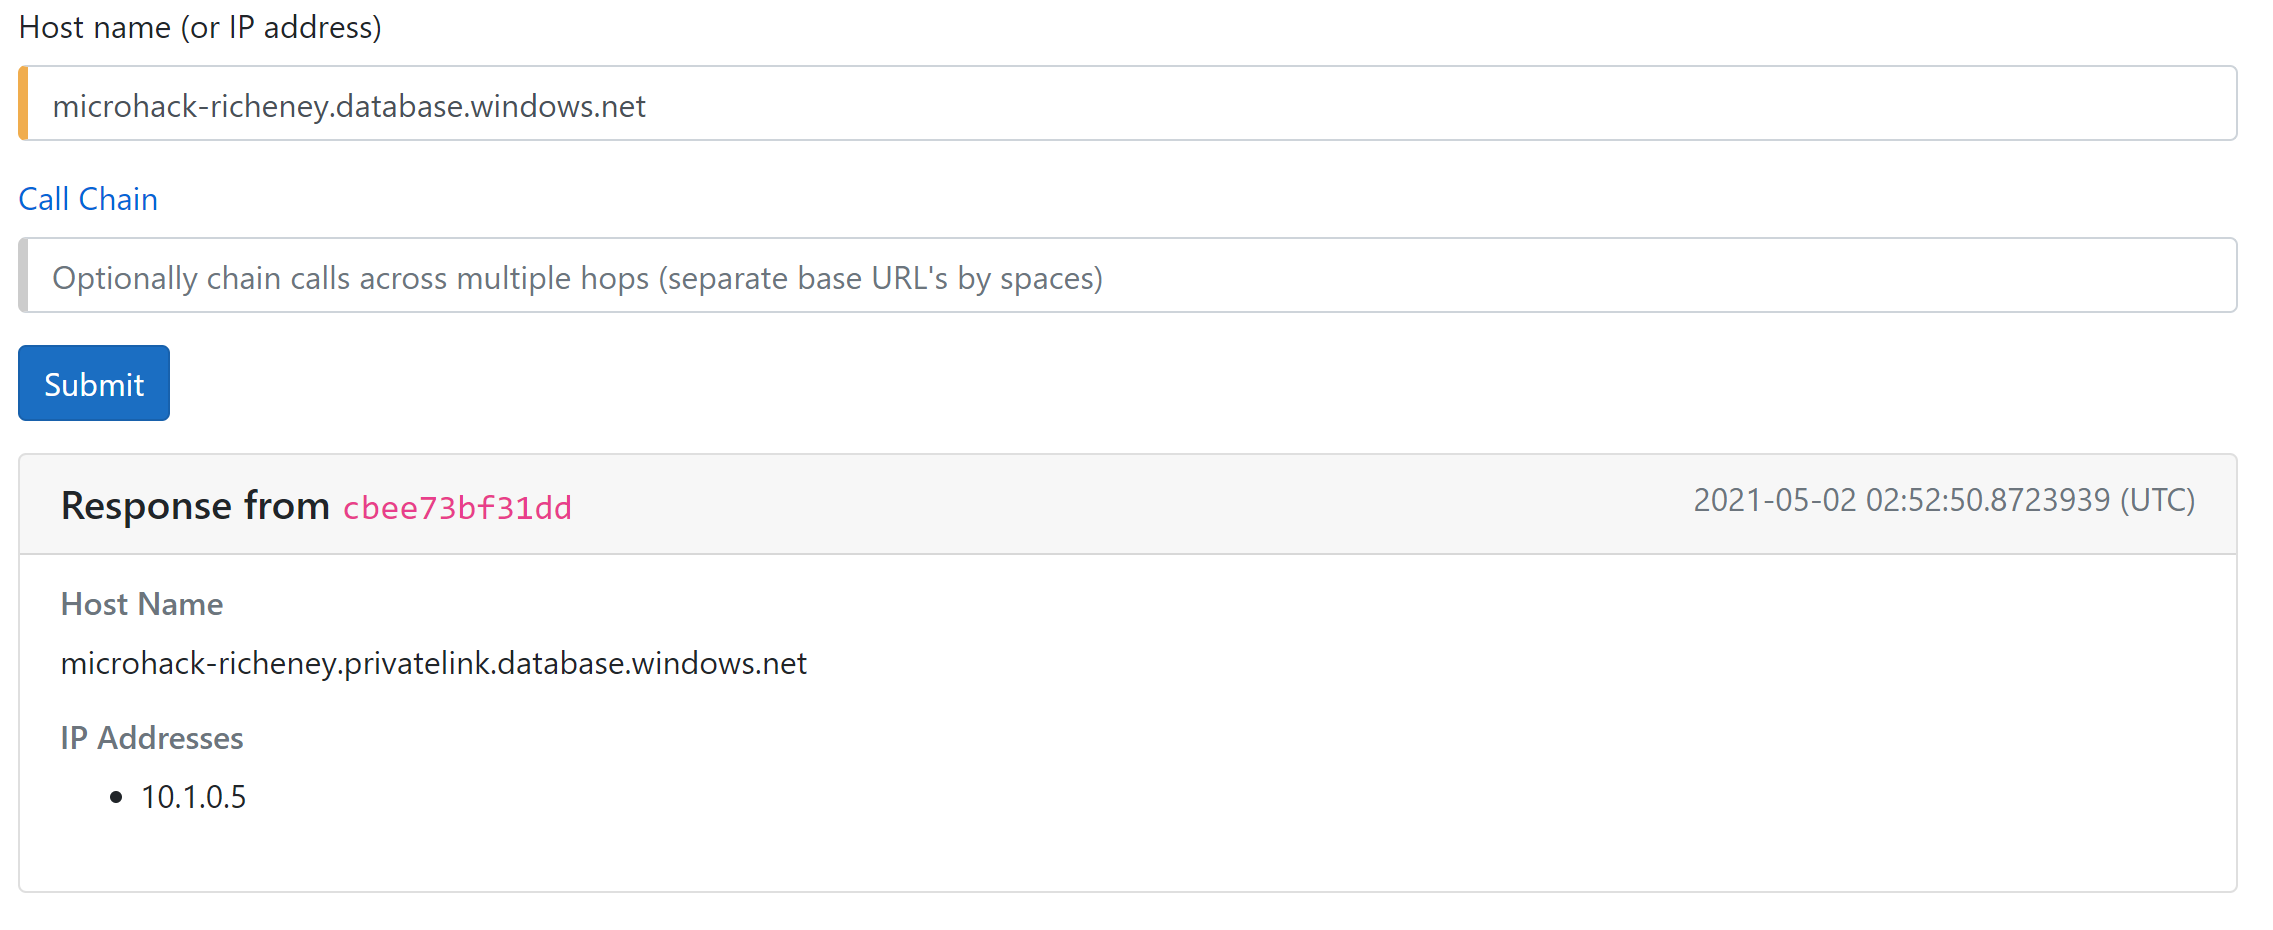
Run the DNS gadget for the SQL server FQDN, i.e. microhack-richeney.database.windows.net.
The DNS gadget will resolve to the public endpoint IP address.
Add WEBSITE_DNS_SERVER=168.63.129.16 environment variables to force DNS to use DNS Private Zones:
az webapp config appsettings set --name vnet-integration-richeney --settings WEBSITE_DNS_SERVER=168.63.129.16
Note that the 168.63.129.16 IP address is not part of the RFC1918 address space, which is why you also need the WEBSITE_VNET_ROUTE_ALL=1 environment variable.
Portal: Web App Settings
Add WEBSITE_DNS_SERVER=168.63.129.16 into the Application Settings.
Retest the DNS gadget. It will now return the private IP address of the private endpoint instead.
OK, we should be able to use that SQL private endpoint now.
Final SQL test
Retest that SQL private endpoint connection using your connection string.
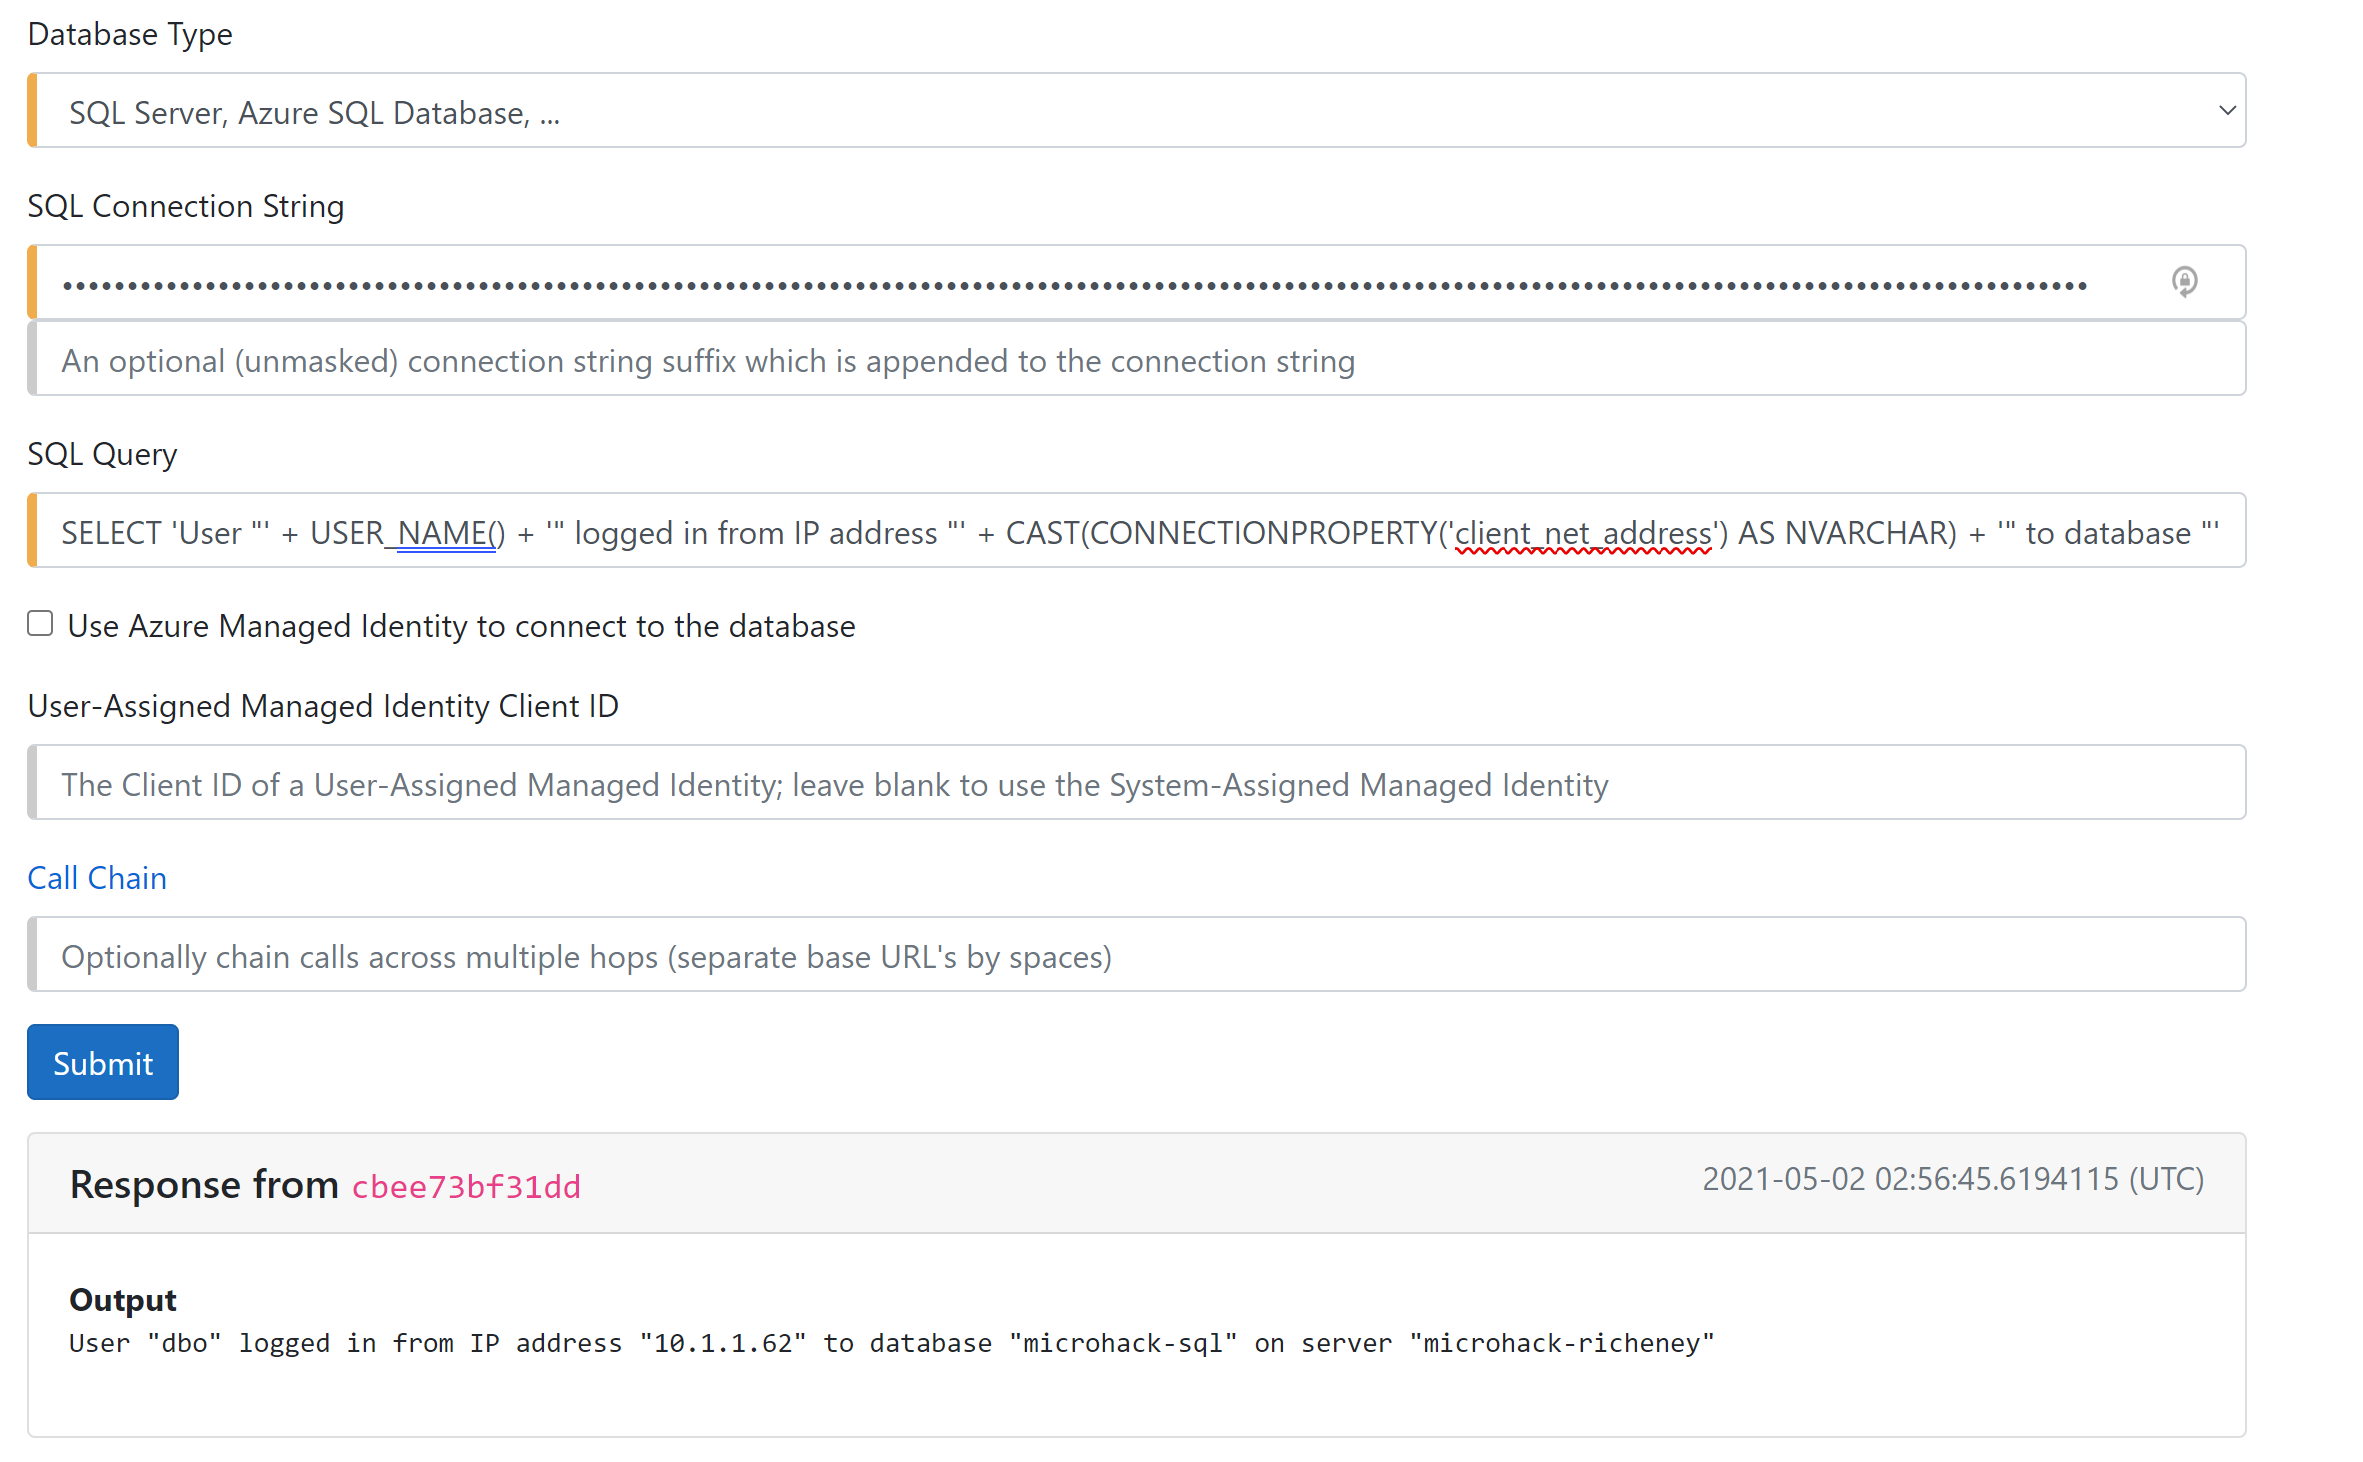
Success!
Recap
OK, that was the long way round but it is useful to really understand what each part of the config does and how this hands together.
Let’s recap:
- All you need for web apps to talk to your VMs etc. is vNet Integration
- Traffic to private IP addresses will go into the dedicated subnet
- If you want all traffic to go through the virtual network then set WEBSITE_VNET_ROUTE_ALL=1
- If you have private endpoints then you need to integrate with DNS Private Zones
- Set WEBSITE_DNS_SERVER=168.63.129.16
- This requires WEBSITE_VNET_ROUTE_ALL=1
| Variable | Value | Notes |
|---|---|---|
| WEBSITE_VNET_ROUTE_ALL | 1 | Routes all through the vNet, not just RFC1918 |
| WEBSITE_DNS_SERVER | 168.63.129.16 | Integrate with Azure DNS private zones |
Cleaning up
You may delete the resource group to remove all resources for this page.
az group delete --yes --no-wait --name privatelink-int-microhack-rg
You may also unset the two environment variables for this session.
unset AZURE_DEFAULTS_GROUP AZURE_DEFAULTS_LOCATION
References
- https://github.com/jelledruyts/InspectorGadget
- https://docs.microsoft.com/azure/app-service/web-sites-integrate-with-vnet
- https://docs.microsoft.com/azure/app-service/overview-inbound-outbound-ips
- https://docs.microsoft.com/azure/app-service/configure-common
- https://docs.microsoft.com/azure/virtual-network/nat-overview
- https://docs.microsoft.com/azure/virtual-network/what-is-ip-address-168-63-129-16
- https://en.wikipedia.org/wiki/Private_network#Private_IPv4_addresses
Help us improve
Azure Citadel is a community site built on GitHub, please contribute and send a pull request
Make a change