Transitive Behaviour
Understand the implications of transitive peering.
Lab Overview
Now that we have successfully setup a virtual network peering, let’s see how transitive peering works.
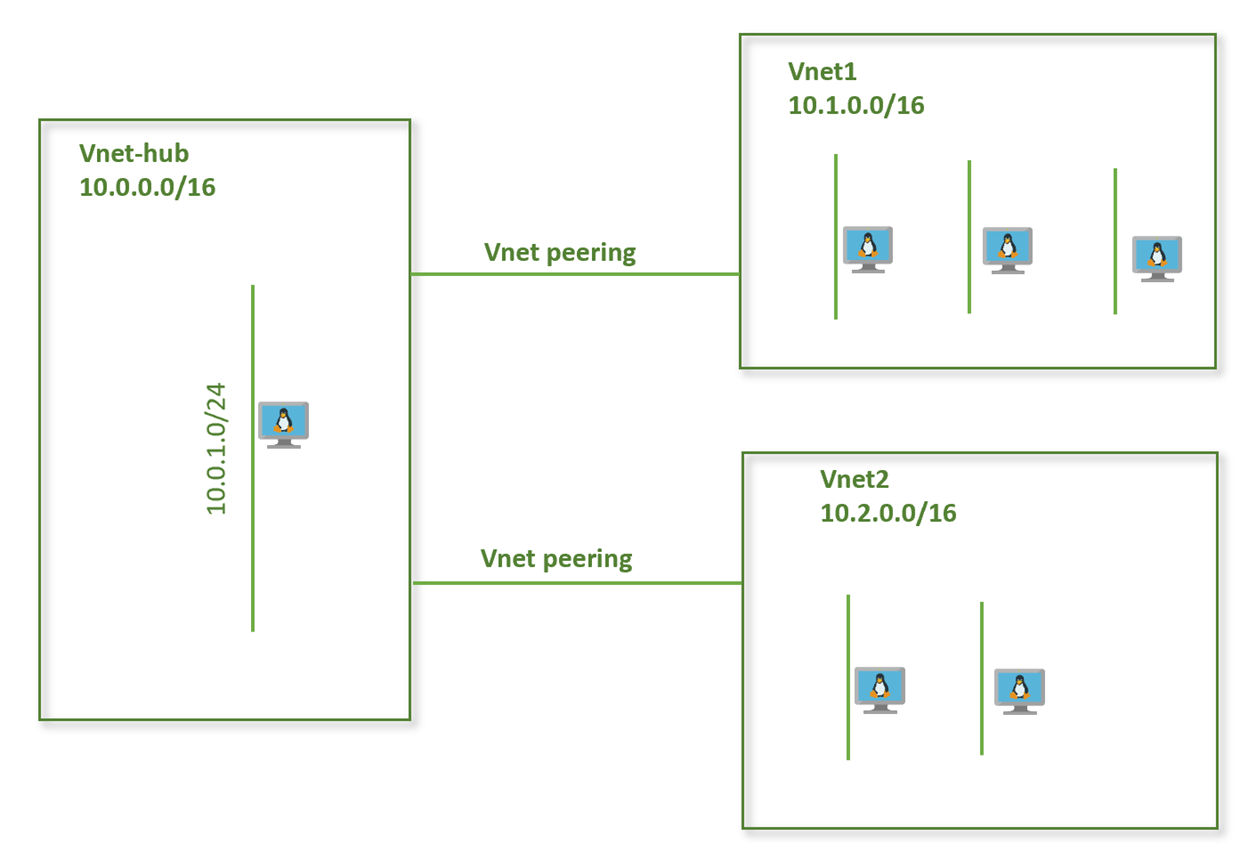
Lab Diagram
Create a vNet
We will use CLI to create a virtual network vnet2, add a subnet vnet2-subnet1 and add a virtual machine vnet2-vm1 in the subnet.
-
Define variables
ResourceGroup=rg-lab VnetName=vnet2 VnetPrefix=10.2.0.0/16 SubnetName=vnet2-subnet1 SubnetPrefix=10.2.1.0/24 Location=westus2 -
Create a virtual network vnet2, with one subnet vnet2-subnet1
az network vnet create -g $ResourceGroup -n $VnetName --address-prefix $VnetPrefix --subnet-name $SubnetName --subnet-prefix $SubnetPrefix -l $Location
Attach the NSG
-
Add another variable
Nsg=nsg1 -
Attach the NSG to vnet2-subnet1
az network vnet subnet update -g $ResourceGroup -n $SubnetName --vnet-name $VnetName --network-security-group $Nsg
Create a VM
-
Additional variables
VmName=vnet2-vm1
SubnetName=vnet2-subnet1
AdminUser=azureuser
AdminPassword=Azure123456!
Note: The above parameters provide a username and password for simplicity. Please create a user with a strong password known only to you!
-
Create a virtual machine
az vm create --resource-group $ResourceGroup --name $VmName --image UbuntuLTS --vnet-name $VnetName --subnet $SubnetName --admin-username $AdminUser --admin-password $AdminPassword
Peer virtual networks
Next, let’s peer virtual networks vnet-hub and vnet2.
-
In the Search box at the top of the Azure portal, begin typing vnet2. When vnet2 appears in the search results, select it.
-
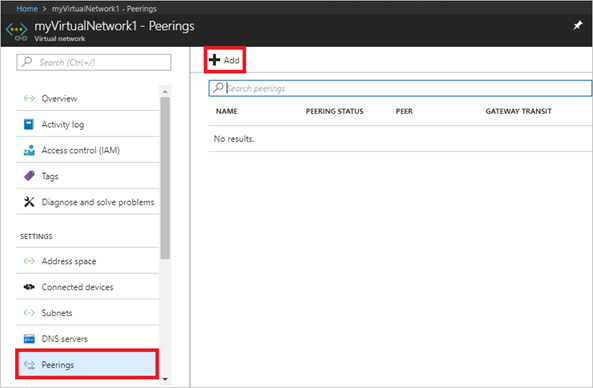
Go to Settings Peerings, and then select + Add, as shown in the following picture:
-
Enter, or select, the following information, accept the defaults for the remaining settings, and then select OK.
Setting Value Name of the peering from vnet1 to remote vNet peer-vnet2-to-vnet-hub Subscription Select your subscription Virtual network vnet-hub Name of the peering from vnet-hub to vnet1 peer-vnet-hub-to-vnet2 Allow forwarded traffic from vnet1 to vnet-hub Enabled Allow forwarded traffic from vnet-hub to vnet1 Enabled Verify the peering status. This should show as Connected.
-
Verify the routes in vnet2.
Go to the virtual machine vnet2-vm1 page and go to Settings → Networking tab.
Click on the network interface name and go to Support + troubleshooting → Effective Routes. You should be able to see a route to the vnet-hub network 10.0.0.0/16 with Next Hop Type as VNet Peering.
Verify reachability between the peered vnets:
Let’s try to reach virtual machines across the two peers.
-
From the Azure portal, go to the Virtual machines page
-
Note the Public IP of VM vnet2-vm1
-
Note the private IP of VM vnet-hub-vm1
-
Connect to virtual machine vnet2-vm1 using its public IP
ssh <username>@<Public_IP_of_VM> -
Ping private IP of virtual machine vnet-hub-vm1
-
Verify pings are successful
Transitive Peering
So far, we have a hub and spoke topology where we have vnet-hub connected to vnet1 and vnet-hub also connected to vnet2. Note that vnet1 and vnet2 are not directly peered. Let’s check connectivity between virtual networks vnet1 and vnet2.
-
From the Azure portal, go to the Virtual machines page
-
Note the Public IP of VM vnet2-vm1
-
Note the private IP of VM vnet1-vm-mgmt1
-
Connect to virtual machine vnet2-vm1 using its public IP
ssh <username>@<Public_IP_of_VM> -
Ping private IP of virtual machine vnet1-vm-mgmt1
- Were you able to ping successfully?
Conclusion
The connectivity between vnet1 and vnet2 does not work because transitive peering is not allowed.
Help us improve
Azure Citadel is a community site built on GitHub, please contribute and send a pull request
Make a change