Routing Tables
Understand how Azure routes traffic in a virtual network and how user defined routes can be used to change the default behaviour.
Lab Overview
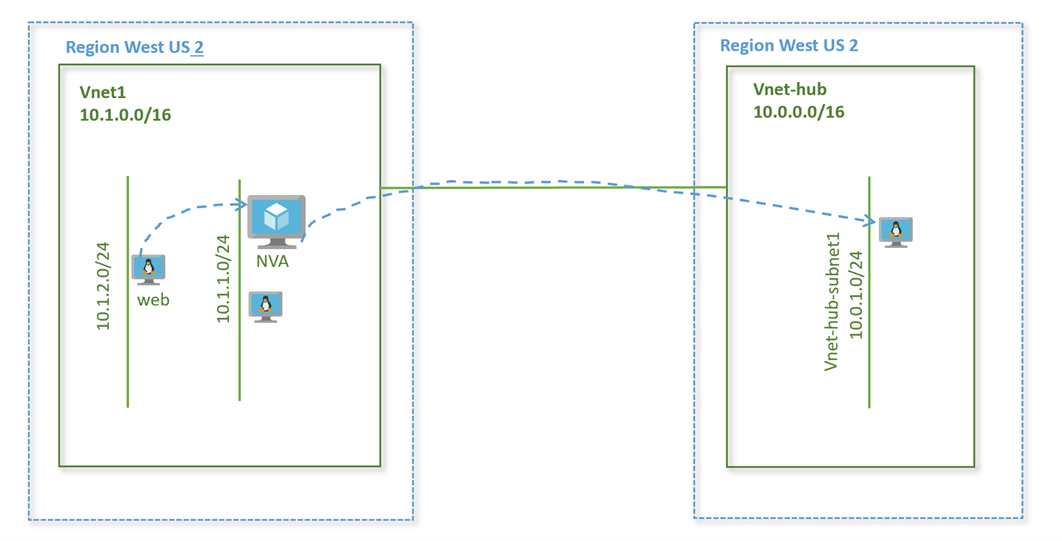
Let’s look at how routing and custom routes work in a virtual network. We spun up a CSR in the previous lab. We will check how user defined routes work through a network virtual appliance with CSR as an example NVA.
Lab Diagram

Create a route table
-
On the upper-left side of the screen, select Create a resource > Networking > Route table.
-
In Create route table, enter or select this information:
Setting Value Name rt-nva Subscription Select your subscription Resource group Create new, enter rg-lab, and select OK Location Leave the default West US 2 -
Select Create.
The new route table should show up in the list.
Create a route
-
Click on the route table ‘rt-nva’ that you just created.
-
Under Settings, select Routes > + Add.
-
In Add route, enter or select this information
Setting Value Route name route-to-nva Address prefix 10.0.1.0/24 Next hop type Virtual appliance Next hop address 10.1.1.5 (or IP of the NVA CSR) -
Select OK.
Associate a route table to a subnet
Click on the route table ‘rt-nva’ that you just created.
-
From the route table rt-nva page, under Settings, select Subnets
-
Click Associate, enter or select this information:
Setting Value Virtual network vnet1 Subnet vnet1-subnet2 -
Select OK
Enable IP Forwarding on the NVA
Enable IP Forwarding on the NVA VM’s network interface.
- Go to the virtual machines page and click on VM csr1
- Select Networking from the VM blade on the left and click on the network interface for the VM
- Click on IP Configuration tab in the left blade under Settings
- Verify IP forwarding is enabled
Test the routing
Test routing from the vnet2-vm-web1 VM to the 10.0.1.0/24 subnet.
-
SSH into the virtual machine vnet1-vm-web1
- Ping the CSR1000v VM csr1
- Verify pings are successful
-
Now ping the destination vm vnet-hub-vm1 using its private IP address 10.0.1.4
- Pings should be successful
-
Run
tracerouteto the vnet-hub-vm1 virtual machineazuser@vnet1-vm-web1:~$ traceroute 10.0.1.4 traceroute to 10.0.1.4 (10.0.1.4), 30 hops max, 60 byte packets 1 10.1.1.6 (10.1.1.6) 1.913 ms 1.900 ms 1.873 ms 2 * 10.0.1.4 (10.0.1.4) 3.760 ms *The next hop for the destination shows as the IP address of the CSR1000v virtual machine. This is our user defined routes in action.
Help us improve
Azure Citadel is a community site built on GitHub, please contribute and send a pull request
Make a change