Set up a Remote State
Configure a storage account for use as a remote state in Terraform.
Introduction
When you run terraform in a pipeline then you will need to configure a backend for the remote state. In this lab you’ll create a storage account with suitable settings, and then give yourself access to write blobs to it.
You will configure the storage account in either
- your single subscription (suitable for testing)
- a separate subscription (e.g. a Management subscription in a platform landing zone) (see aka.ms/alz)
The storage configuration includes
-
Enforced role based access control (RBAC)
RBAC ensures that only authorized users and applications can access the storage account, enhancing security compared to using account keys or SAS keys, as per the security recommendations. Only privileged roles can create RBAC role assignments, whereas Contributor roles can use storage account keys.
-
Blob versioning
Blob versioning helps protect your data by enabling you to recover previous versions of objects in case of accidental deletion or modification. In a Terraform context it also provides a secondary audit trail of changes.
-
Soft delete
Soft delete provides an additional layer of protection by retaining deleted blobs for a specified period, allowing recovery if needed.
The normal convention for the container is to name it tfstate. We will create two, test and prod, to be used in the user context and via the CI/CD pipelines respectively.
Create the storage account
-
Define a few variables
-
Set the resource group name and region
rg="rg-terraform"
loc="uksouth"
Feel free to set these to your own preferred values.
-
Set subscription ID
Set to the current subscription if you are using only a single subscription
subscriptionId=$(az account show --query id -otsv)or set to an alternate subscription in line with the recommendations
subscriptionId<managementSubscriptionId>
-
-
Create the resource group
az group create --name $rg --location $loc -
Define the storage account name
The name needs to be globally unique, therefore the command generated a predictable string from a hash of the resource group ID.
storage_account_name="terraformfabric$(az group show --name $rg --query id -otsv | sha1sum | cut -c1-8)" -
Create the storage account
az storage account create --name $storage_account_name --resource-group $rg --location $loc \ --min-tls-version TLS1_2 --sku Standard_LRS --https-only true --default-action "Allow" --public-network-access "Enabled" \ --allow-shared-key-access false --allow-blob-public-access false storage_account_id=$(az storage account show --name $storage_account_name --resource-group $rg --query id -otsv) -
Enable versioning and soft delete
az storage account blob-service-properties update --account-name $storage_account_name --enable-versioning --enable-delete-retention --delete-retention-days 7 -
Create the containers
The Terraform state file will be created in these containers.
az storage container create --name prod --account-name $storage_account_name --auth-mode login az storage container create --name test --account-name $storage_account_name --auth-mode login -
Add Storage Blob Data Contributor role assignment
Adding this role allows you to read, write and delete blob files in the new storage account. It is more common to assign this at the storage account level, but we’ll scope it to the container level so that the user and the service principal are not able to overwrite each other’s state file.
We’ll only create the role assignment for the user context against the test container right now. The service principal will come later.
az role assignment create --assignee $(az ad signed-in-user show --query id -otsv) --scope "$storage_account_id/blobServices/default/containers/test" --role "Storage Blob Data Contributor"
Validation
If you check the Overview for your storage account then you’ll see that most of the recommendations have been met.
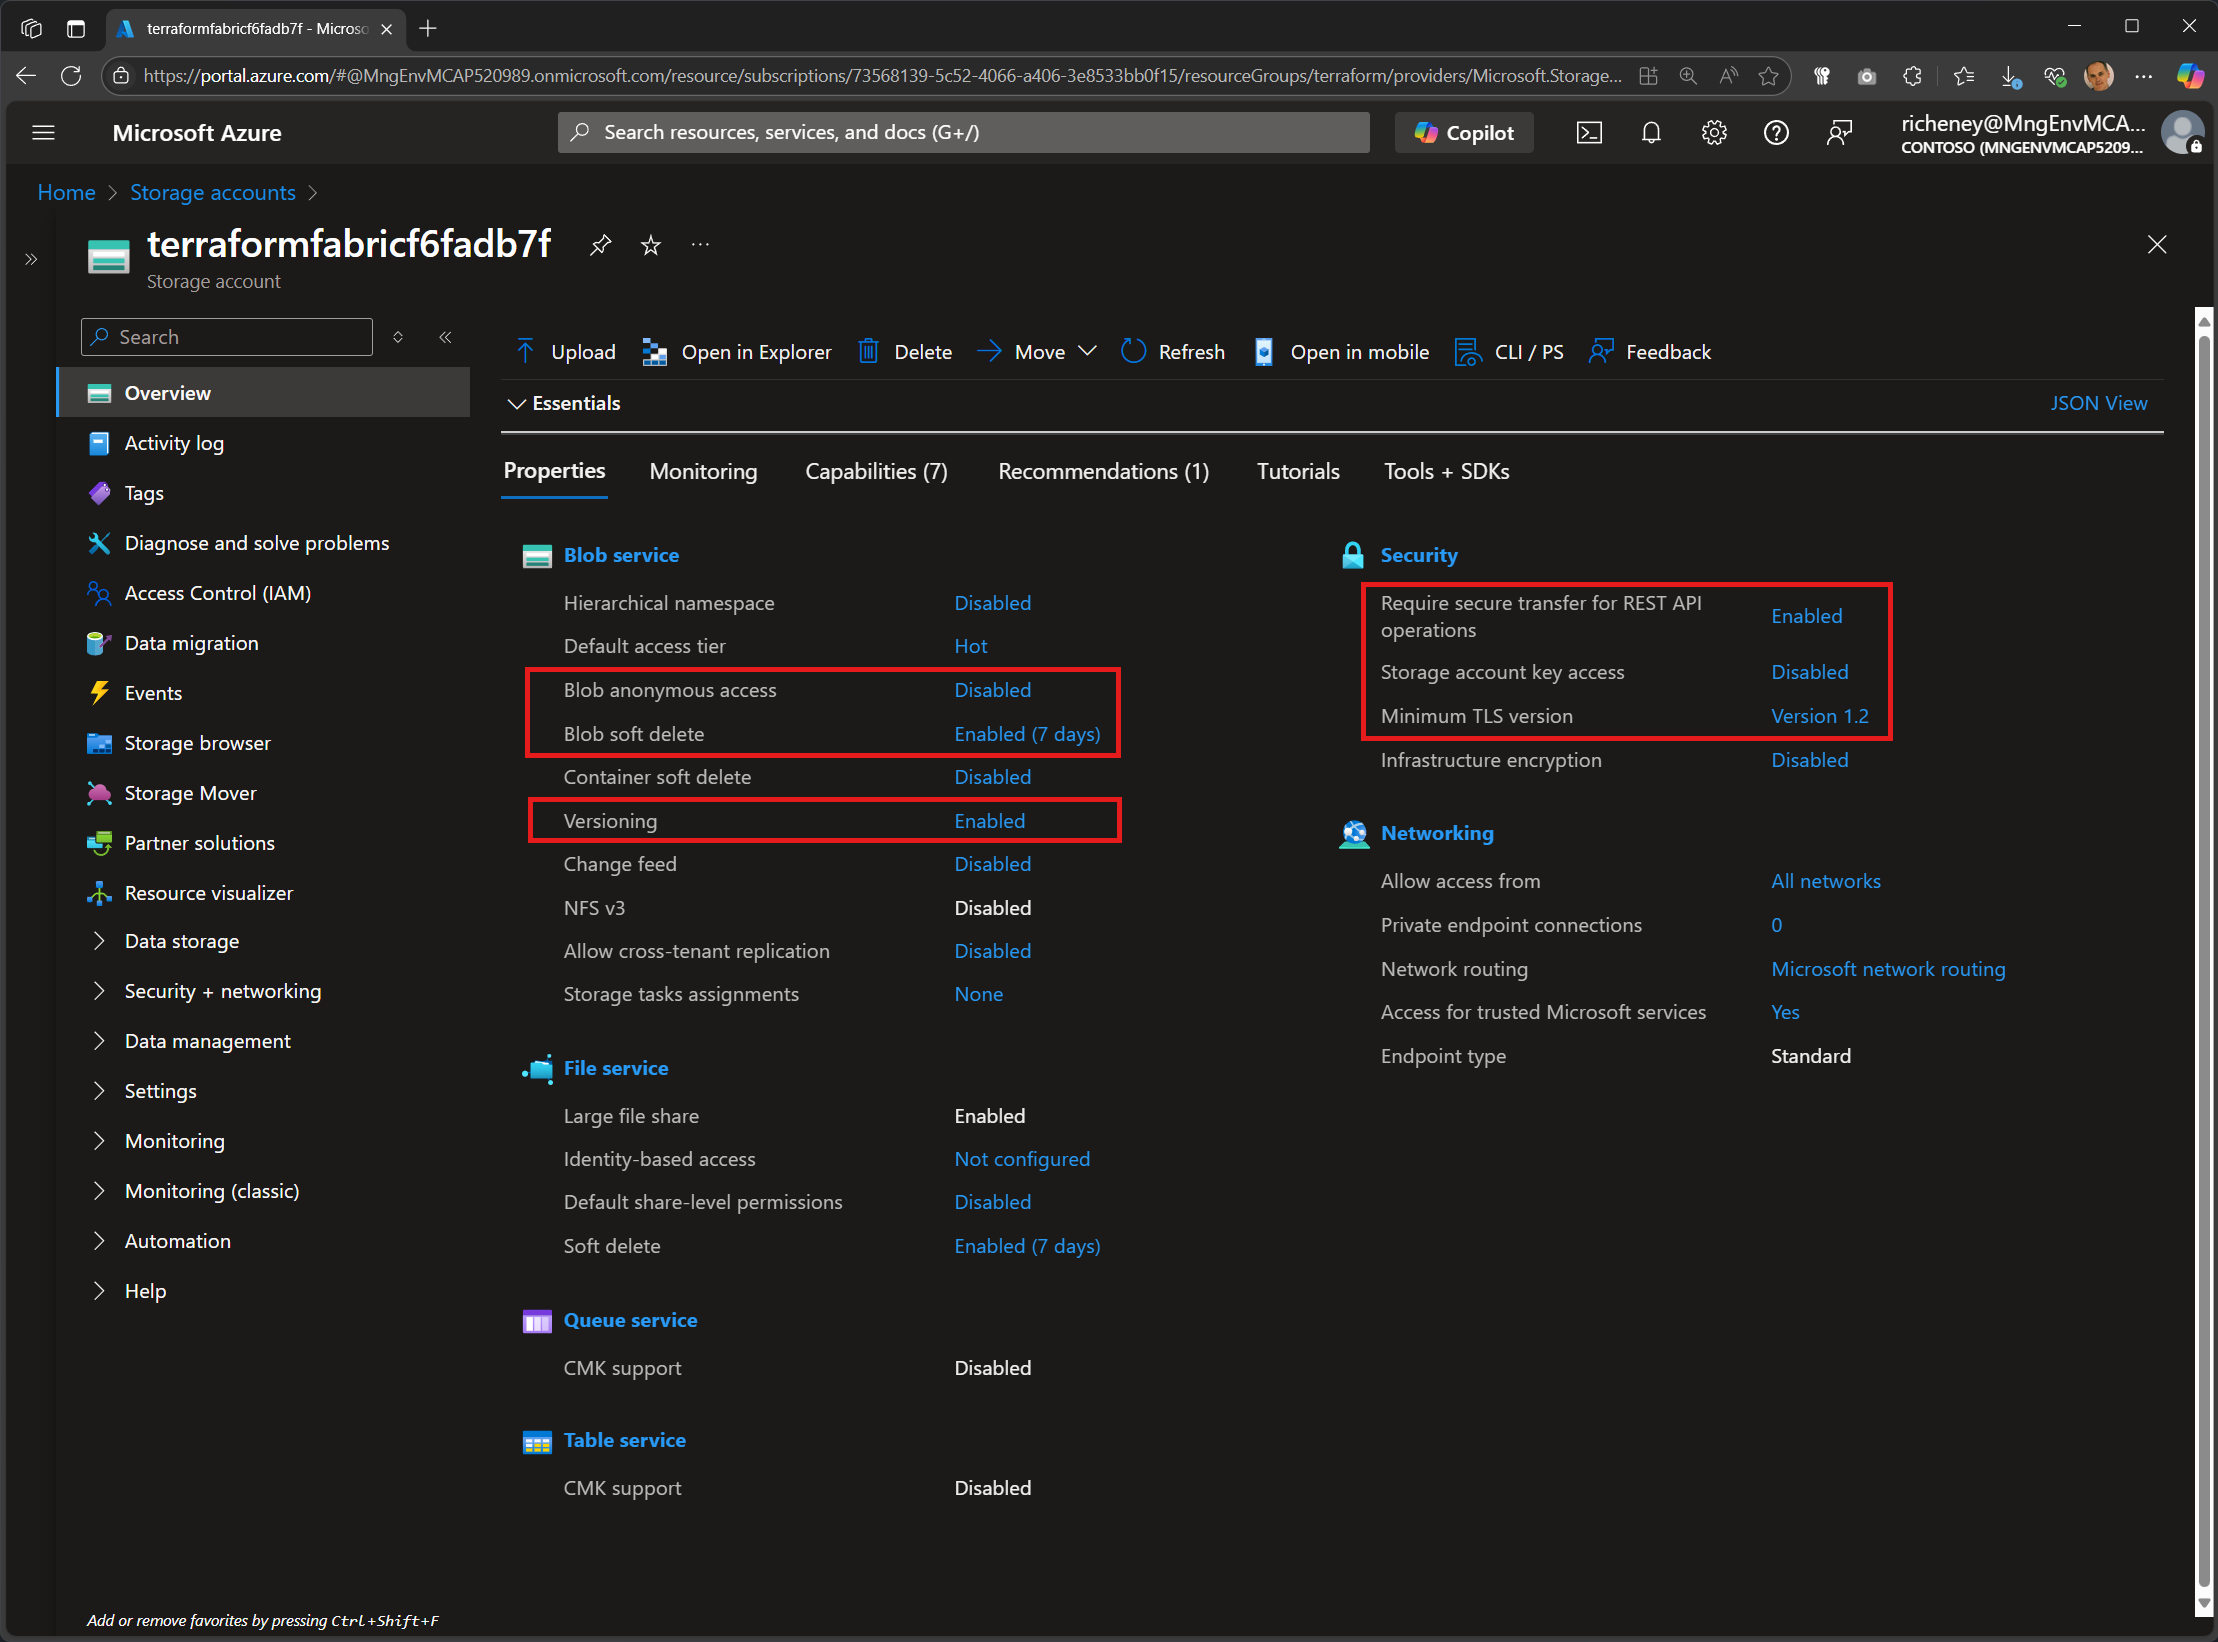
- Blob anonymous access disable
- Blob soft delete set to 7 days
- Blob versioning enabled
- HTTPS required
- Storage account key access disables
- TLS v1.2
Full set of commands
The commands above have been consolidated into the single code black below for ease of use.
rg="rg-terraform"
loc="uksouth"

subscriptionId=$(az account show --query id -otsv)
az group create --name $rg --location $loc
storage_account_name="terraformfabric$(az group show --name $rg --query id -otsv | sha1sum | cut -c1-8)"
az storage account create --name $storage_account_name --resource-group $rg --location $loc \
  --min-tls-version TLS1_2 --sku Standard_LRS --https-only true --default-action "Allow" --public-network-access "Enabled"  \
  --allow-shared-key-access false --allow-blob-public-access false
storage_account_id=$(az storage account show --name $storage_account_name --resource-group $rg --query id -otsv)
az storage account blob-service-properties update --account-name $storage_account_name --enable-versioning --enable-delete-retention --delete-retention-days 7
az storage container create --name prod --account-name $storage_account_name --auth-mode login
az storage container create --name test --account-name $storage_account_name --auth-mode login
az role assignment create --assignee $(az ad signed-in-user show --query id -otsv) \
  --scope "$storage_account_id/blobServices/default/containers/test" --role "Storage Blob Data Contributor"
Next
The storage account is ready for use as a remote state backend. Let’s get an example repo and then set up Terraform in the user context. We’ll build out a config before automating more fully with a service principal and GitHub Actions workflow.