GitHub Actions for Microsoft Fabric
Configure OpenID Connect and GitHub Actions variables and test your repo's CI/CD pipeline.
Introduction
Now that you have your repository set up and have made some changes, it’s time to commit those changes locally and push them to your remote repository on GitHub. We’ll also cover how to use the GitHub CLI to add repository variables, which are essential for configuring your CI/CD workflows.
On this page we will
- create a prod.tfvars
- use the git CLI to
- commit the changes locally
- push up into the origin
- use the gh (GitHub) CLI to
- authenticate and set repo context
- create GitHub action repository variables
- add a federated credential to the managed identity for the branch
- run the GitHub Actions pipeline using gh
We will focus on using the CLIs as they can be a quick way of staying in the flow. (You can run the GitHub Actions pipelines via the web pages should you prefer. There are plenty of example guides out there.)
Note that this page is a v1, for the simpler use case where you are the sole Fabric admin for a dev/test environment and you can get away with pushing directly to main.
I intend to create a v2 that includes the use of branch protection, pull requests, environments and reviews. This is the more robust approach as you can include environments in the subject for your federated credentials and ensure that production cannot be changed unless changes to the main branch are peer reviewed.
Create a prod.tfvars File
A prod.tfvars file allows you to separate production-specific variables from your main Terraform configuration. This is useful for managing different environments and keeping sensitive or environment-specific values out of your main codebase.
-
Create a variable file for production
Create a file named
prod.tfvarsin your repository and add your production variable values. For example:fabric_capacity_id = "<your-prod-capacity-id>" fabric_capacity_region = "UK South" resource_group_name = "terraform" storage_account_name = "<your-prod-storage-account>"As mentioned earlier, Terraform allows you to plan or apply whilst specifying a variable file as a switched argument (e.g.
-var-file=prod.tfvars) and this is exactly what the workflow will do. We will use a GitHub Actions variable for the name of the variable file and add it into the command line within the workflow.Using a separate tfvars file helps you manage multiple environments and keep your configuration organized.
Terraform also allows you to add inline variables (e.g.
-var 'variable=value'). Or you can use environment variables which may be set by hardcoding the values into the workflow, or pulling them from GitHub Actions variables and/or secrets. Lots of flexibility.
Commit your changes
-
Check the status
git statusFeel free to check the status after each of the following commands if you are new to the git workflow.
-
Stage the files ready for committing
git add .Staging allows you to be selective in what is committed.
-
Commit with a descriptive message
git commit -m " Added RBAC to the workflow." -
Push up to the origin, i.e. your GitHub fork of the template
git push origin main
Before Using the GitHub CLI
Check you have
-
committed and pushed all your local changes to the remote repository
-
authenticated with GitHub:
gh auth login -
checked current authentication:
gh auth status -
interactively set the default repo:
This sets it for the current directory. Make sure you are in the root of your cloned repo.
gh repo set-defaultIt is always sensible to check that your GitHub context is correct before making changes.
-
open the web page for the repo
gh repo view --web Note that the recent commit has been successfully pushed up.
ℹ️ Tip: add an alias to your .bashrc,
alias web='gh repo view --web'. Then you can typewebwhenever you need to open the GitHub page.
Using the GitHub CLI to Add Repository Variables
The example pipeline scripts makes use of repository variables. GitHub also supports secrets, but none of these values are particularly sensitive and it is more useful to see the values. (Note that GitHub Actions variables and secrets can also be handled at the organization level and at the environment level depending on your licensing and configuration.) The GitHub CLI (gh) makes it easy to manage these variables directly from your terminal.
-
Set the variables
Set these to your correct values.
fabric_subscription_id="<subscriptionGuid>"
backend_subscription_id="<subscriptionGuid>"
resource_group_name="terraform"
managed_identity_name="fabric_terraform_provider"
⚠️ If you have used a single subscription then set both subscription_id variables to the same value.
-
Derive additional values
tenant_id=$(az account show --name $fabric_subscription_id --query tenantId -otsv) client_id=$( az identity show --name fabric_terraform_provider --resource-group $resource_group_name --subscription $backend_subscription_id --query clientId -otsv) storage_account_name=$(az storage account list --resource-group $resource_group_name --subscription $backend_subscription_id --query "[?starts_with(name,'terraformfabric')]|[0].name" -otsv) -
Set the repository variables
gh variable set ARM_TENANT_ID --body "$tenant_id"
gh variable set ARM_SUBSCRIPTION_ID --body "$fabric_subscription_id"
gh variable set ARM_CLIENT_ID --body "$client_id"
gh variable set BACKEND_AZURE_SUBSCRIPTION_ID --body "$backend_subscription_id"
gh variable set BACKEND_AZURE_RESOURCE_GROUP_NAME --body "terraform"
gh variable set BACKEND_AZURE_STORAGE_ACCOUNT_NAME --body "$storage_account_name"
gh variable set BACKEND_AZURE_STORAGE_ACCOUNT_CONTAINER_NAME --body "prod"
gh variable set TFVARS_FILE --body "prod.tfvars"
Example output:
✓ Created variable ARM_TENANT_ID for richeney/fabric_terraform_provider
✓ Created variable ARM_SUBSCRIPTION_ID for richeney/fabric_terraform_provider
✓ Created variable ARM_CLIENT_ID for richeney/fabric_terraform_provider
✓ Created variable BACKEND_AZURE_SUBSCRIPTION_ID for richeney/fabric_terraform_provider
✓ Created variable BACKEND_AZURE_RESOURCE_GROUP_NAME for richeney/fabric_terraform_provider
✓ Created variable BACKEND_AZURE_STORAGE_ACCOUNT_NAME for richeney/fabric_terraform_provider
✓ Created variable BACKEND_AZURE_STORAGE_ACCOUNT_CONTAINER_NAME for richeney/fabric_terraform_provider
✓ Created variable TFVARS_FILE for richeney/fabric_terraform_provider
-
Display all repository variables and values
gh variable list -
Display a link to the GitHub Actions variables page
gh repo view --json nameWithOwner --template '{{printf "https://github.com/%s/settings/variables/actions\n" .nameWithOwner}}'Example output:
https://github.com/richeney/fabric_terraform_provider/settings/variables/actions -
Open the page
Press ctrl + click to check the values on the GitHub web page.
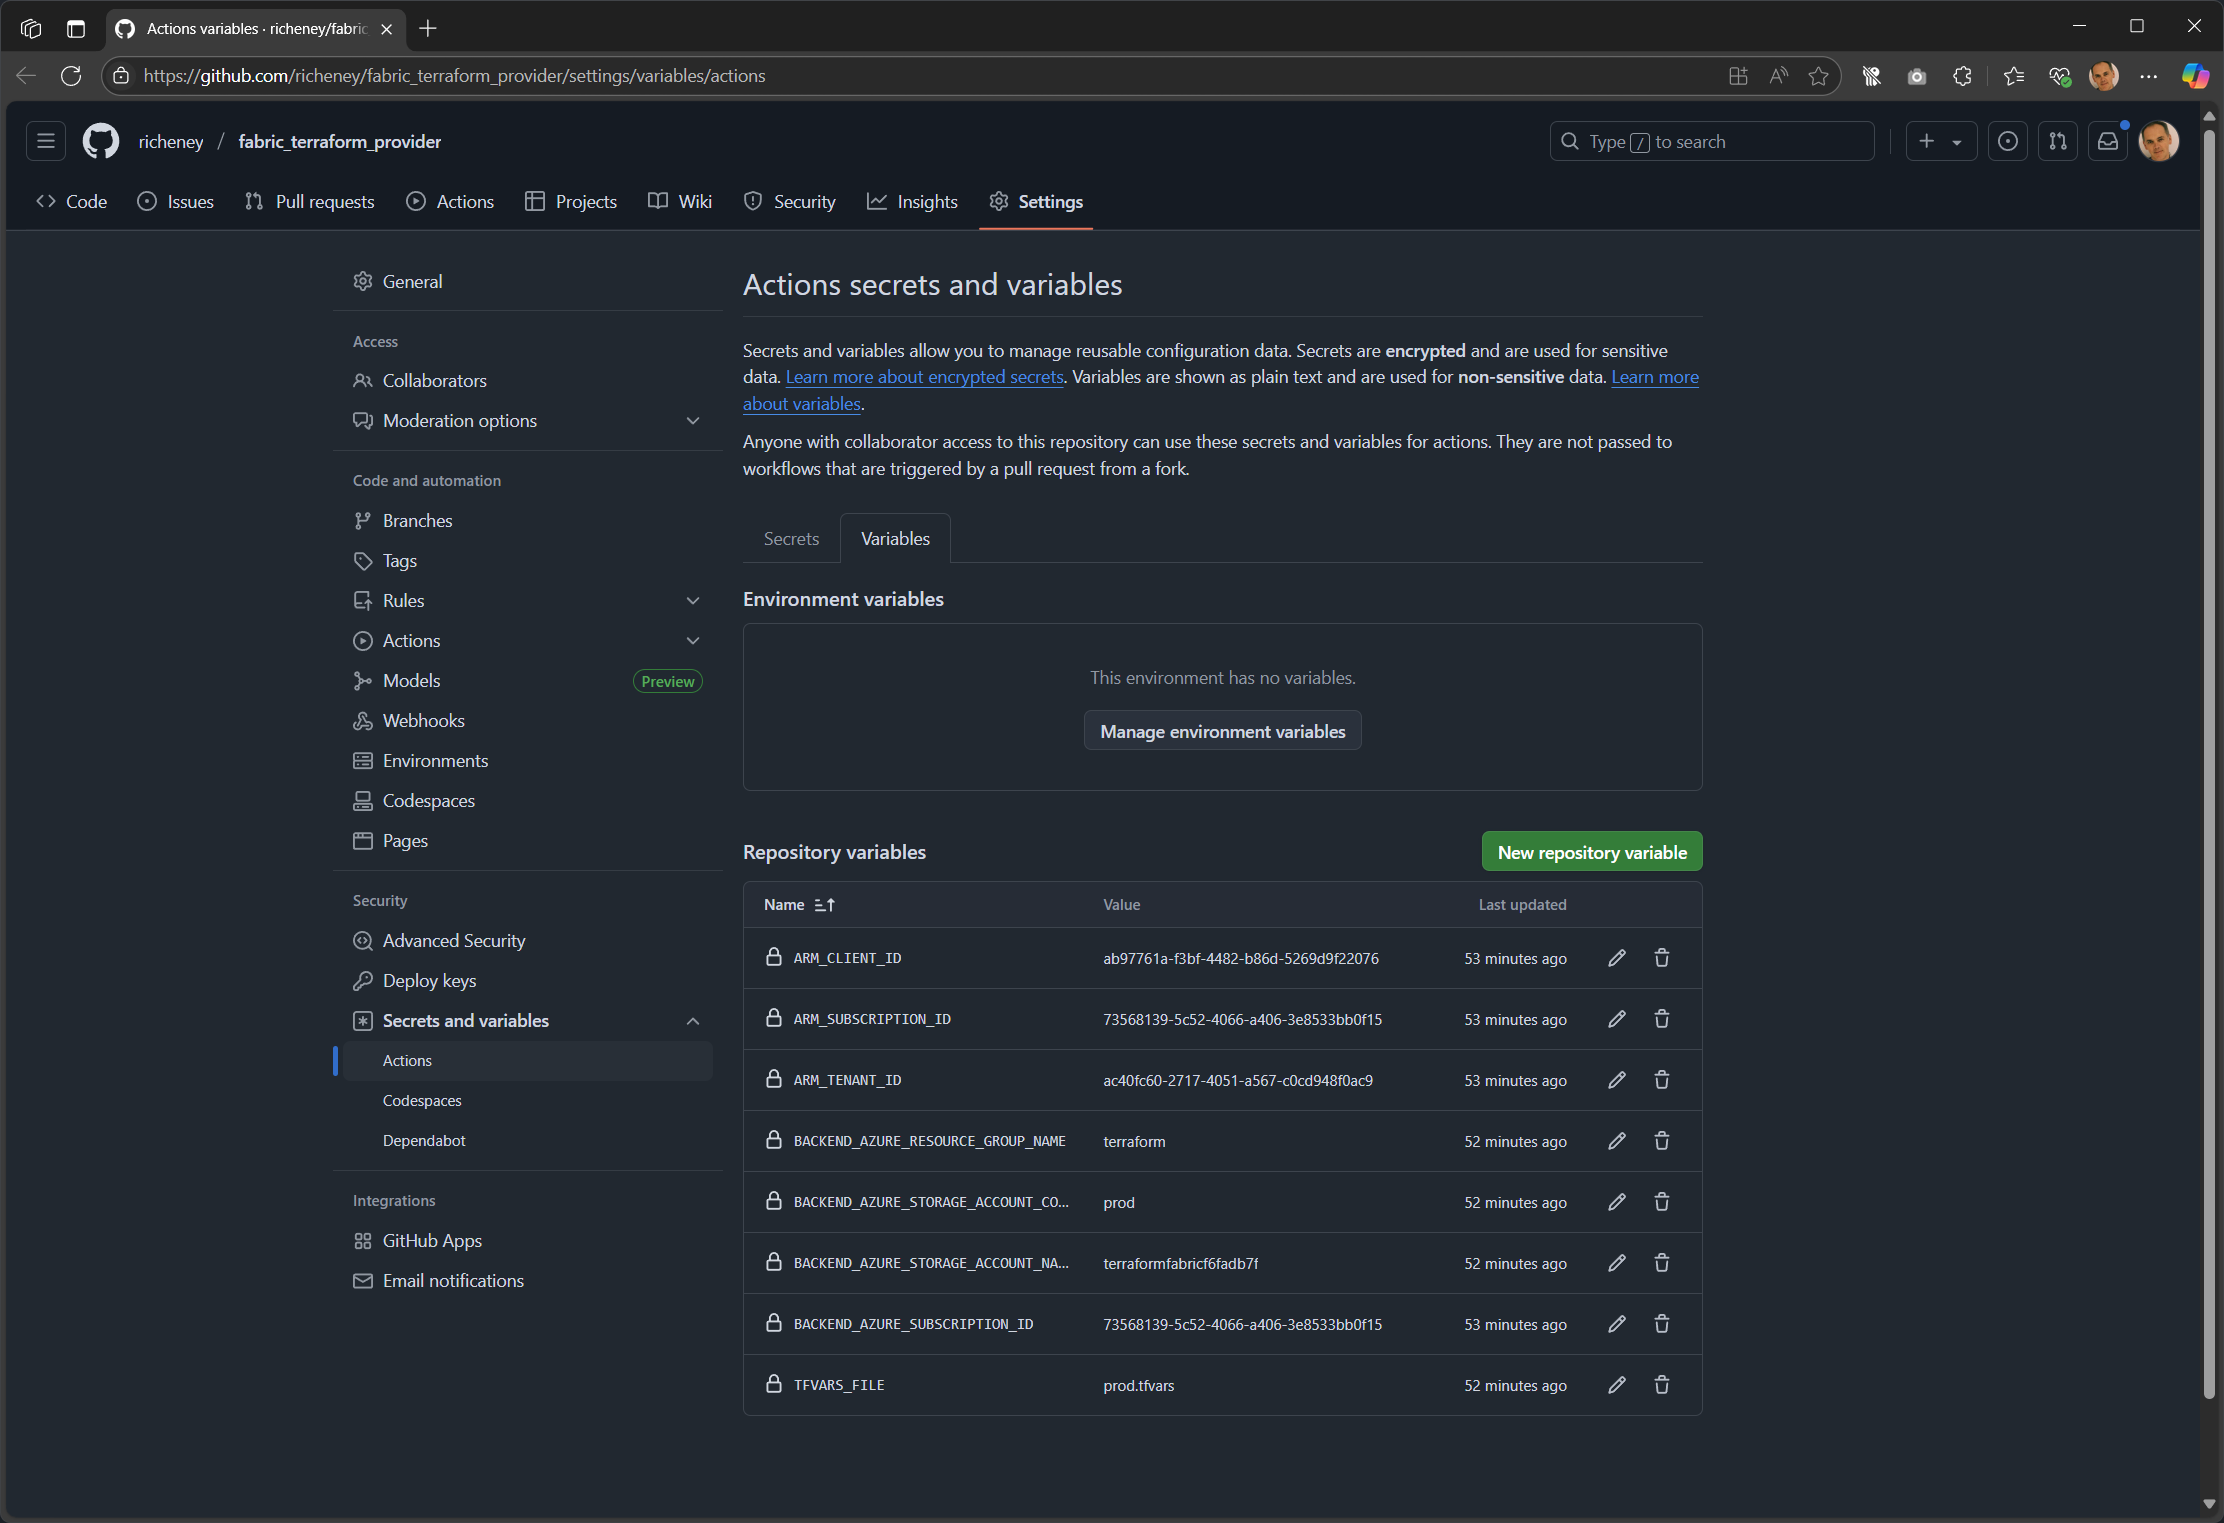 The web page path is Settings > Secrets and variables > Actions > Variables tab.
Add a Federated Credential to the Managed Identity for the Branch
To enable GitHub Actions to authenticate as your managed identity, you need to add a federated credential. This allows your workflow to use OIDC to obtain tokens for Azure resources securely, without secrets.
This enables secure, passwordless authentication for the GitHub Actions workflows in the main branch of this repository.
Portal
The portal experience is really nice for creating GitHub federated credentials.
-
Managed Identities > Select the fabric_terraform_provider identity
-
Settings > Federated credentials > + Add credential
-
Configure the federated credential
Connect your GitHub account
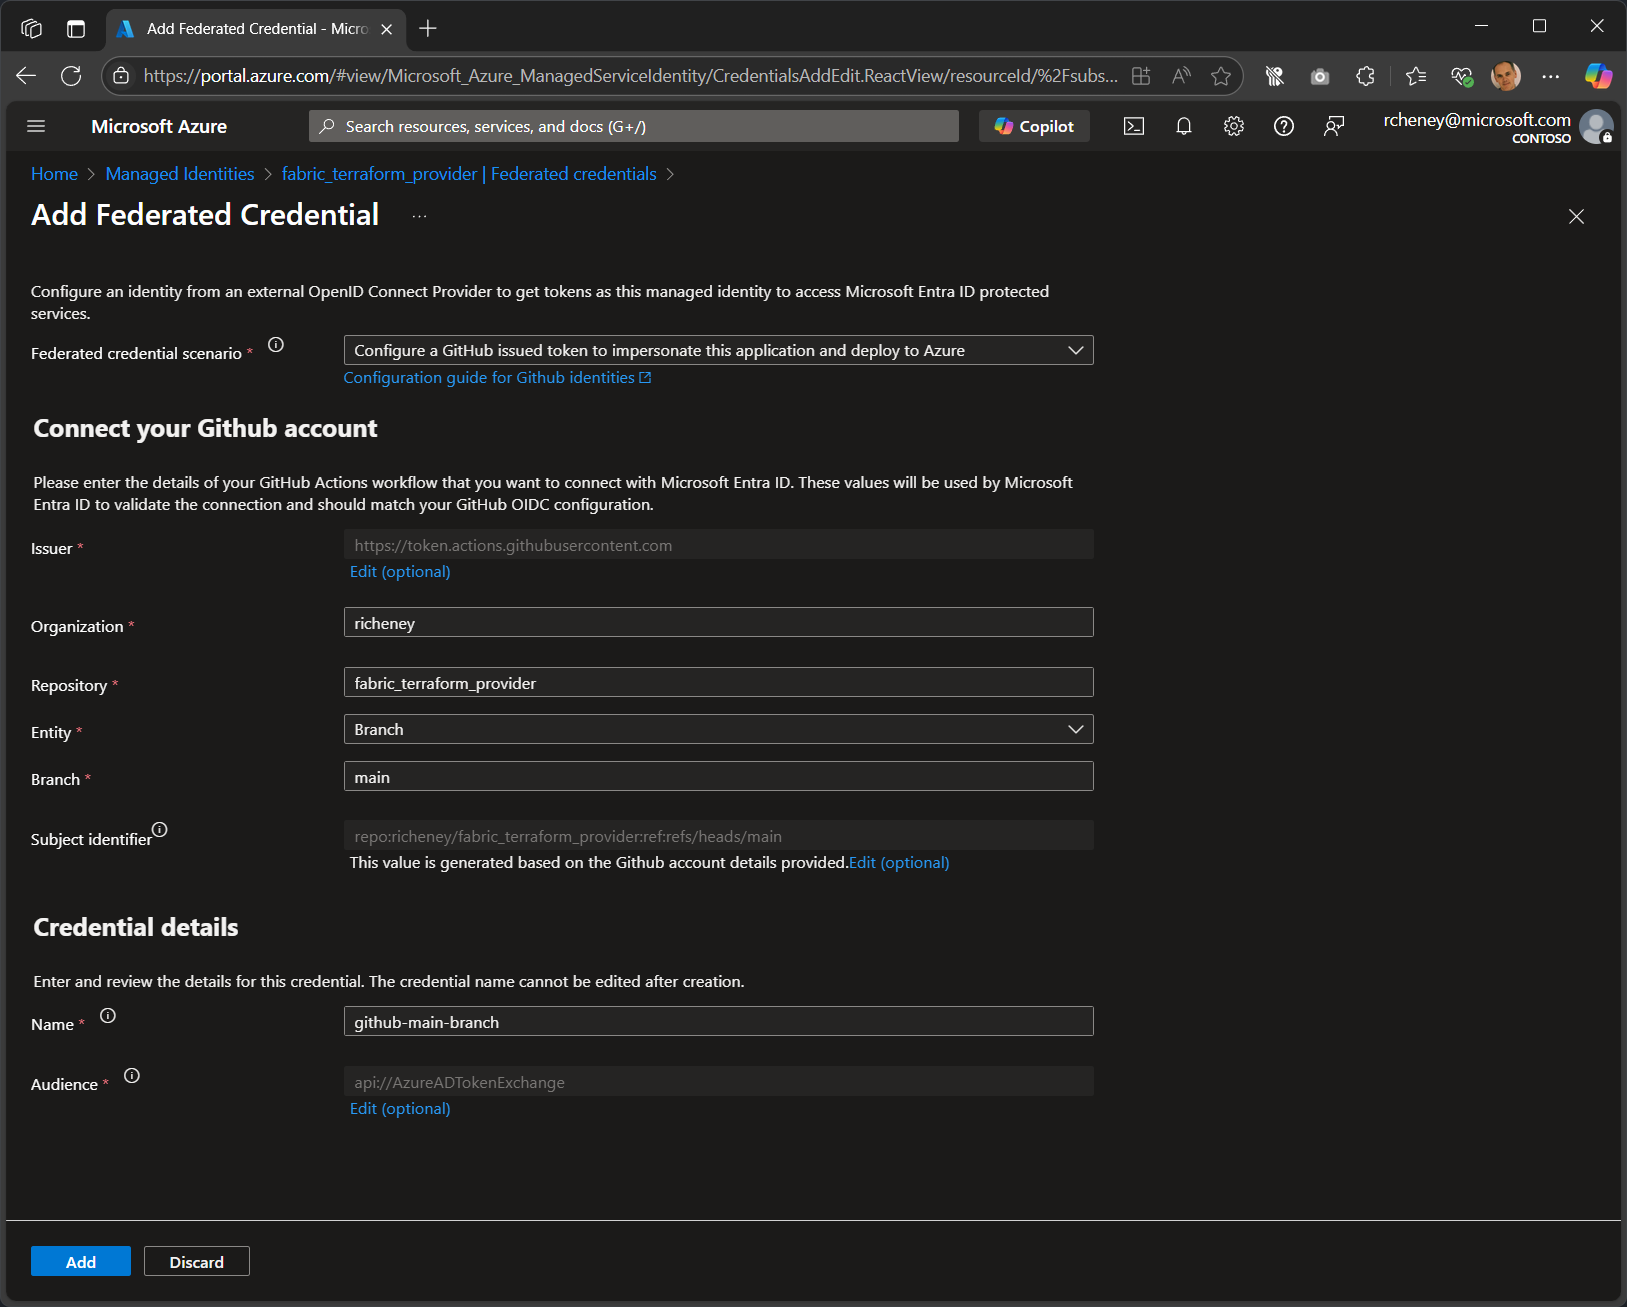
The following settings are used when adding a federated credential in the Azure portal:
- Federated credential scenario: Configure a GitHub issued token to impersonate this application and deploy to Azure
- Issuer:
https://token.actions.githubusercontent.com(default) - Organization: Your GitHub username or organization (e.g.
richeney) - Repository:
fabric_terraform_provider - Entity: Branch (you can also select environment, pull request, or tag)
- Branch:
main
- Branch:
- Subject identifier: Derived from the GitHub details (e.g.
repo:richeney/fabric_terraform_provider:ref:refs/heads/main)
Credential details
- Name:
github-main-branch(used in the resource ID; cannot be changed later) - Audience:
api://AzureADTokenExchange(default)
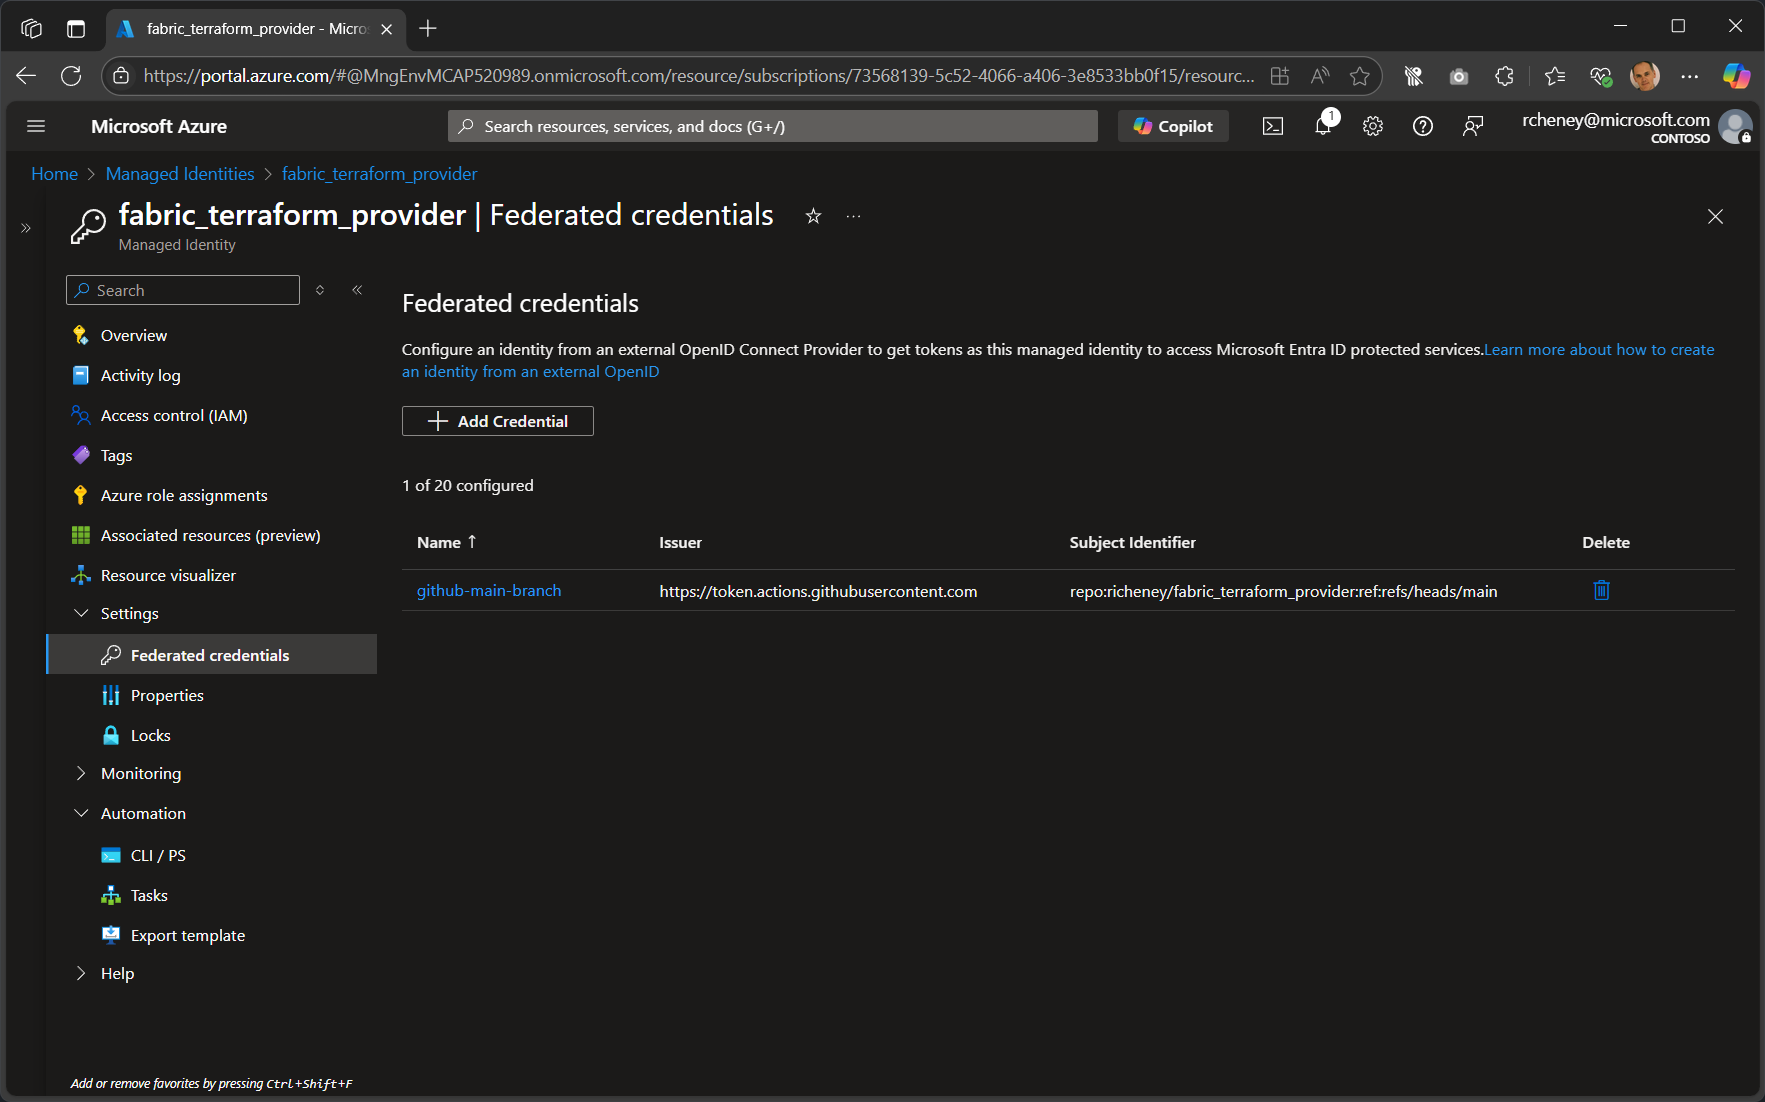
-
Completed credential
Azure CLI
-
Variables
rg="terraform" identity="fabric_terraform_provider" -
Add the federated credential to your managed identity
az identity federated-credential create --name github-main-branch \
  --identity-name $identity --resource-group $rg \
  --audiences "api://AzureADTokenExchange" \
  --issuer "https://token.actions.githubusercontent.com" \
  --subject "$(gh repo view --json nameWithOwner --template '{{printf "repo:%s:ref:refs/heads/main" .nameWithOwner}}')"
Example output:
{
  "audiences": [
    "api://AzureADTokenExchange"
  ],
  "id": "/subscriptions/73568139-5c52-4066-a406-3e8533bb0f15/resourcegroups/terraform/providers/Microsoft.ManagedIdentity/userAssignedIdentities/fabric_terraform_provider/federatedIdentityCredentials/github-main-branch",
  "issuer": "https://token.actions.githubusercontent.com",
  "name": "github-main-branch",
  "resourceGroup": "terraform",
  "subject": "repo:richeney/fabric_terraform_provider:ref:refs/heads/main",
  "systemData": null,
  "type": "Microsoft.ManagedIdentity/userAssignedIdentities/federatedIdentityCredentials"
}
Run the GitHub Actions Pipeline
OK, a good time for a quick recap:
- the managed identity
- has a federated credential to this repo’s branch for OpenID Connect
- has an RBAC role assignment to allow blob write to the prod container for the remote state
- is a member of an Entra ID security group
- the repo changes are committed and pushed up
- the variables used by the workflow have been set
- Fabric’s tenant settings permit the security group to access the Fabric API used by the provider
Time to run the workflow!
Using gh
Running workflows from the CLI is a convenient way to test and manage your CI/CD pipelines without leaving your terminal.
-
Run the workflow
The workflow is triggered by workflow_dispatch, i.e. manually. (See the GitHub docs for alternatives.)
gh workflow runInteractively select
Terraform GitHub Actions Workflow (terraform.yml). Then select theapplyaction. -
Watch the run
gh run watch -
List the runs
gh run listExample output:
STATUS TITLE WORKFLOW BRANCH EVENT ID ELAPSED AGE ✓ Terraform Destroy Terraform GitHub Actions Workflow main workflow_dispatch 15219526348 48s about 4 minutes ago ✓ Terraform Apply Terraform GitHub Actions Workflow main workflow_dispatch 15219500280 1m4s about 6 minutes ago -
View the logs
View the logs on the CLI.
gh run view --logOr open up the web page.
gh run view --web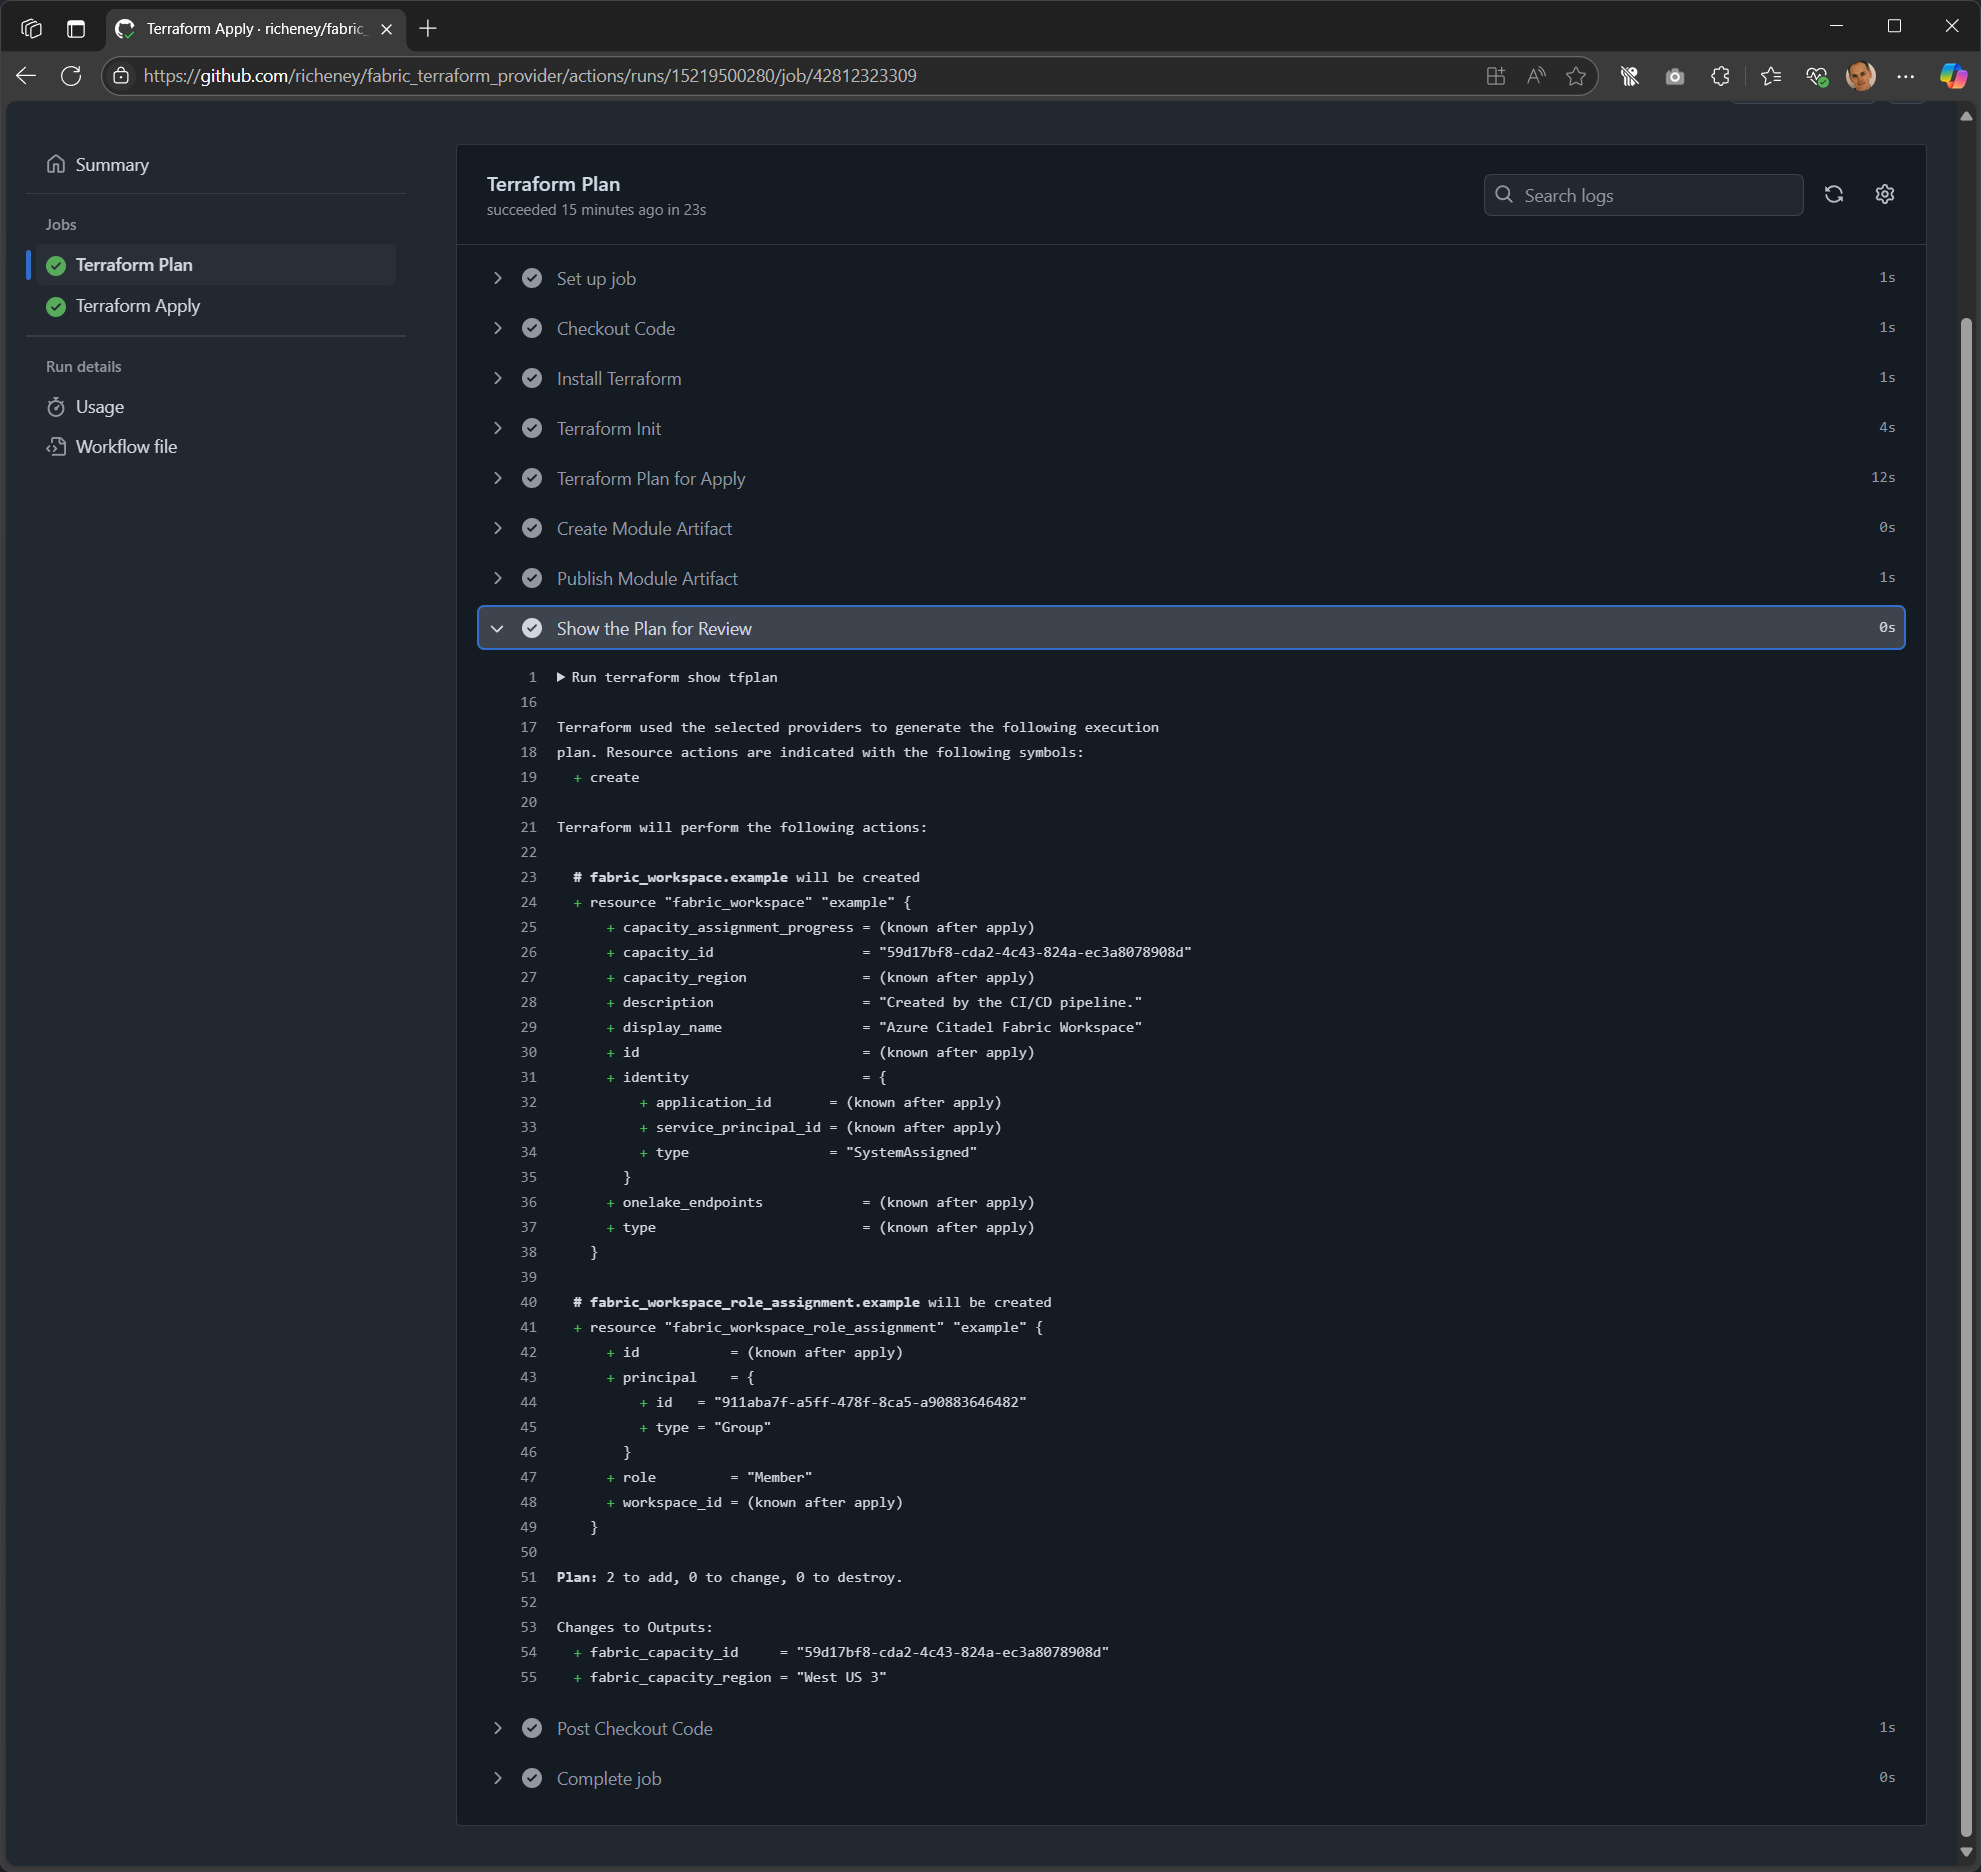
Explaining the workflow
A couple of key points on the workflow and environment variables:
- The ARM_TENANT_ID, ARM_CLIENT_ID and ARM_USE_OIDC select the managed identity and use OpenID Connect rather than a service principal secret or certificate for authentication. (As well as the permissions for id-token and contents.)
- The azurerm provider is not used here, but that requires subscription_id to be set in the provider block, or via ARM_SUBSCRIPTION_ID.
- The Entra auth mode is enforced via ARM_USE_AZUREAD; otherwise Terraform defaults to using storage keys.
- The terraform init includes all of the backend config, essentially overriding the backend.tf. As we are using Entra auth then it only required storage_account_name, container_name, and key, plus either tenant_id or inherited ARM_TENANT_ID.
- The BACKEND_SUBSCRIPTION_ID and BACKEND_RESOURCE_GROUP_NAME are not actually used, but they’re useful for when you need to quickly find the remote state backend.
- TF_VAR_subscription_id is used by the Azure DevOps Terraform functions; it is not relevant to the GitHub Actions workflow
- Using include-hidden-files ensures the lock file is included in the artifact, avoiding race conditions where a provider is updated between plan and apply, causing an error
Next Steps
With your changes committed and pushed, and your repository variables configured, you’re ready to run your CI/CD workflows or continue developing your project. Using the GitHub CLI streamlines the process and keeps your configuration consistent and secure.
Happy automating!