Expanding your config
A few tips to build out your config. A collection of friendly URLs, useful tips using the Fabric CLI and Model Context Protocol (MCP) servers in vscode, plus the native Git integration for Fabric workspaces.
Introduction
OK, we have spent a lot of time with tooling, with configuring app registrations and managed identity for the user context and CI/CD scenarios, plus working with repos and pipelines.
You are set to develop faster with a Git repo in the user context and then switch to the productionised version in the cloud Git provider and deployment.
This page covers some useful tooling and additional links to help you on your way as you expand your Terraform config in the fabric ecosystem.
Fabric Terraform provider documentation
Resource number one is the provider documentation itself. Terraform on Microsoft Fabric Documentation
Again, each resource and data source page will have information on whether the feature is preview or not, and whether it can be used by a service principal.
Let’s look at an example for Copy Jobs.
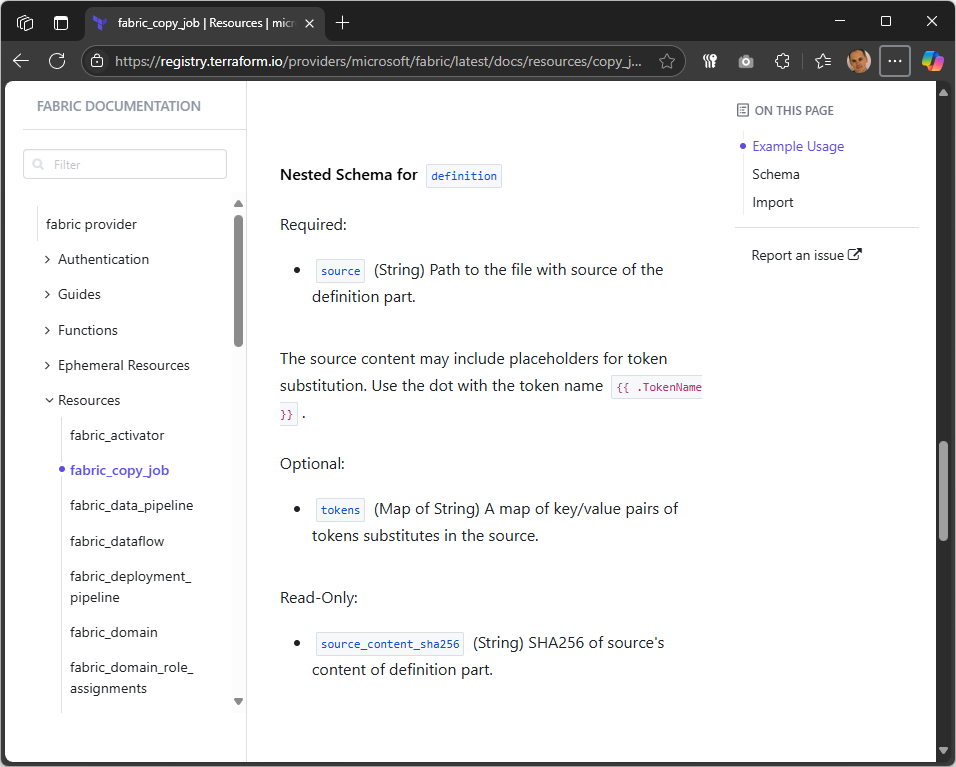
Many of the attributes are pretty simple and well described in the documentation and examples, but some of the more complex attributes - such as the definition here - are not well documented.
So how would you find out what the content of the definition JSON template should look like? Let’s see how MCP servers and the Fabric CLI can help us get there.
Model Context Protocol (MCP)
Model Context Protocol (MCP) servers can integrate with Visual Studio Code to enable enhanced context and tooling for infrastructure-as-code workflows. You can connect to MCP servers running locally (on your machine) or remotely (on another host or in the cloud). MCP servers support several connection types, including:
- http: Connects to an MCP server over HTTP, suitable for remote or cloud-hosted servers
- stdio: Communicates over standard input/output streams, often used for local processes
- docker: Runs the MCP server inside a Docker container, isolating dependencies
The main focus of MCP servers is to provide live data, such as up-to-date provider schemas, documentation, and code examples, which is great as the fabric Terraform provider is being updated frequently but still lacks some detailed examples. Using MCP servers for both Microsoft Docs and for Terraform Registry can be a potent combination with GitHub Copilot in Agent mode.
VS Code now supports MCP servers as first class resources and will either store the server config within an mcp.json in your roaming profile, or you can add that config as a .vscode/mcp.json file in your workspace.
In this section you will add the Microsoft Docs MCP server into your profile settings via the GUI, and then add the Terraform MCP server into your workspace. Once configured then we will run through an example set of prompts for GitHub Copilot.
Microsoft Docs MCP server
These steps are correct as of VS Code v1.102.1.
-
Extensions (
CTRL+SHIFT+X) > MCP Servers > MCP Servers for agent mode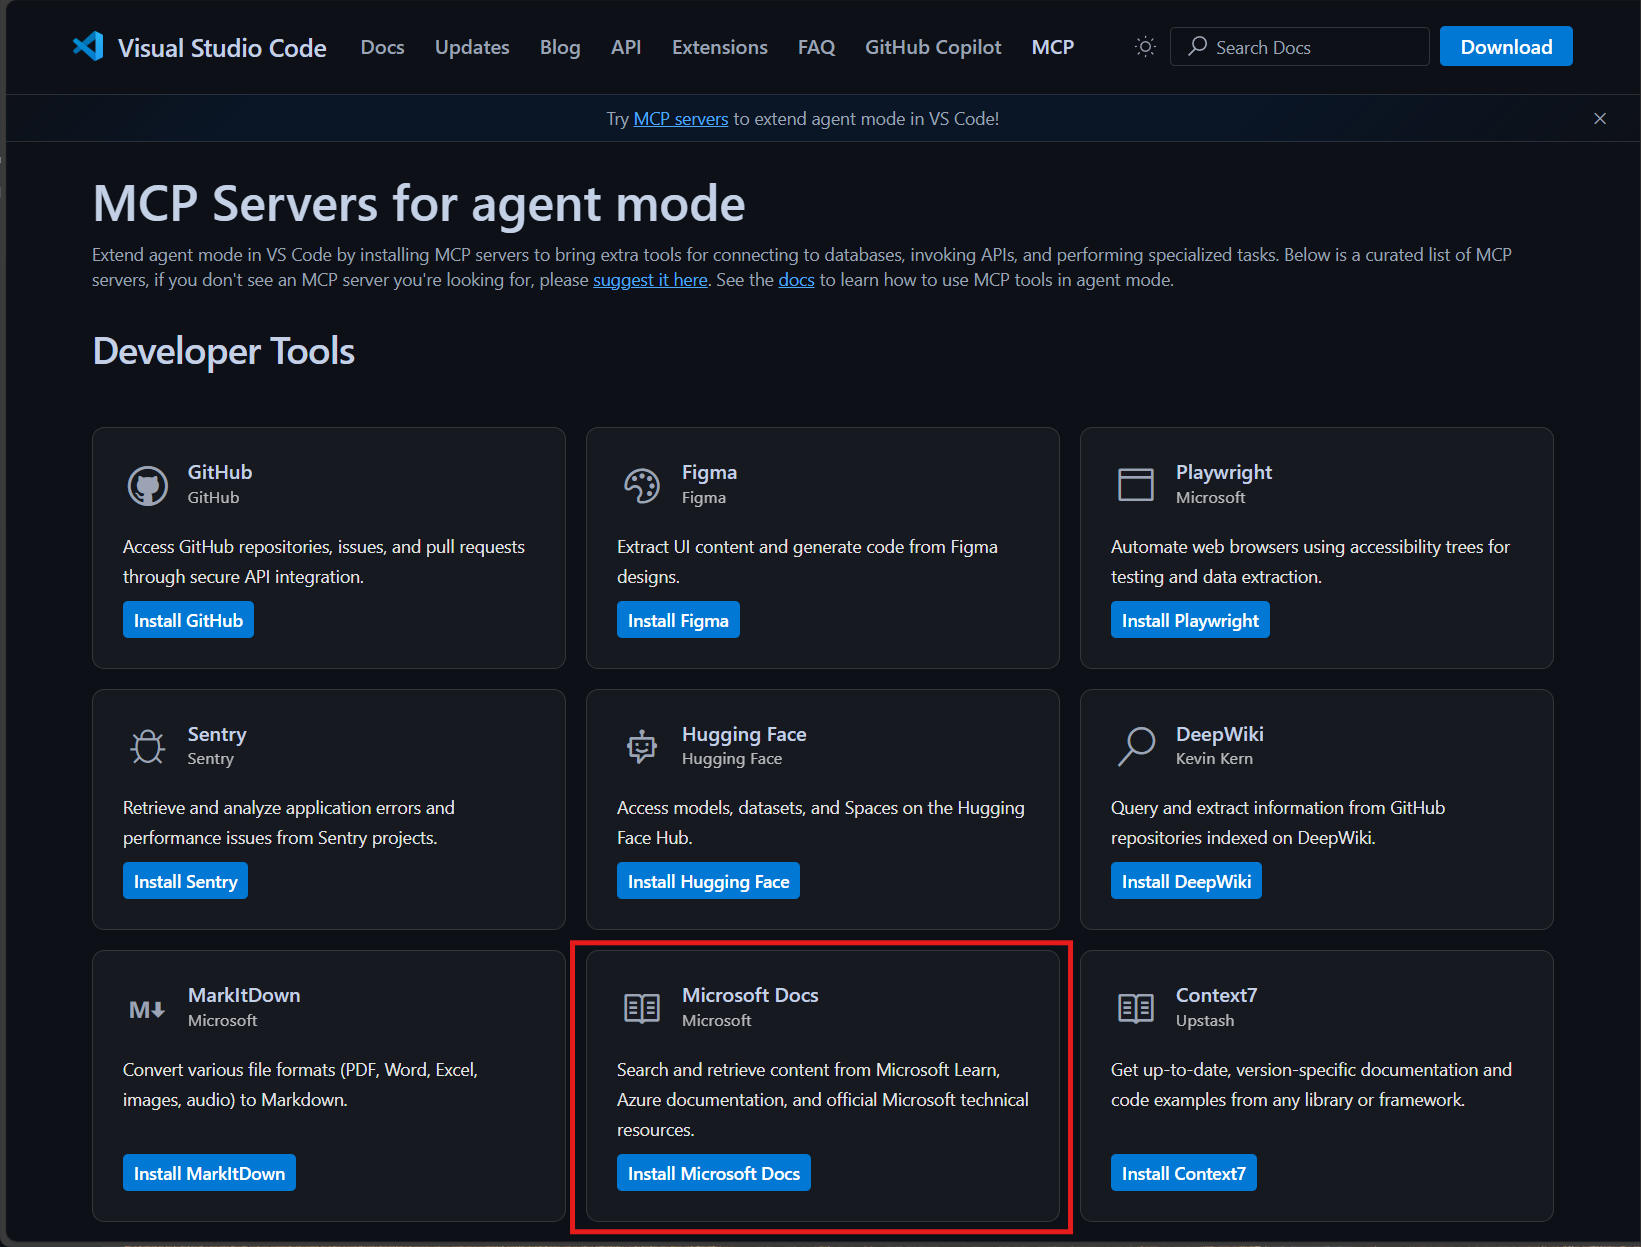
-
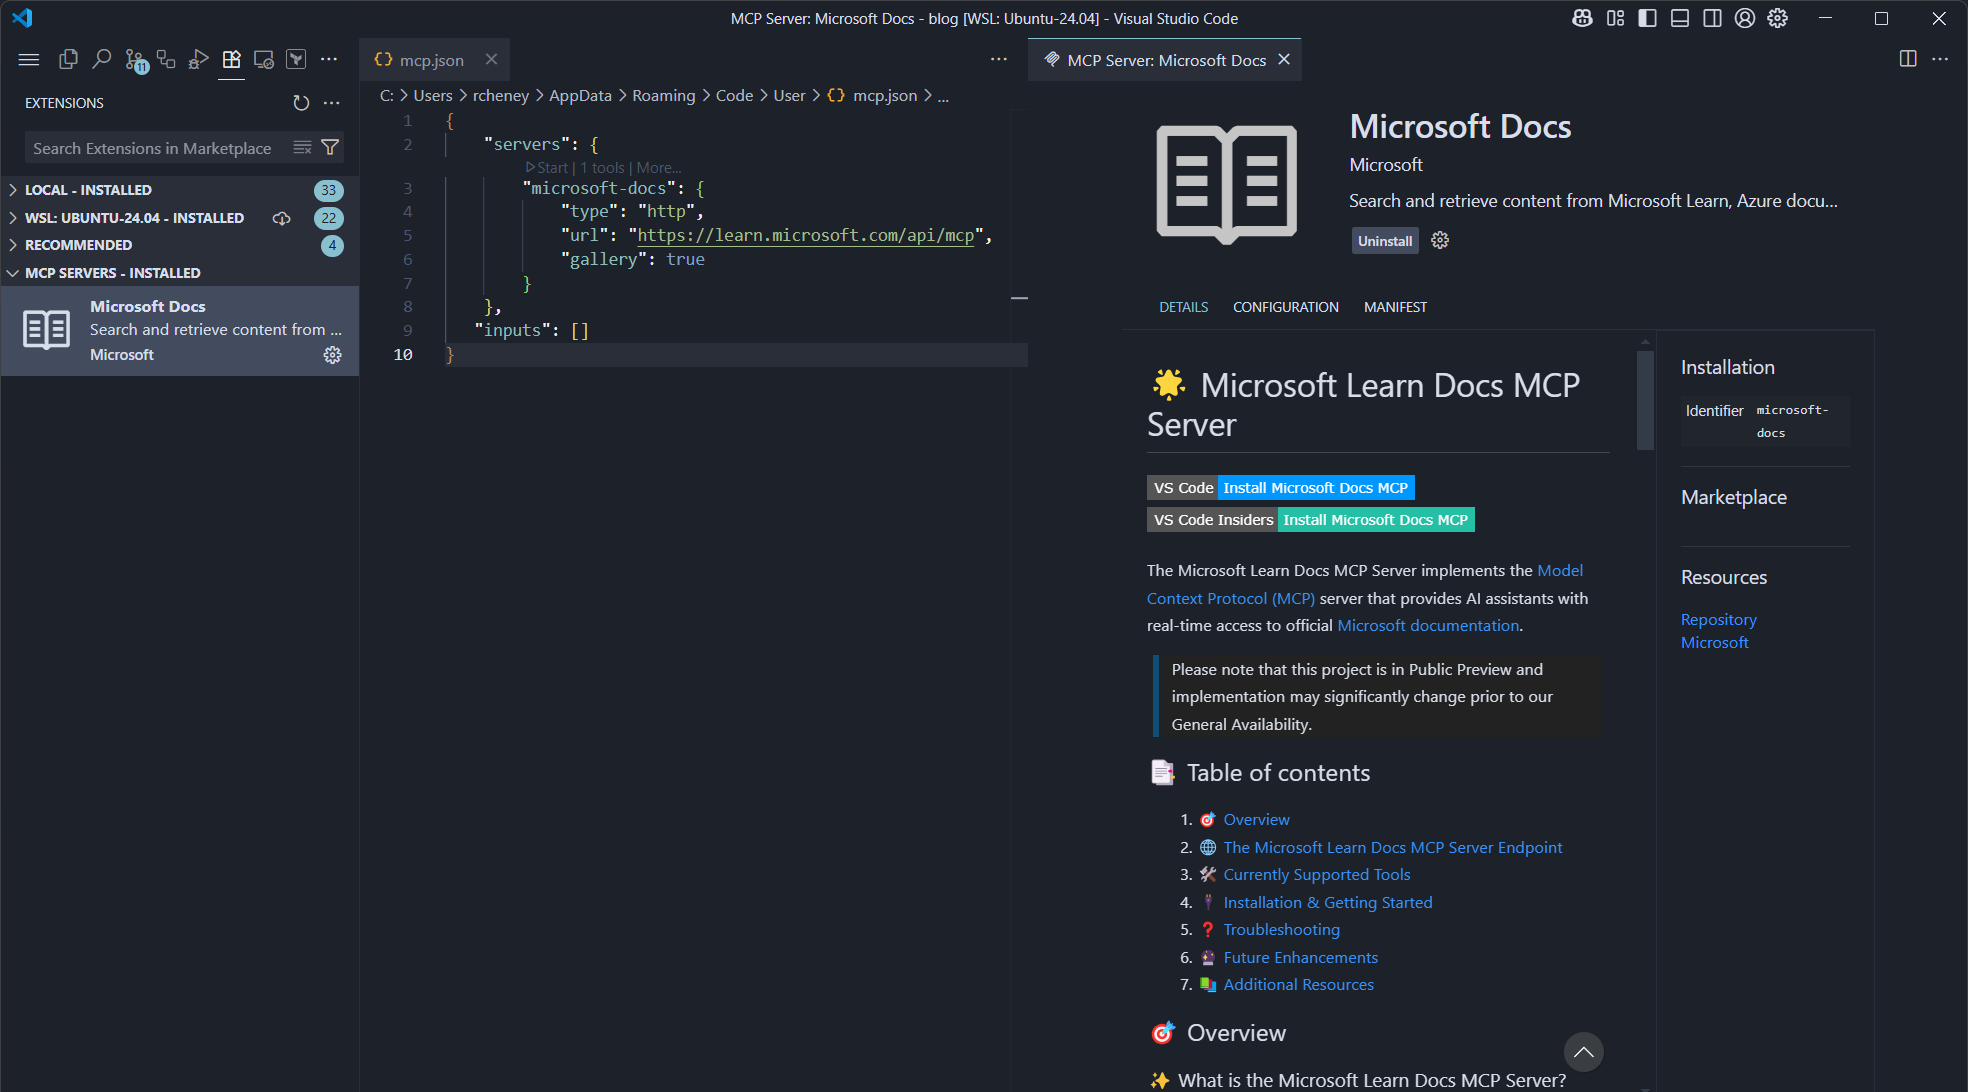
Click on Install Microsoft Docs
-
Click on Install
Remote http MCP servers are the simplest to set up.
Terraform MCP server
⚠️ Note that this MCP server is in beta at the time of writing.
Docker
The Terraform MCP server needs docker to be installed and running.
You can test the MCP server will work at the terminal by using:
docker run --interactive --rm hashicorp/terraform-mcp-server
Once docker downloads the image then you will see the following message.
HCP Terraform MCP Server running on stdio.
Use CTRL+D to exit and remove the container.
Configure
You could also add the Terraform MCP server config into the roaming mcp.json profile (%USERPROFILE%/AppData/Roaming/Code/User/mcp.json) alongside the definition for the Microsoft Learn Docs MCP server, but we will create a workspace specific file instead so that you can see how to control which servers are available for which projects.
-
Open the Explorer tab in Visual Studio Code (
CTRL+SHIFT+E) -
Add .vscode/mcp.json
{
    "servers": {
        "terraform": {
            "type": "stdio",
            "command": "docker",
            "args": [
                "run",
                "--interactive",
                "--rm",
                "hashicorp/terraform-mcp-server"
            ]
        }
    }
}
This approach is common as there is a limit of 128 tools in the GitHub Copilot agent mode and you may need to be selective. As an example, you may add an npm MCP servers for a Node.JS workspace, but you don’t need that generally. (The Microsoft Docs MCP server only uses one tool.)
Example Prompts
You are now ready to use the MCP server right within the IDE. Here are a few example prompts for you to test with.
-
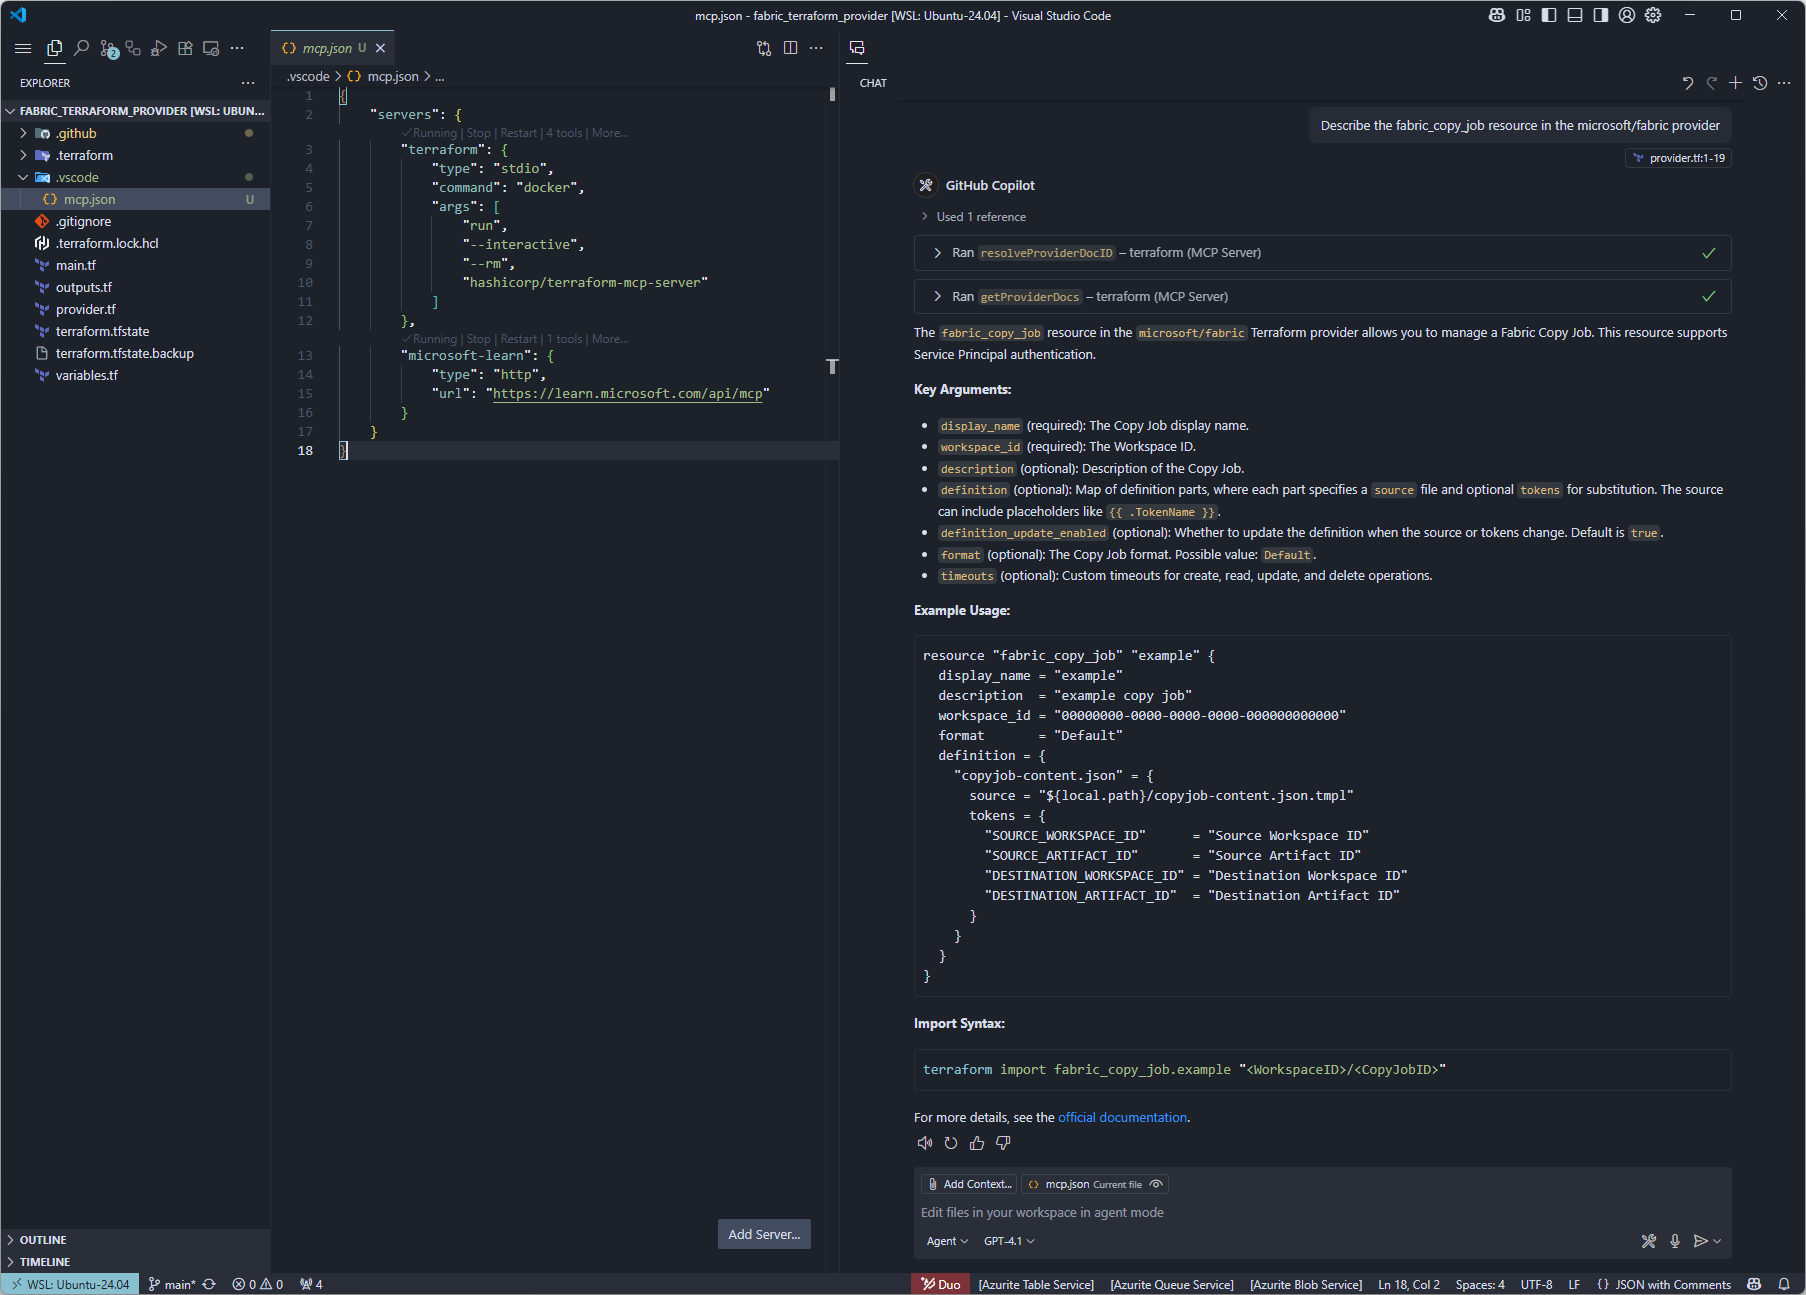
Describe a resource
Describe the fabric_copy_job resource in the microsoft/fabric providerYou may have to approve the use of the MCP server first time round and then you should see a similar response to the screenshot below.
-
Describe a valid definition for the resource
Use Microsoft Learn to describe a valid definition for this resourceAdd in the Microsoft Learn MCP server to get more definition.
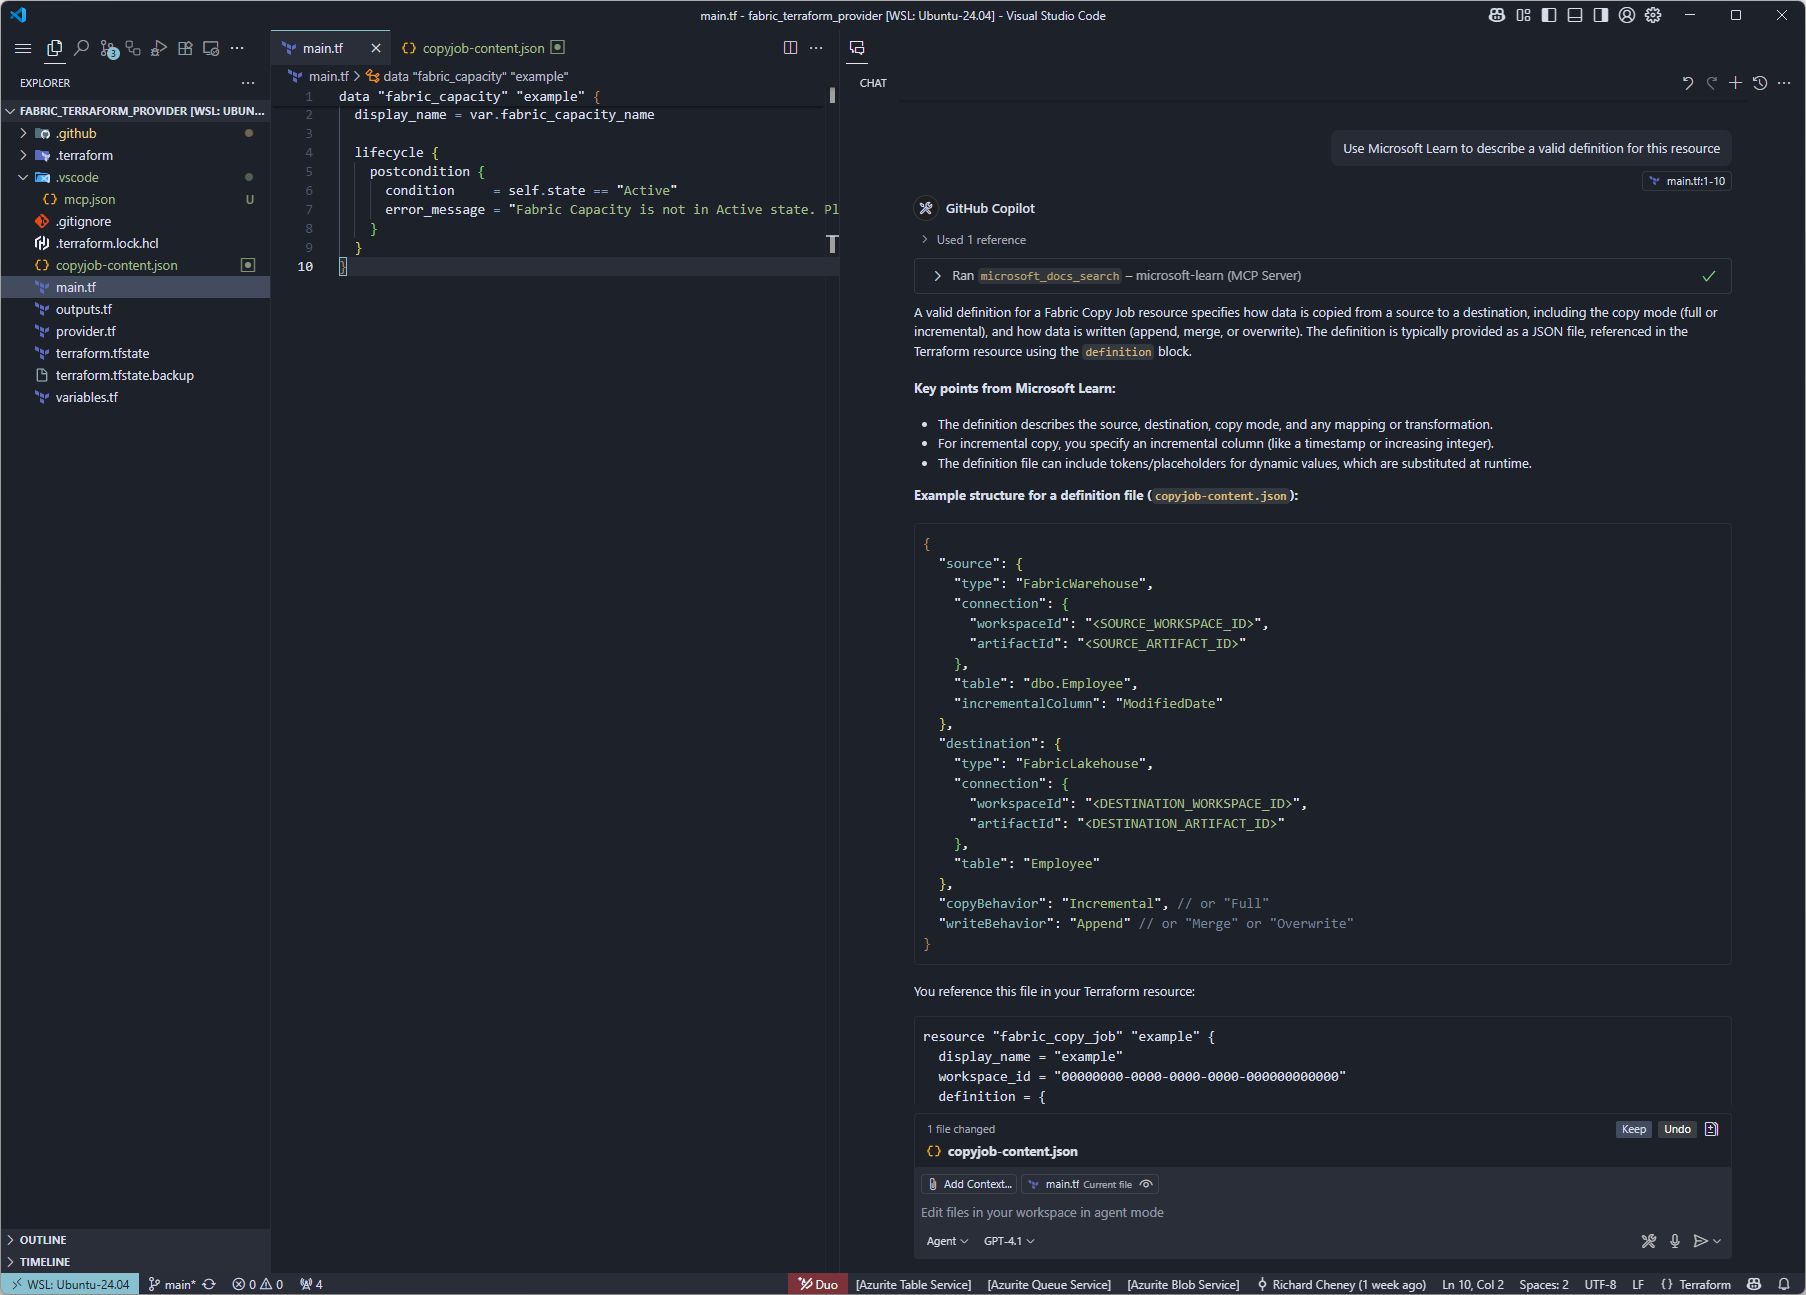
The MCP server has linked to an anchor within the copy job documentation for more detail.
-
Create an example template
Generate a valid copyjob-content.json template including the token handlebarsAgent mode can go further, generating files for you. Here it is creating an example template file for you to use as a starting point.
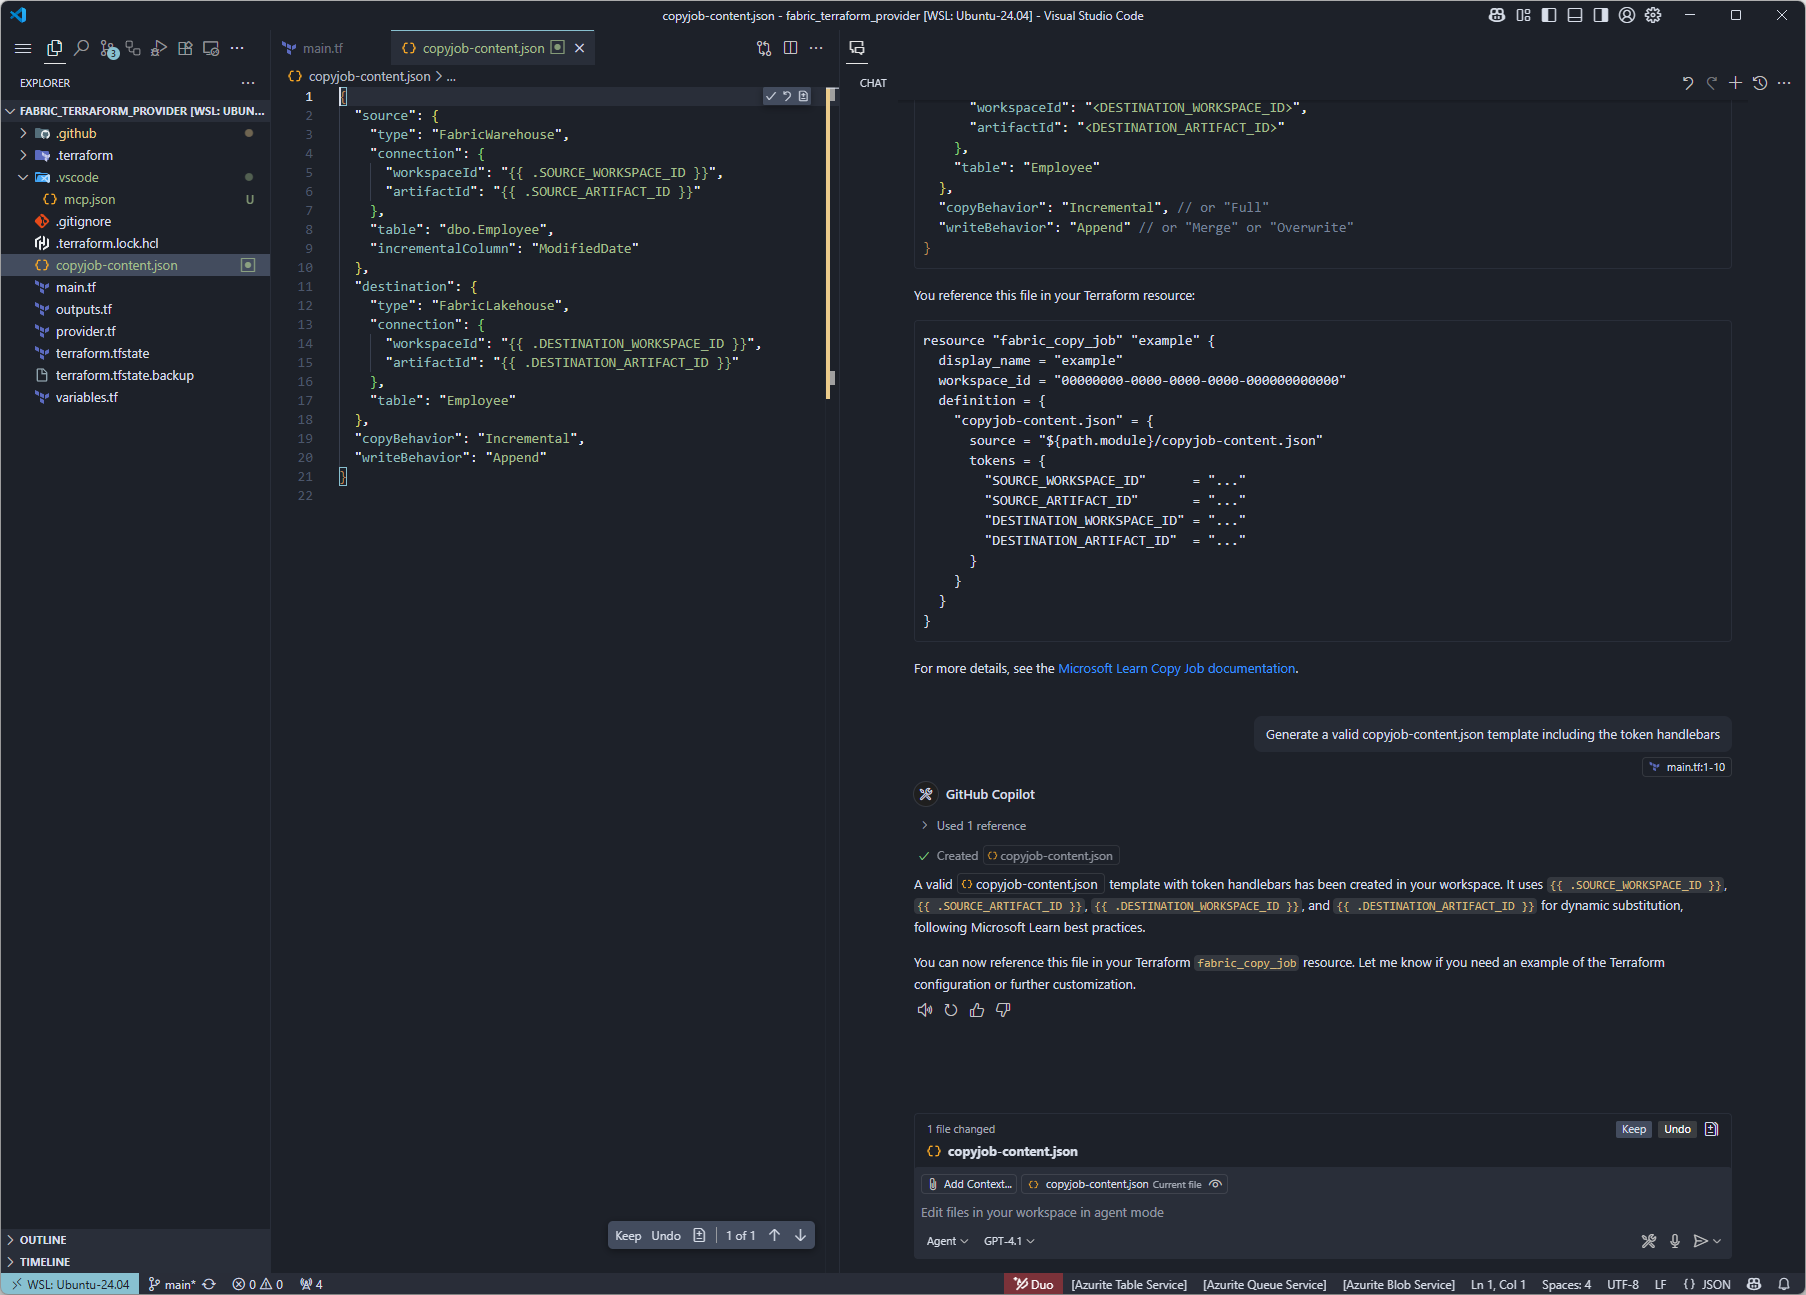
Using GitHub Copilot Agent mode in combination with the MCP servers is a powerful combination to get you working faster. We have a valid template, but it is just an example. What if you have a manually created resource and you need to query it?
Using the Fabric CLI
This is where the Fabric CLI is absolute gold dust. A common workflow is to manually create a customised resource in the Fabric portal, then use the Fabric CLI to inspect and understand its configuration. This approach helps you bridge the gap between manual changes and infrastructure as code.
-
Create the resource manually
In the Fabric portal, create your custom resource, such as a Copy Job and configure it as needed.
-
Authenticate with the Fabric CLI
Authenticate into Fabric.
fab auth loginCheck your authentication status.
fab auth status -
List the workspaces
fab lsExample output:
My workspace.Personal aidwfactoryStreaming.Workspace aidwiotfactory.Workspace -
List the resources in a workspace
Example:
fab ls aidwiotfactory.WorkspaceExample output:
DataflowsStagingLakehouse.SemanticModel DataflowsStagingLakehouse.SQLEndpoint DataflowsStagingLakehouse.Lakehouse DataflowsStagingWarehouse.SemanticModel DataflowsStagingWarehouse.Warehouse IoT.Dashboard Test.Report Test OneLake.Report Test OneLake_Dataset_2080000_651f1831-8e0a-f011-bae2-000d3a3012e8.SemanticModel Test_Dataset_2080000_a508f593-770a-f011-bae2-000d3a3012e8.SemanticModel aidwBronze2SilverActivityData.DataPipeline aidwCopySilverActivity.CopyJob aidwFactoryBronze2SilverCompletions.DataPipeline aidwSilverToGold.Notebook aidwfactorybronze.SemanticModel aidwfactorybronze.SQLEndpoint aidwfactorybronze.Lakehouse aidwfactorygold.SemanticModel aidwfactorygold.SQLEndpoint aidwfactorygold.Lakehouse aidwfactorysilver.SemanticModel aidwfactorysilver.SQLEndpoint aidwfactorysilver.Lakehouse testSources.Eventstream -
Inspect a resource
Use the Fabric CLI to view a resource as JSON.
Example:
fab get aidwiotfactory.Workspace/testSources.Eventstream -q . -
List queryable properties
List the queryable properties in the resource:
fab get aidwiotfactory.Workspace/testSources.Eventstream -fExample output:
id
type
displayName
description
workspaceId
definition.parts[0].path
definition.parts[0].payload.sources
definition.parts[0].payload.destinations
definition.parts[0].payload.streams
definition.parts[0].payload.operators
definition.parts[0].payload.compatibilityLevel
definition.parts[0].payloadType
definition.parts[1].path
definition.parts[1].payload.retentionTimeInDays
definition.parts[1].payload.eventThroughputLevel
definition.parts[1].payloadType
definition.parts[2].path
definition.parts[2].payload.$schema
definition.parts[2].payload.metadata
definition.parts[2].payload.config
definition.parts[2].payloadType
connections
Note that the
-fforces the output, otherwise you are prompted in v1.0.0 with:? Item definition is retrieved without its sensitivity label. Are you sure? (Y/n) -
Query a single property and create a JSON file
There are a couple of small challenges with creating output for Terraform use:
- the warning message above is also sent to stdout
- the end of line is Windows format, i.e. CRLF
This shell command takes the definition property and outputs to a file.
fab get aidwiotfactory.Workspace/testSources.Eventstream -fq definition | grep -v "sensitivity label" | jq . > eventstream.json.tmplYou will then need to configure and test from there, but this approach should take you a long way.
Additional resources can be found here:
Git Integration with Microsoft Fabric
Terraform is not the only way to integrate Git with a Microsoft Fabric config.
Another option is to look at the Git Integration in Microsoft Fabric, enabling version control, collaboration, and CI/CD workflows for items within a Fabric workspace. This is handled directly within the Fabric GUI and is in preview at the time of writing.
As a suggestion, I would consider using both approaches, pinned the to the right persona. Common personas seen in Microsoft Fabric are Data Engineers, Data Scientists, Data Analysts, Fabric Administrators and Data Stewards.
For Fabric Administration I can see Terraform being a natural place to configure capacities, group memberships, RBAC permissions and more. Potentially Data Engineers who want to bootstrap with standard pipelines and transformations, or Data Analysts who want to instantiate notebooks and reports consistently.
However many will want to use the FabriC UI directly, and use the Git integration whilst staying in the flow when working solo or as part of a small v-team.
And there is no reason why these two approaches cannot co-exist.
Additional resource links
- https://microsoft.github.io/fabric-cli/
- https://github.com/RuiRomano/fabric-cli-powerbi-cicd-sample
- https://github.com/murggu/fab-demos
Next
These labs should have given you a good overview on how you may approach automating Microsoft Fabric deployments and configurations with the growing ecosystem of tooling including the Fabric CLI, Fabric Terraform provider, Git integration for Fabric and the Terraform MCP server, plus clear guidance on configuring access when in user context and using managed identity as your workload identity.