Azure Citadel
  • Blogs

  • ARM
  • Azure Arc
    • Overview
    • Azure Arc-enabled Servers
      • Prereqs
      • Scenario
      • Hack Overview
      • Azure Landing Zone
      • Arc Pilot resource group
      • Azure Monitoring Agent
      • Additional policy assignments
      • Access your on prem VMs
      • Create onboarding scripts
      • Onboarding using scripts
      • Inventory
      • Monitoring
      • SSH
      • Windows Admin Center
      • Governance
      • Custom Script Extension
      • Key Vault Extension
      • Managed Identity
    • Azure Arc-enabled Kubernetes
      • Prereqs
      • Background
      • Deploy Cluster
      • Connect to Arc
      • Enable GitOps
      • Deploy Application
      • Enable Azure AD
      • Enforce Policy
      • Enable Monitoring
      • Enable Azure Defender
      • Enable Data Services
      • Enable Application Delivery
    • Useful Links
  • Azure CLI
    • Install
    • Get started
    • JMESPATH queries
    • Integrate with Bash
  • Azure Landing Zones
    • Prereqs
    • Day 1
      • Azure Baristas
      • Day 1 Challenge
    • Day 2
      • Example
      • Day 2 Challenge
    • Day 3
      • Day 3 Challenge
    • Useful Links
  • Azure Policy
    • Azure Policy Basics
      • Policy Basics in the Azure Portal
      • Creating Policy via the CLI
      • Deploy If Not Exists
      • Management Groups and Initiatives
    • Creating Custom Policies
      • Customer scenario
      • Policy Aliases
      • Determine the logic
      • Create the custom policy
      • Define, assign and test
  • Azure Stack HCI
    • Overview
    • Useful Links
    • Updates from Microsoft Ignite 2022
  • Marketplace
    • Introduction
      • Terminology
      • Offer Types
    • Partner Center
    • Offer Type
    • Publish a VM Offer HOL
      • Getting Started
      • Create VM Image
      • Test VM Image
      • VM Offer with SIG
      • VM Offer with SAS
      • Publish Offer
    • Other VM Resources
    • Publish a Solution Template HOL
      • Getting Started
      • Create ARM Template
      • Validate ARM Template
      • Create UI Definition
      • Package Assets
      • Publish Offer
    • Publish a Managed App HOL
      • Getting Started
      • Create ARM Template
      • Validate ARM Template
      • Create UI Definition
      • Package Assets
      • Publish Offer
    • Managed Apps with AKS HOL
    • Other Managed App Resources
    • SaaS Offer HOLs
    • SaaS Offer Video Series
      • Video 1 - SaaS Offer Overview
      • Video 2 - Purchasing a SaaS Offer
      • Video 3 - Purchasing a Private SaaS Plan
      • Video 4 - Publishing a SaaS Offer
      • Video 5 - Publishing a Private SaaS Plan
      • Video 6 - SaaS Offer Technical Overview
      • Video 7 - Azure AD Application Registrations
      • Video 8 - Using the SaaS Offer REST Fulfillment API
      • Video 9 - The SaaS Client Library for .NET
      • Video 10 - Building a Simple SaaS Landing Page in .NET
      • Video 11 - Building a Simple SaaS Publisher Portal in .NET
      • Video 12 - SaaS Webhook Overview
      • Video 13 - Implementing a Simple SaaS Webhook in .NET
      • Video 14 - Securing a Simple SaaS Webhook in .NET
      • Video 15 - SaaS Metered Billing Overview
      • Video 16 - The SaaS Metered Billing API with REST
  • Microsoft Fabric
    • Theory
    • Prereqs
    • Fabric Capacity
    • Set up a Remote State
    • Create a repo from a GitHub template
    • Configure an app reg for development
    • Initial Terraform workflow
    • Expanding your config
    • Configure a workload identity
    • GitHub Actions for Microsoft Fabric
    • GitLab pipeline for Microsoft Fabric
  • Packer & Ansible
    • Packer
    • Ansible
    • Dynamic Inventories
    • Playbooks & Roles
    • Custom Roles
    • Shared Image Gallery
  • Partner
    • Lighthouse and Partner Admin Link
      • Microsoft Cloud Partner Program
      • Combining Lighthouse and PAL
      • Minimal Lighthouse definition
      • Using service principals
      • Privileged Identity Management
    • Useful Links
  • REST API
    • REST API theory
    • Using az rest
  • Setup
  • Terraform
    • Fundamentals
      • Initialise
      • Format
      • Validate
      • Plan
      • Apply
      • Adding resources
      • Locals and outputs
      • Managing state
      • Importing resources
      • Destroy
    • Working Environments for Terraform
      • Cloud Shell
      • macOS
      • Windows with PowerShell
      • Windows with Ubuntu in WSL2
    • Using AzAPI
      • Using the REST API
      • azapi_resource
      • Removing azapi_resource
      • azapi_update_resource
      • Data sources and outputs
      • Removing azapi_update_resource
  • Virtual Machines
    • Azure Bastion with native tools & AAD
    • Managed Identities

  • About
  • Archive
  1. Home
  2. Microsoft Fabric
  3. Fabric Capacity

Table of Contents

  • Quick check
  • SKU types
  • Access to F-SKUs
    • Capacity Admins
    • Contributors
  • Fabric CLI
  • Next

Fabric Capacity

You will need a Fabric capacity for this quickstart. List T-, P, and F-SKUs with the Fabric CLI and understand access to F-SKUs.

Quick check

  1. Check your Fabric CLI authentication status

    fab auth status
    

    Not logged in? Log in with fab auth login.

  2. List the available capacities.

    fab ls -l .capacities
    

    Below is example output showing all three SKU types.

        name                                                 id                                     sku   region      state
    ---------------------------------------------------------------------------------------------------------------------------
    Premium Per User - Reserved.Capacity                     59d17bf8-cda2-4c43-824a-ec3a8078908d   PP3   West US 3   Active
    Trial-20250314T172025Z-xmVeQXcryUKTbE5vcFY5Dg.Capacity   29dc2bec-dc5e-4c0a-85bc-564d96106653   FT1   West US 3   Active
    example.Capacity                                         3da9391c-0cbb-4005-952a-1007a3021888   F2    UK South    Active
    

    The two key columns for the fabric Terraform provider are the Fabric capacity Name and ID.

SKU types

As per the table above, you have three SKU options to create a for Fabric capacity.

  1. Fabric Capacity (F-SKU)

    Follow the guide to create a new F-SKU capacity in Azure. The F-SKUs are recommended for production use, but note that they will incur costs on your Azure subscription as per the pricing page.

    Example commands to create an F2 SKU:

    az group create --name "rg-fabric" --location "UK South"
    upn=$(az ad signed-in-user show --query userPrincipalName -otsv)
    az fabric capacity create --capacity-name "example" --resource-group "rg-fabric" --location "UK South" --sku "{name:F2,tier:Fabric}" --administration "{members:[${upn}]}"
    
  2. Premium Per User Capacity (P-SKU)

    Follow the guide to create a new P-SKU capacity using your Power BI Premium licences. Note that the P-SKUs are being phased out as Microsoft simplifies the Microsoft Fabric purchasing options. Also note that Free or Pro licences in Power BI are not sufficient for creating workspaces.

  3. Trial capacity (T-SKU)

    Follow the guide to create a 60-day T-SKU trial capacity.

Access to F-SKUs

You will only see an F-SKU Fabric capacity if you are one of the Capacity Admins, or if you are assigned as a Contributor.

Capacity Admins

Only one admin may be specified when first creating a Fabric capacity in the portal. You can then go back in and update it with additional users or service principals.

  • View the Fabric capacities
  • Select the correct Fabric capacity
  • Settings > Capacity administrators

Screenshot of the Azure Portal showing the Capacity administrators settings for a selected Fabric capacity. The interface includes options to add or remove administrators and displays the current list of assigned admins.

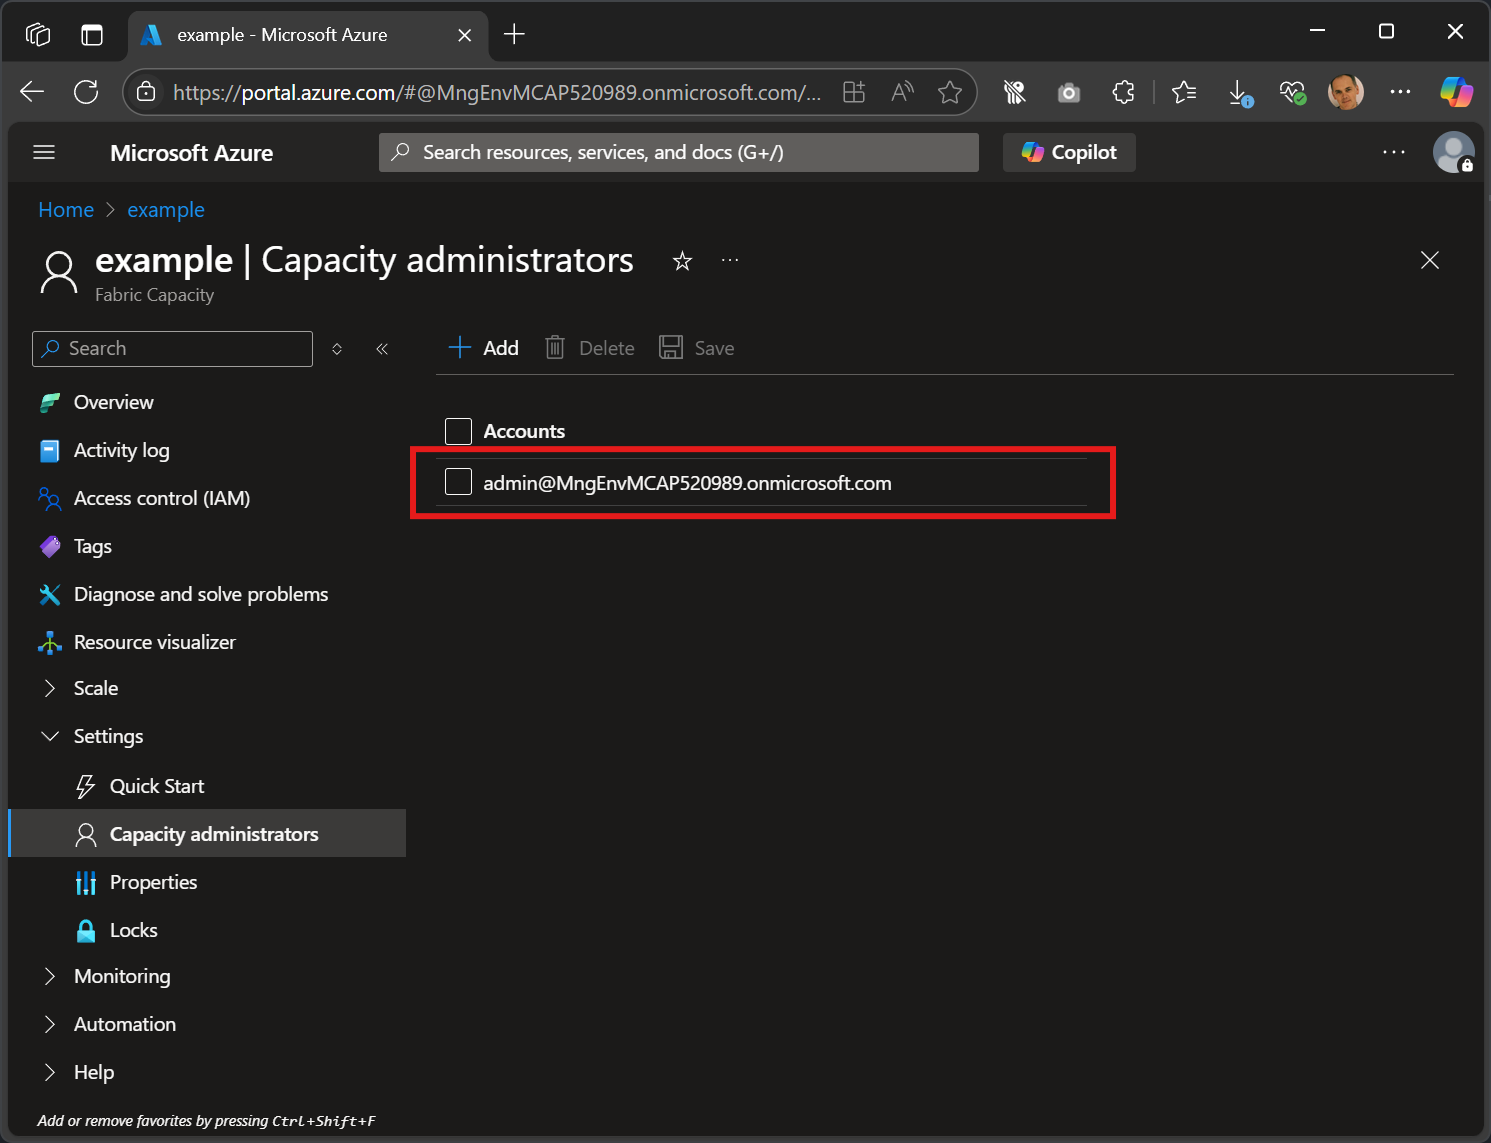
Note that Terraform also allows us to assign a security group. This is not currently possible via the portal.

You cannot assign a guest user as a Capacity Admin.

Contributors

You can also view and modify capacities in the Admin Portal if you have the Fabric Administrator role in Entra. This is one of the easiest places to set any Contributors on a Fabric capacity.

  • Open Fabric Portal
    • click on the bottom left to toggle between Power BI and Fabric experiences
  • click on the Settings cog at the top right
  • Admin Portal
  • Capacity settings

Screenshot of the Admin Portal showing a list of Fabric capacities. Each capacity is displayed with details such as name, SKU type, region, and state. The side pane includes action options like settings and administrators.

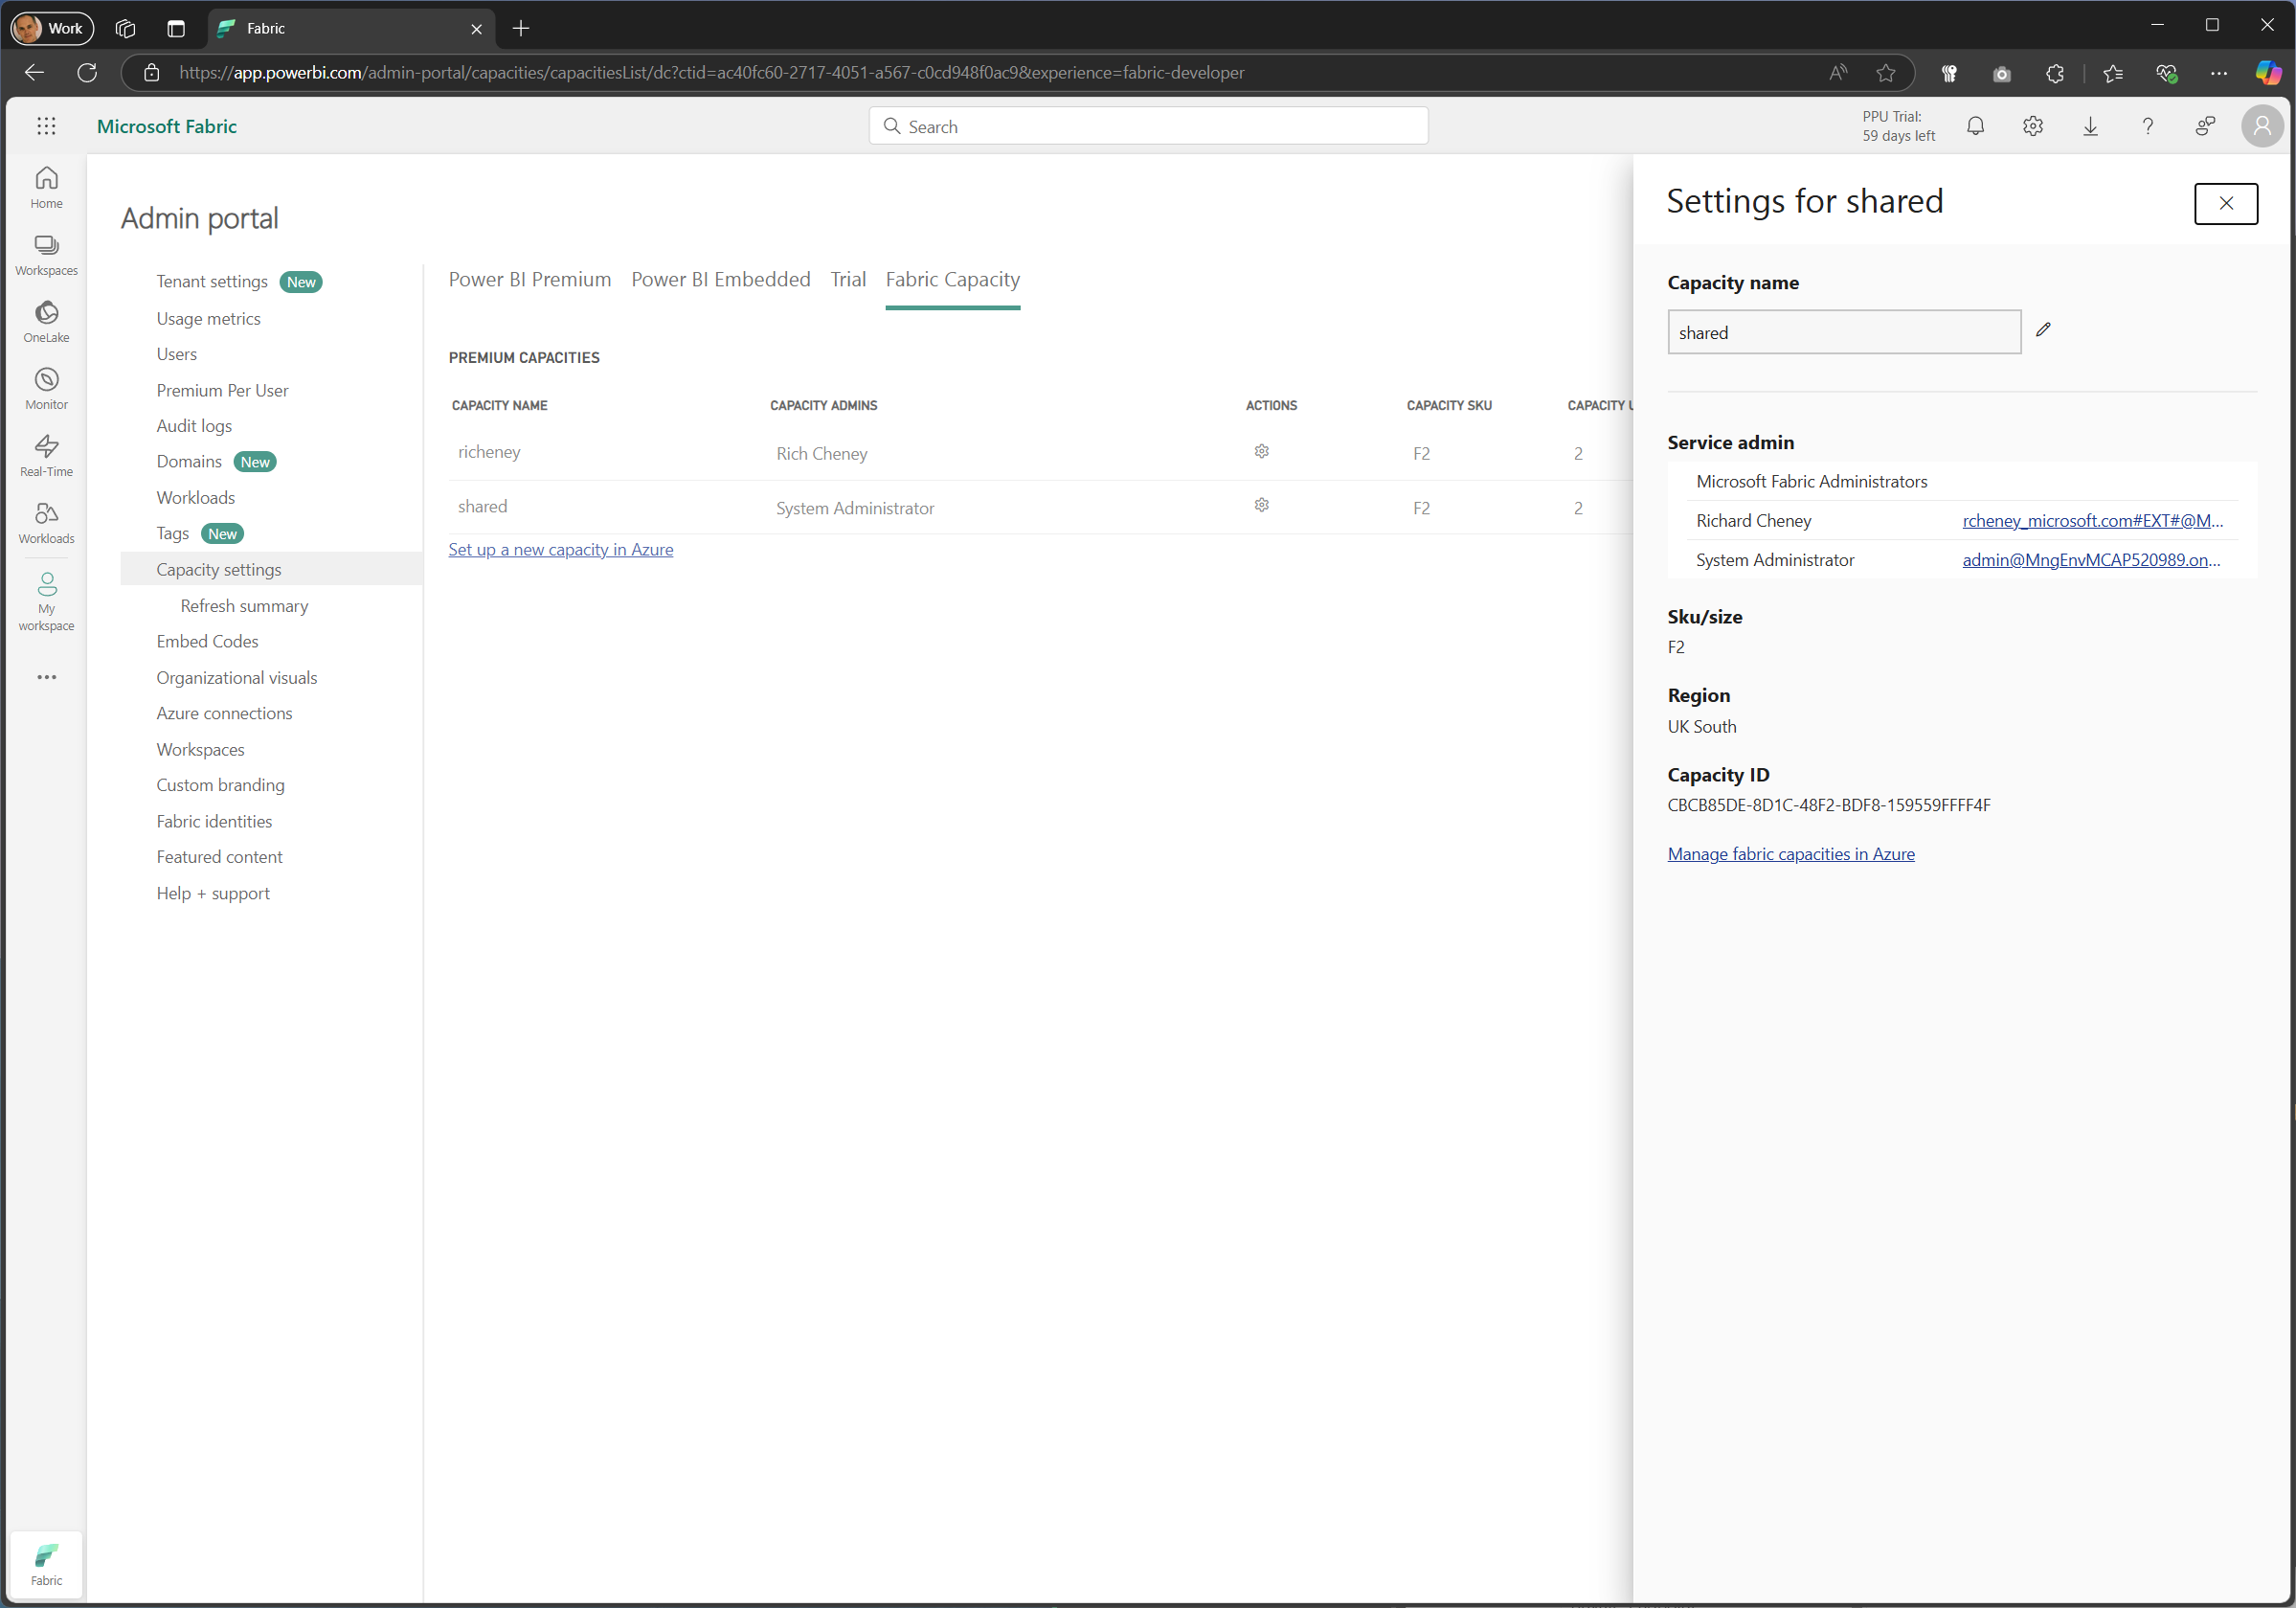
The above view shows the side pane for the Actions, including the Fabric ID.

Click on a capacity for the full properties.

Screenshot of the Admin Portal showing the properties of a selected Fabric capacity. The properties include the list of Capacity Admins and the Contributors.

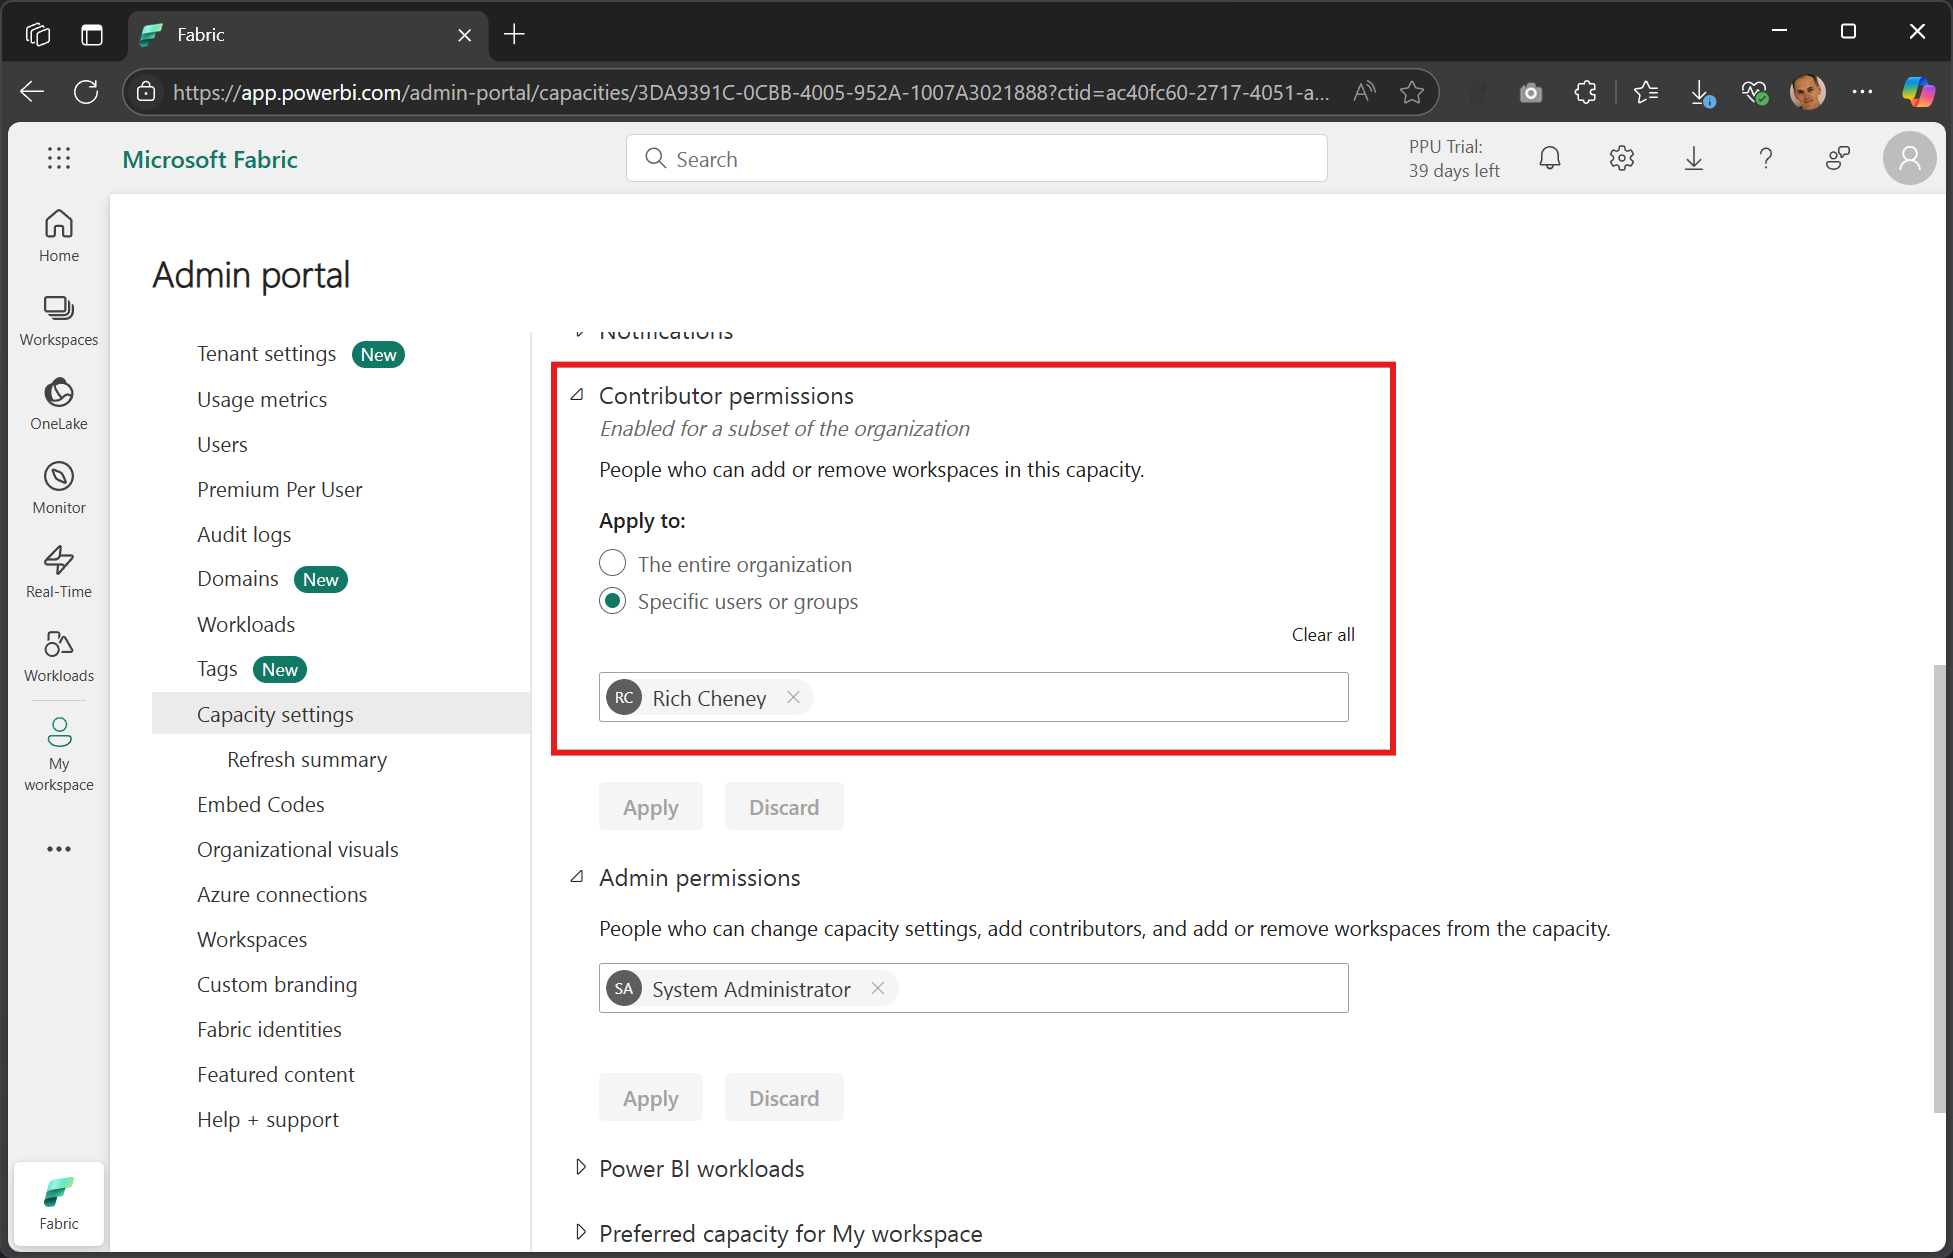
⚠️ This screenshot shows a security group called Sales in the Contributors box, but in my experience you have to specify individual users for it to work with the fabric CLI and Terraform provider.

Note that both the Capacity Admins and Contributors are shown here and may be updated.

Fabric CLI

When automating, one of the easiest ways to list the capacities available to you is by using the Fabric CLI.

  1. Authenticate

    fab auth login
    
  2. Check authentication status

    fab auth status
    

    Example output:

    ✓ Logged in to app.fabric.microsoft.com
      - Account: richeney@MngEnvMCAP520989.onmicrosoft.com (<object_id>)
      - Tenant ID: <tenant_id>
      - Token (fabric/powerbi): a0f9************************************
      - Token (storage): a0f9************************************
      - Token (azure): a0f9************************************
    
  3. List the available capacities.

    fab ls -l .capacities
    

    Example output showing all three SKU types.

        name                                                 id                                     sku   region      state
    ---------------------------------------------------------------------------------------------------------------------------
    Premium Per User - Reserved.Capacity                     59d17bf8-cda2-4c43-824a-ec3a8078908d   PP3   West US 3   Active
    Trial-20250314T172025Z-xmVeQXcryUKTbE5vcFY5Dg.Capacity   29dc2bec-dc5e-4c0a-85bc-564d96106653   FT1   West US 3   Active
    example.Capacity                                         3da9391c-0cbb-4005-952a-1007a3021888   F2    UK South    Active
    

    Note that the table shown here has been truncated and the detailed output also shows subscriptionID, resourceGroup, admins and tags.

  4. Get full output for an F-SKU (optional)

    If you have an F-SKU then you can get the full JSON output with this command. This command will not work with T-SKUs or P-SKUs.

    fab get .capacities/example.Capacity -q .
    

    Example output:

    {
      "properties": {
        "provisioningState": "Succeeded",
        "state": "Active",
        "administration": {
          "members": [
            "admin@MngEnvMCAP520989.onmicrosoft.com",
            "richeney@MngEnvMCAP520989.onmicrosoft.com"
          ]
        }
      },
      "id": "/subscriptions/73568139-5c52-4066-a406-3e8533bb0f15/resourceGroups/rg-fabric/providers/Microsoft.Fabric/capacities/example",
      "name": "example",
      "type": "Microsoft.Fabric/capacities",
      "location": "UK South",
      "sku": {
        "name": "F2",
        "tier": "Fabric"
      },
      "tags": {},
      "fabricId": "cbcb85de-8d1c-48f2-bdf8-159559ffff4f"
    }
    

    Pro tip: Pipe the output through to jq on linux to colorize the output or strip off CRLF from end of line when scripting, e.g. fabricId=$(fab get .capacities/example.Capacity -q . | jq -r .fabricId).

Next

OK, you should have a Fabric capacity to use, and you know the name and the fabricId. Next we’ll create a storage account for the remote state backend.

Prereqs Fabric Capacity Set up a Remote State