Secure
Make the environment more secure using NSGs and policies.
Introduction
In this section of the lab, we will use Azure features to further secure the virtual data centre environment. We will use the Network Security Group (NSG) feature to secure traffic from our On Premises virtual network to the applications running on our spoke VNets. In addition, we will explore the Azure Security Center to analyse potential security issues in our environment and take action to resolve them.
Network Security Groups
At the moment, our user in the On Premises VNet is potentially able to access the Spoke 1 & 2 virtual machines on any TCP port - for example, SSH. We want to use Azure Network Security Groups (NSGs) to prevent traffic on any port other than HTTP and port 3000 (the port the application runs on) being allowed into our Spoke VNets.
An NSG is a list of user-defined security rules that allows or denies traffic on specific ports, or to / from specific IP address ranges. An NSG can be applied at two levels: at the virtual machine NIC level, or at a subnet level.
Our NSG will define two inbound rules - one for HTTP and another for TCP port 3000. We’ll create this NSG within our Hub VNet in order to enforce traffic at a central location. This NSG will be applied at the first CSR1000V interface (i.e. the interface where traffic would come in from the OnPrem VNet).
1) In the Azure portal under the resource group VDC-Hub, click ‘Add’ and search for ‘Network Security Group’. Create a new NSG named Hub-NSG.
2) Navigate to the newly created NSG and select it. Select ‘Inbound Security Rules’. Click ‘Add’ to add a new rule. Use the following parameters:
- Source port range: Any
- Destination port range: 80
- Priority: 100
- Action: Allow
- Name: Allow-http
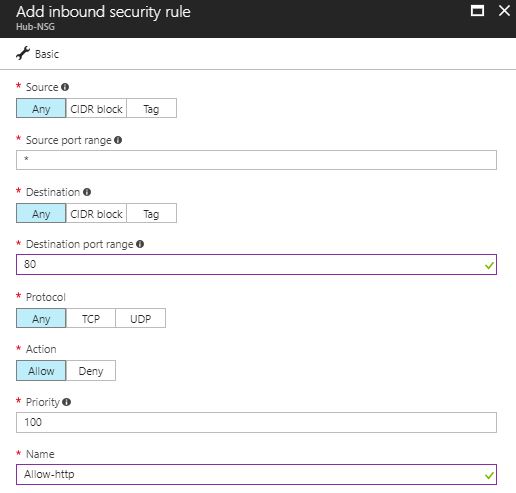
Figure 10: Network Security Group - HTTP Rule
3) Add another rule with the following parameters:
- Source port range: Any
- Destination port range: 3000
- Priority: 110
- Action: Allow
- Name: Allow-3000
4) Add one more rule with the following parameters:
- Source port range: Any
- Destination port range: Any
- Priority: 120
- Action: Deny
- Name: Deny-All
5) Select ‘Network Interfaces’. Click the ‘Associate’ button and choose ‘csr-nic0’.

Figure 11: Network Security Group - Associating with a Subnet
6) SSH back into the OnPrem-VM1 virtual machine from your terminal emulator (this will refresh the NSG rules for the associated NIC). From this VM, attempt to SSH to the first Spoke1 VM:
ssh labuser@10.1.1.5
This connection attempt will fail due to the NSG now associated with the Spoke1 subnet.
7) From OnPrem_VM1, make sure you can still access the demo app:
curl http://10.1.1.4
You might wonder why the third rule denying all traffic is required in this example. The reason for this is that a default rule exists in the NSG that allows all traffic from every virtual network. Therefore, without the specific ‘Deny-All’ rule in place, all traffic will succeed (in other words, the NSG will have no effect). You can see the default rules by clicking on ‘Default Rules’ under the security rules view.
Using Azure Security Center
Azure Security Center is a feature built in to Azure which allows administrators to gain visibility into the security of their environment and to detect and respond to issues and threats. In this part of the lab, we’ll explore Azure Security Center and what it has to offer.
1) In the Azure portal, expand the left hand menu and select ‘All Services’. Search for and then select ‘Security Center’. (This should default to using the free tier.)
2) The overview section of the Security Center shows an ‘at-a-glance’ view of any security recommendations, alerts and prevention items relating to compute, storage, networking and applications.

Figure 12: Azure Security Center - Overview Page
3) Click on ‘Recommendations’ in the Security Center menu. You will see a list of recommendations relating to various areas of the environment - for example, the need to add Network Security Groups on subnets and VMs, or the recommendation to apply disk encryption to VMs.
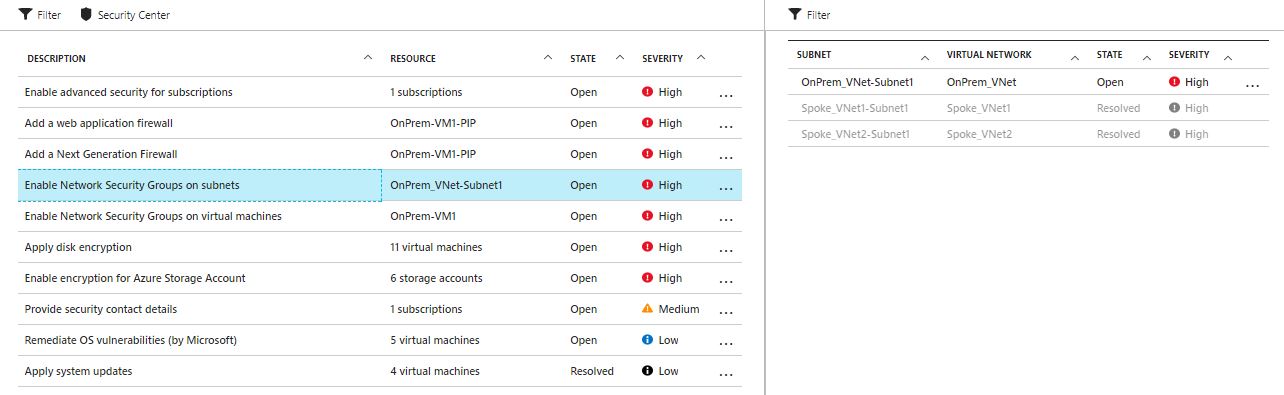
Figure 13: Azure Security Center - Recommendations
4) Explore other areas of the Security Center - click through the Compute, Networking and Storage sections to see recommendations specific to these areas.
Implementing Azure Resource Policies
Azure resource policies are used to place restrictions on what actions can be taken at a subscription or resource group level. For example, a resource policy could specify that only certain VM sizes are allowed, or that encryption is required for storage accounts. In this section of the lab, we’ll apply both built-in and custom resource policies to one of our resource groups to restrict what can and can’t be done in our environment.
1) In the Azure portal, navigate to the VDC-Hub resource group and then click on Policies in the menu.
2) Select Definitions to bring up the list of policy definitions in the right hand pane.
3) Scroll down to the policy entitled ‘Allowed Resource Types’, click the ‘…’, select ‘View Definition’ and then click on ‘JSON’. This shows you the JSON policy document - this simple example takes a list of resource types and prevents the ability to create them.
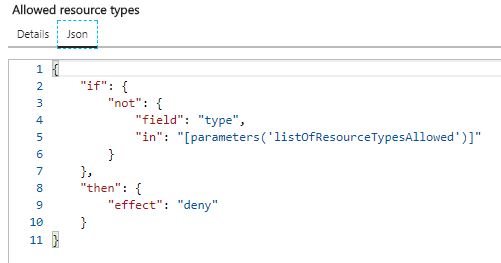
Figure 14: Example Resource Policy - Allowed Resource Types
4) Click on ‘Assignments’ in the menu and then click ‘Assign Policy’.
5) Use the following details to create the policy:
- Scope: *Set to your Azure Pass subscription and then VDC-HUB resource group"
- Policy Definition: Allowed Resource Types (should be greyed out)
- Assigned Name: Allow Network
- Allowed Resource Types: Select all ‘Microsoft.Network’ resources
6) Use the Azure Cloud Shell to attempt to create a virtual machine using the following commands:
az vm create -n policy-test-VM -g VDC-Hub --image UbuntuLTS --generate-ssh-keys
7) The validation should fail with a message stating “The template deployment failed because of policy violation. Please see details for more information.”
8) Return to the ‘Policies’ page and remove the ‘Allow-Network’ resource policy assignment.
If the built-in policies do not meet your requirements, it is also possible to create custom policies. The following steps walk you through custom policy creation.
In this example, we’ll create a policy that enforces a specific naming convention - if the user attempts to create a resource that does not meet the convention, the request will be denied. We first need to define the resource policy template - these are written in JSON format. The JSON for our custom policy is as follows:
{
    "if": {
      "not": {
        "field": "name",
        "like": "VDC-*"
      }
    },
    "then": {
      "effect": "deny"
    }
  }
This policy states that we must name our resources with the ‘VDC-’ prefix.
In this exercise, a file has been created on GitHub containing the above policy - that file will then be referenced from an AZ CLI command in order to create the policy in Azure.
1) Using the AZ CLI, enter the following command:
az policy definition create --name EnforceNaming --display-name EnforceNamingConvention --rules https://raw.githubusercontent.com/azurecitadel/vdc-networking-lab/master/naming-policy.json
2) Assign the policy to the VDC-Hub resource group using the following AZ CLI command:
az policy assignment create --policy EnforceNaming -g VDC-Hub --name EnforceNaming
3) In the VDC-Hub resource group, create a new virtual network named “test-net” using default parameters. You should receive a validation error as the name does not meet the required convention, as specified in the resource policy.
4) Attempt to create the virtual network again, but this time name it “VDC-testnet”. This attempt should succeed as the name matches the convention.
5) Remove the VDC-Test virtual network from the resource group.
6) Unassign and remove the naming convention policy using the following commands:
az policy assignment delete -g VDC-Hub --name EnforceNaming
az policy definition delete --name EnforceNaming
Monitor Compliance Using Azure Policy
In addition to the ability to define and assign resource policies, Azure Policy allows you to identify existing resources within a subscription or resource that are not compliant against the configured policies. In this section, we will use Azure Policy to view non-compliant resources within the VDC-Hub resource group.
1) In the ‘Policies’ section under VDC-Hub, click on ‘Definitions’ and then ‘+ Policy Definition’. Name the policy ‘compliance-test’ and select your subscription under ‘Definition Location’.
2) Select ‘Use existing’ under the category section and select ‘Compute’.
3) Cut and paste the following JSON into the ‘Policy Rule and Parameters’ box and then click ‘save’:
{
    "policyRule": {
    "if": {
      "not": {
        "field": "name",
        "like": "test-*"
      }
    },
    "then": {
      "effect": "audit"
      }
    }
}
4) Click on ‘Assignments’ and then ‘Assign Policy’. Under ‘Policy Definition’, select the policy created in the last step (compliance-test). Name the assignment ‘compliance-test’.
5) Under ‘Scope’, ensure that the ‘VDC-Hub’ resource group is selected. Finally, click on ‘Assign’.
6) Click on the ‘Compliance’ menu option - after some time, this screen should show the resources within the VDC-Hub resource group that are not compliant with the policy (all of them, as none match the name ’test-*’).
Note: it can take around 30 - 60 minutes for the compliance information to be updated, so you may wish to return to this section.
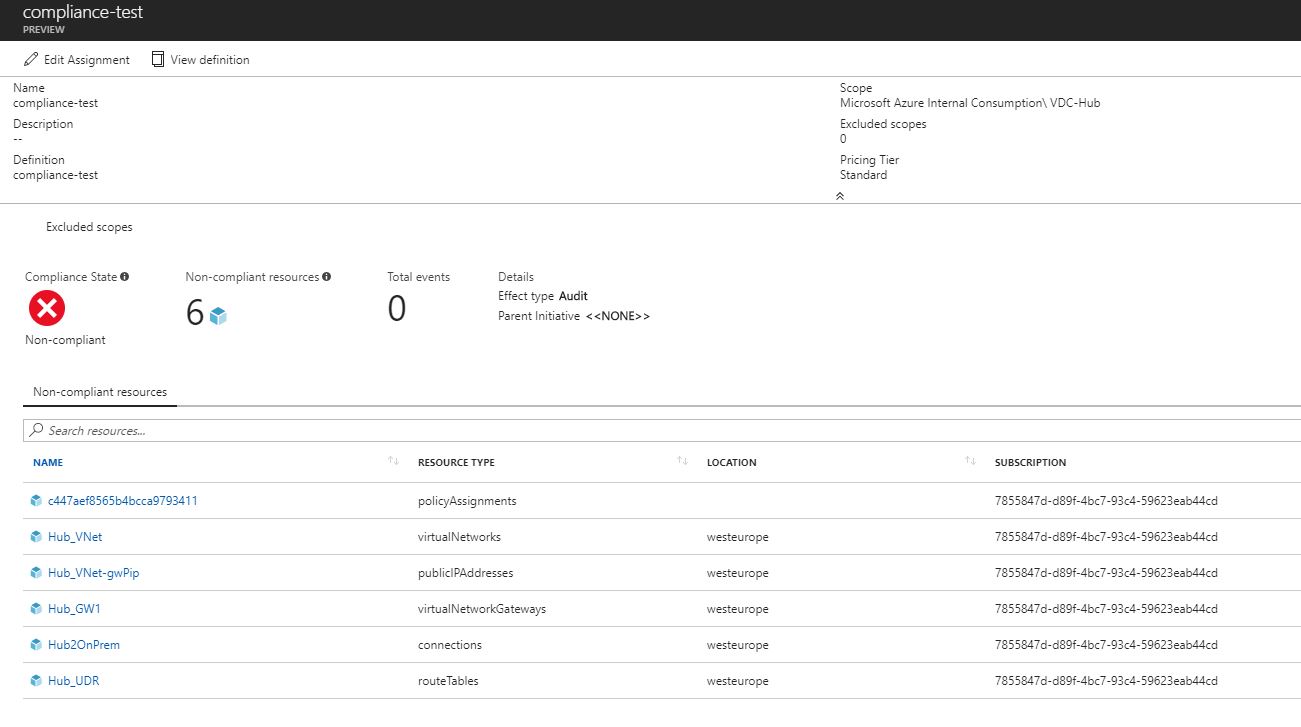
Figure 15: Azure Policy - Compliance View
8) Under the ‘Assignments’ page, click on the ‘…’ on the right hand side of the assignment and select ‘Delete Assignment’.
9) Under the ‘Definitions’ page, click on ‘Policy Definitions’ and delete the ‘compliance-test’ definition we created earlier.
Finishing up
That is the end of the VDC security lab. In the next lab you will see how the networking vcan be monitored.