Azure Citadel
  • Blogs

  • ARM
  • Azure Arc
    • Overview
    • Azure Arc-enabled Servers
      • Prereqs
      • Scenario
      • Hack Overview
      • Azure Landing Zone
      • Arc Pilot resource group
      • Azure Monitoring Agent
      • Additional policy assignments
      • Access your on prem VMs
      • Create onboarding scripts
      • Onboarding using scripts
      • Inventory
      • Monitoring
      • SSH
      • Windows Admin Center
      • Governance
      • Custom Script Extension
      • Key Vault Extension
      • Managed Identity
    • Azure Arc-enabled Kubernetes
      • Prereqs
      • Background
      • Deploy Cluster
      • Connect to Arc
      • Enable GitOps
      • Deploy Application
      • Enable Azure AD
      • Enforce Policy
      • Enable Monitoring
      • Enable Azure Defender
      • Enable Data Services
      • Enable Application Delivery
    • Useful Links
  • Azure CLI
    • Install
    • Get started
    • JMESPATH queries
    • Integrate with Bash
  • Azure Landing Zones
    • Prereqs
    • Day 1
      • Azure Baristas
      • Day 1 Challenge
    • Day 2
      • Example
      • Day 2 Challenge
    • Day 3
      • Day 3 Challenge
    • Useful Links
  • Azure Policy
    • Azure Policy Basics
      • Policy Basics in the Azure Portal
      • Creating Policy via the CLI
      • Deploy If Not Exists
      • Management Groups and Initiatives
    • Creating Custom Policies
      • Customer scenario
      • Policy Aliases
      • Determine the logic
      • Create the custom policy
      • Define, assign and test
  • Azure Stack HCI
    • Overview
    • Useful Links
    • Updates from Microsoft Ignite 2022
  • Marketplace
    • Introduction
      • Terminology
      • Offer Types
    • Partner Center
    • Offer Type
    • Publish a VM Offer HOL
      • Getting Started
      • Create VM Image
      • Test VM Image
      • VM Offer with SIG
      • VM Offer with SAS
      • Publish Offer
    • Other VM Resources
    • Publish a Solution Template HOL
      • Getting Started
      • Create ARM Template
      • Validate ARM Template
      • Create UI Definition
      • Package Assets
      • Publish Offer
    • Publish a Managed App HOL
      • Getting Started
      • Create ARM Template
      • Validate ARM Template
      • Create UI Definition
      • Package Assets
      • Publish Offer
    • Managed Apps with AKS HOL
    • Other Managed App Resources
    • SaaS Offer HOLs
    • SaaS Offer Video Series
      • Video 1 - SaaS Offer Overview
      • Video 2 - Purchasing a SaaS Offer
      • Video 3 - Purchasing a Private SaaS Plan
      • Video 4 - Publishing a SaaS Offer
      • Video 5 - Publishing a Private SaaS Plan
      • Video 6 - SaaS Offer Technical Overview
      • Video 7 - Azure AD Application Registrations
      • Video 8 - Using the SaaS Offer REST Fulfillment API
      • Video 9 - The SaaS Client Library for .NET
      • Video 10 - Building a Simple SaaS Landing Page in .NET
      • Video 11 - Building a Simple SaaS Publisher Portal in .NET
      • Video 12 - SaaS Webhook Overview
      • Video 13 - Implementing a Simple SaaS Webhook in .NET
      • Video 14 - Securing a Simple SaaS Webhook in .NET
      • Video 15 - SaaS Metered Billing Overview
      • Video 16 - The SaaS Metered Billing API with REST
  • Microsoft Fabric
    • Theory
    • Prereqs
    • Fabric Capacity
    • Set up a Remote State
    • Create a repo from a GitHub template
    • Configure an app reg for development
    • Initial Terraform workflow
    • Expanding your config
    • Configure a workload identity
    • GitHub Actions for Microsoft Fabric
    • GitLab pipeline for Microsoft Fabric
  • Packer & Ansible
    • Packer
    • Ansible
    • Dynamic Inventories
    • Playbooks & Roles
    • Custom Roles
    • Shared Image Gallery
  • Partner
    • Lighthouse and Partner Admin Link
      • Microsoft Cloud Partner Program
      • Combining Lighthouse and PAL
      • Minimal Lighthouse definition
      • Using service principals
      • Privileged Identity Management
    • Useful Links
  • REST API
    • REST API theory
    • Using az rest
  • Setup
  • Terraform
    • Fundamentals
      • Initialise
      • Format
      • Validate
      • Plan
      • Apply
      • Adding resources
      • Locals and outputs
      • Managing state
      • Importing resources
      • Destroy
    • Working Environments for Terraform
      • Cloud Shell
      • macOS
      • Windows with PowerShell
      • Windows with Ubuntu in WSL2
    • Using AzAPI
      • Using the REST API
      • azapi_resource
      • Removing azapi_resource
      • azapi_update_resource
      • Data sources and outputs
      • Removing azapi_update_resource
  • Virtual Machines
    • Azure Bastion with native tools & AAD
    • Managed Identities

  • About
  • Archive
  1. Home
  2. Archive
  3. Network
  4. Core Concepts
  5. Network Security Groups

Table of Contents

  • Lab Overview
    • Lab Diagram
  • Create application security groups
  • Associate ASG to network interface
  • Create a network security group
  • Create security rules
  • Verify NSG for the virtual machine
  • Verify Security rules
    • Connect to the management server
    • Connect to the web server
  • Conclusion
  • Challenge

Network Security Groups

Need a L4 ACL to control permitted flows? Create Network Security Groups (NSGs) using Application Security Groups (ASGs).

Lab Overview

In this lab, we will see how to create network security groups. Network Security Groups enable restricting flows at a subnet or at a virtual machine’s network interface level. We will create rules and apply at a subnet level. We will also see how application security groups are applied.
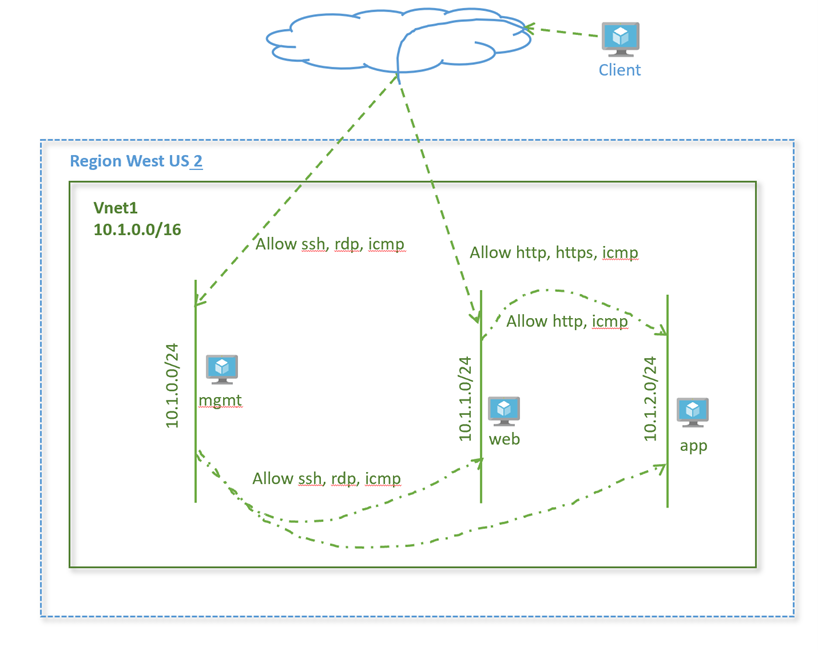
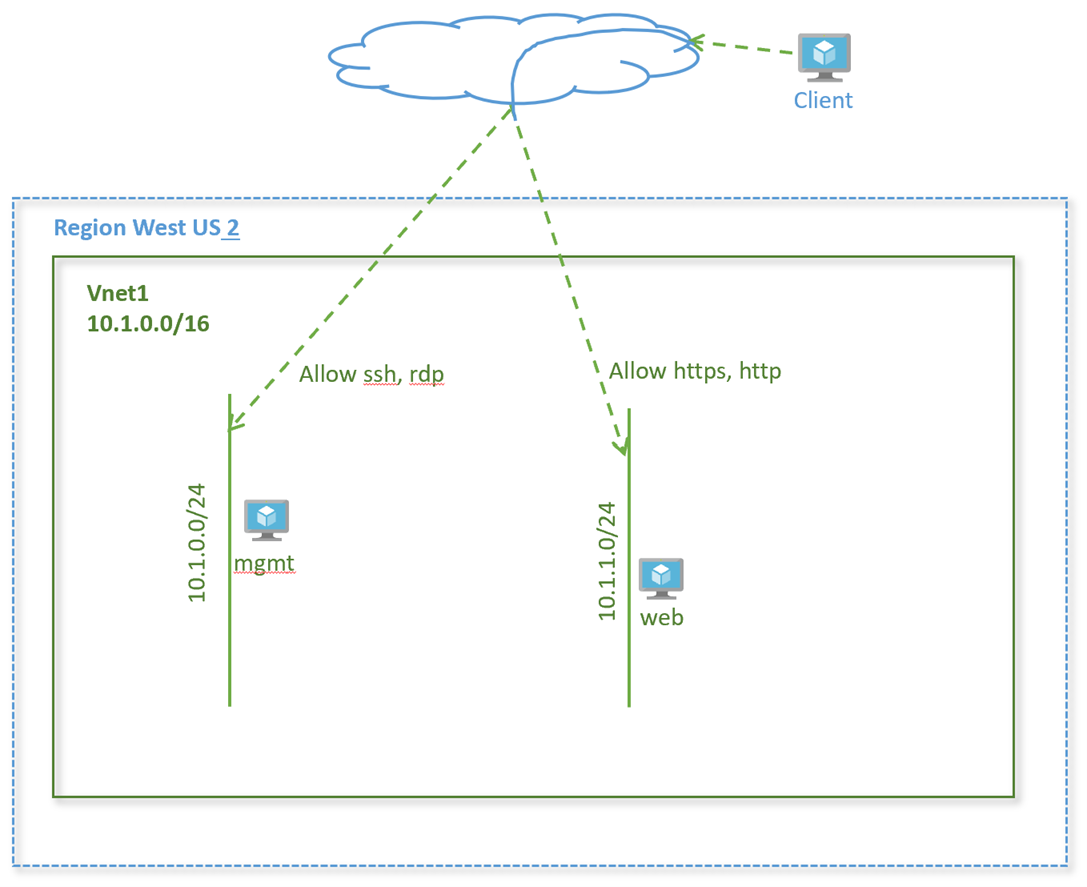
Lab Diagram

Diagram

Create application security groups

An application security group enables you to group together servers with similar functions, such as web servers.

  1. Select + Create a resource on the Azure portal

  2. In the Search the Marketplace box, enter Application security group. When Application security groups appears in the search results, select it.

  3. Click +Add. Enter, or select, the following information:

    Setting Value
    Subscription Select your subscription
    Resource group Select rg-lab from the dropdown
    Name mgmt
    Location West US 2
  4. Click Review+Create

  5. Once validation passes, click Create

  6. Repeat steps 3, specifying the following values:

    Setting Value
    Subscription Select your subscription
    Resource group Select rg-lab from the dropdown
    Name web
    Location West US 2

Associate ASG to network interface

  1. In the Search resources, services, and docs box at the top of the portal, begin typing virtual machines. From the search results, select Virtual machines.
  2. Select virtual machine vnet1-vm-mgmt1
  3. Under Settings → Networking → Application security groups, select Configure the application security groups, select mgmt for Application security groups, and then select Save
  4. Repeat steps 1-3 for virtual machines vnet1-vm-web1 and add application group web

Create a network security group

  1. In the Search resources, services, and docs box at the top of the portal, begin typing Network security group. From the search results, select Network security group.

  2. Click +Add. Enter, or select, the following information.

    Setting Value
    Subscription Select your subscription.
    Resource group Select rg-lab from the dropdown.
    Name nsg1
    Location West US 2
  3. Click Review+Create. Once validation passes, Create.

Create security rules

Create a security rule to allow SSH and RDP to the management servers.

  1. On the network security groups page, click on the network security group nsg1 you just created.

  2. Go to Settings → Inbound security rules and click +Add.

  3. Enter, or select the following values, accept the remaining defaults, and then select Add:

    Setting Value
    Destination Select Application security group
    Destination Application security group mgmt
    Destination port ranges 22, 3389
    Protocol TCP
    Priority 100
    Name allow-mgmt-access
  4. Create another security rule that allows http and https traffic to the web application security group.

    Setting Value
    Destination Select Application security group
    Destination Application security group web
    Destination port ranges 80,443
    Protocol TCP
    Priority 120
    Name allow-web

Associate network security group to subnet

  1. On the Network security groups page, click on the security group nsg1
  2. Under Settings, select Subnets and then select + Associate
  3. Under Associate subnet, select Virtual network and then select vnet1. Select Subnet, select vnet1-subnet1, and then select OK.
  4. Repeat step 3 to associate to subnet vnet1-subnet2 from vnet1

Verify NSG for the virtual machine

  1. Go to the virtual machine vnet1-vm-mgmt1.

  2. Got to Settings → Networking.

  3. Check the network security group nsg1 is applied to the subnet vnet-subnet1.

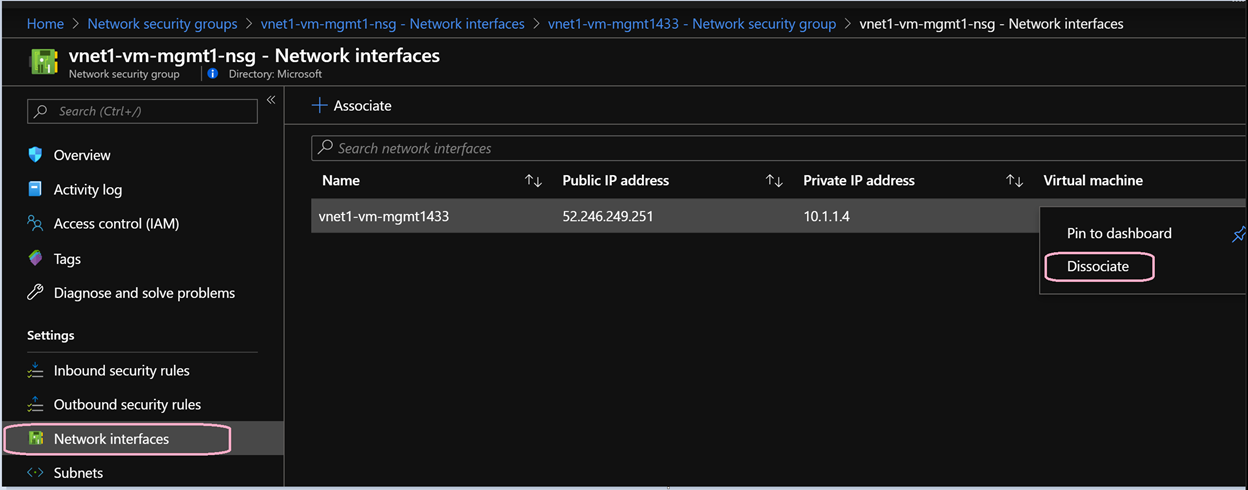
  4. You will also see another security group vnet1-vm-mgmt1-nsg attached to the network interface of the virtual machine. This was created when you created the VM and assigned Basic network security group as default configuration setting. You can go ahead and disassociate this security group from the network security group as we now have one applied at the subnet level. Note the name of the security group.

  5. Click on the network security group attached to the interface.

  6. Go to Settings → Network interfaces.

  7. Click on the three dots … on the right and click Dissociate.

    Disassociate

  8. Repeat above steps for each VM created with a basic network security group

Verify Security rules

It’s time to see the rules in action.

Connect to the management server

  1. From your laptop, SSH to the management server
  2. SSH to vnet1-vm-mgmt1 using its public IP address
  3. Verify you are successfully able to login

Which rule enabled ssh access?

Connect to the web server

  1. From your laptop, SSH to the web server
  2. SSH to vnet1-vm-web1

Are you able to reach the login prompt? Which rule was used for this flow?

Conclusion

We learnt how to configure network security groups and application security groups to protect your compute instances in Azure.

Challenge

Complete additional flows as given in the diagram below to restrict traffic further within your virtual network. Make sure only this traffic is allowed.

Challenge

Virtual Network Network Security Groups Using the Azure CLI